Lovin' From the Oven

  • Home
  • About Me
  • Recipes
  • FAQ
  • My Lifestyle Blog
  • Disclaimer

Archives for January 2013

Puppy Chow Brownies

January 10, 2013 by kim 4 Comments

DSC_2664

I was just at Lake Tahoe this past weekend with my family and DB, and it’s crazy to think how much of a different lifestyle it is. I only live about three hours away from Tahoe, but the amount of snow they get is incredible.

I’ve lived in Southern California for 24 years of my life, so I have no idea what it means to wake up early to de-ice your windshield, shovel the driveway, or put on chains.

DSC_2660

The closest experience in SoCal that I ever got to snow was hail. Let me tell you, those things are definitely not the same. Instead of little snow flurries nestling upon your nose, you get mini cue balls aiming for your eyeballs and denting your cars.

DSC_2668

I used to think that I’d love to retire to Lake Tahoe when I’m older, but this past weekend made me change my mind. I’m terrified of driving on a road where one side says “Caution for falling rocks” and the other side says “Caution for 4000 feet cliff.” That’s pretty much the only way to get in and out of Tahoe, too.

DSC_2673

Not only that, but snow makes everything so dang dirty. Sure, it looks pretty when it’s freshly fallen, but after a couple of days with no snow, everything turns black and runny.

DSC_2678

Snow gets everywhere— your house, your car, your shoes. Once it melts, you’ve got water everywhere. It’s truly a pain to deal with.

All in all, I still love going to Tahoe for a week or two out of the year. Nothing beats the view, the people, and the experience. Just as long as I’m not stuck there, I’m a happy camper.

DSC_2683

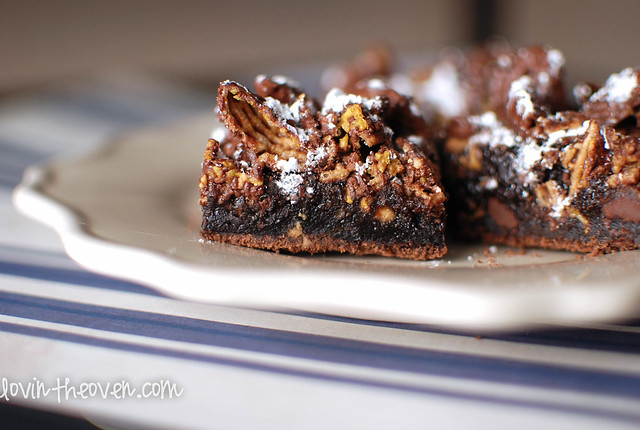
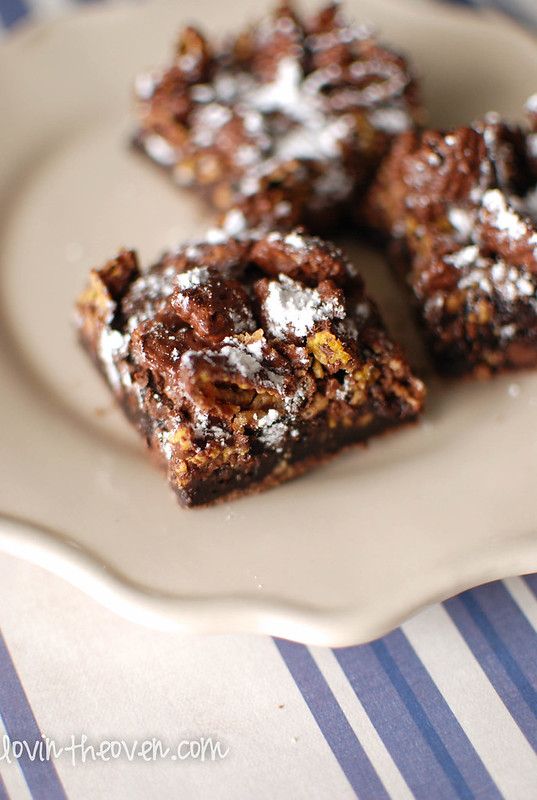
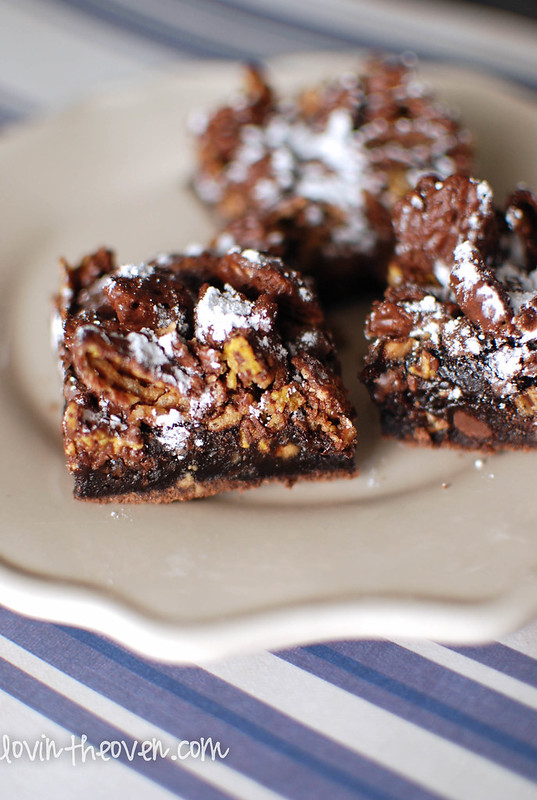
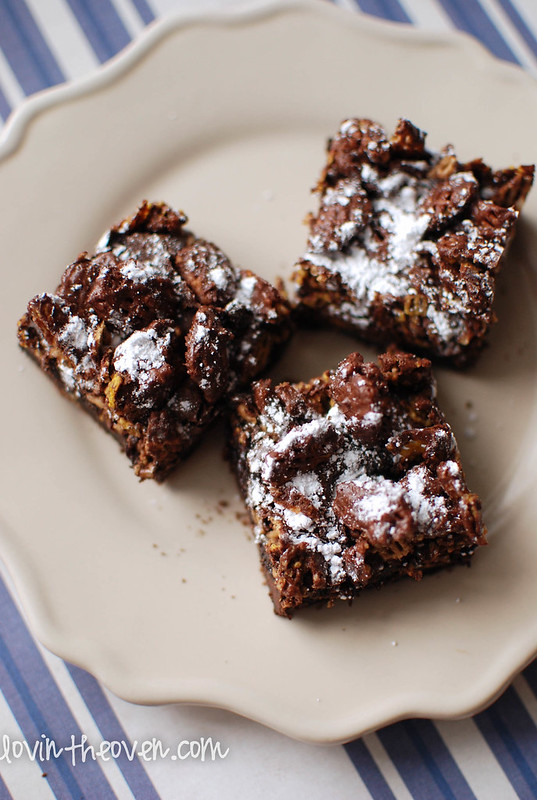
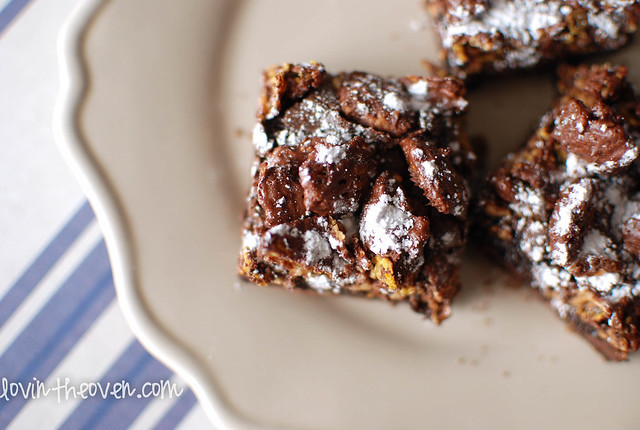
The best part about snow is having lots of desserts to enjoy the serenity. These brownies would go great with a cup of hot cocoa, cause you know, you can never have enough chocolate.

I thought the cereal would get soggy from baking, but the puppy chow pretty much kept its consistency. The brownies have a nice fudgy texture and create a wonderful base for the puppy chow. Don’t skimp on the powdered sugar; it completes the look and the taste. These brownies are another winner in my book and I’ll be making them again throughout the year.

Recipe From Sugar Plum and makes about 16 brownies.

Print
Puppy Chow Brownies

Yield: 16 brownies

Ingredients

  • 1/2 cup unsalted butter
  • 1 1/4 cups granulated sugar
  • 1 3/4 cups semisweet chocolate chips, divided use
  • 3 large eggs
  • 1/2 teaspoon baking soda
  • 1/4 teaspoon baking powder
  • 1/2 teaspoon salt
  • 3 tablespoons unsweetened cocoa powder
  • 3/4 cup all purpose flour
  • 3 tablespoons creamy peanut butter + 2 tablespoons
  • 2 cups rice chex cereal
  • Confectioners' sugar

Directions

  1. Preheat oven to 350 degrees F. Grease a 8x8 pan.
  2. In a small saucepan over medium heat, completely melt the butter. Add in the sugar, stirring constantly, and bring to a boil.
  3. Remove pan from heat and stir in 1 cup chocolate chips until melted and smooth. Let cool for 5 minutes.
  4. Beat together eggs and chocolate-butter mixture for 8 minutes, or until well combined and doubled in volume.
  5. Turn the mixer speed to low and carefully mix in baking soda, baking powder, salt and cocoa powder.
  6. Add in flour and 1/2 cup chocolate chips until just combined. Evenly spread batter in pan.
  7. Using a butter knife, swirl 3 tablespoons peanut butter through batter. Bake 10 minutes.
  8. Meanwhile, prepare the puppy chow: Melt together the remaining 1/3 cup chocolate chips and 2 tablespoons peanut butter in a saucepan over low heat.
  9. Once that is completely melted and smooth, carefully fold in cereal until well coated.
  10. Place cereal on top of brownies. Lightly cover pan with foil.
  11. Put the pan back into the oven for an additional 20 minutes, or until well risen and set. Cool completely on a wire rack. Dust with confectioners' sugar.
3.1
https://lovintheoven.com/puppy-chow-brownies/

Filed Under: bars/brownies, chocolate chip, cocoa, dessert, peanut butter/peanuts

Coca Cola Pot Roast

January 9, 2013 by kim 5 Comments

crockpotbeef-3

I know I said less crockpot recipes and more stove top recipes, but this was one dish I made last year. I actually just got back to the bay area from my extended winter break vacation, and it’s taking me a while to get back into the groove of things.

You know how it is… I still have one and a half luggages laying on the floor in front of my door, waiting to get unpacked and put away. It took all my energy plus some just to go and buy groceries today. I had to restock everything since we had an empty fridge from being away for so long.

crockpotbeef

Restocking an empty fridge isn’t exactly a bad thing. Actually, it’s great. I get to start over fresh and follow my New Years resolution by eating healthier. All the temptation is taken out by simply not buying any bad groceries.

crockpotbeef-2

Now, I have a lot of fish, vegetables, and fruits. It’s going to be hard for my DB to eat lunch, though, since he doesn’t eat anything green or from the sea. Oh well.

crockpotbeef-4

Since we don’t drink any soda in my household, I had to go out and buy one can of coke. In case you were wondering, you can’t just buy a can of coke. I tried. I ended up buying an individual plastic bottle instead (by the checkout line) and using a portion of that.

Print
Coca Cola Pot Roast

Ingredients

  • 2.5-3 pounds Beef Chuck Roast Boneless
  • 1 can of Coke
  • 1 packet Mccormick's Slow Cooker Savory Pot Roast seasoning packet
  • 1 cup water

Directions

  1. Place the chuck roast on the bottom of your slow cooker.
  2. Mix the seasoning packet with the 1 cup of water, pour on top of the meat. Pour the entire can of coke on top.
  3. Cover and cook on high for 4 hours, or low for 6-8 hours.
3.1
https://lovintheoven.com/coca-cola-pot-roast/

Filed Under: beef, crockpot, dinner

BLT Sandwich with Avocado

January 5, 2013 by kim 4 Comments

blt-4

Some days, you just can’t get yourself together to make a real meal, despite the fact that you’ve been starving for the past two hours. Enter the BLT– the solution to that problem. It takes a whole 5 minutes to make and you have a hearty, mouth watering sandwich.

blt-5

You can add more of, take out, and include any ingredient that you want without being judged for it. Don’t really like lettuce? Change it to spinach. How about that meat? Bacon’s just not satisfying your manly cravings? Throw in some turkey, ham, and roast beef.

blt

This is my version of the perfect BLT. I like having a lot of veggies and just a tad bit of saltiness from the extra crispy bacon. Everyone’s is different.

blt-2

The ingredient list for this sandwich isn’t very specific, so feel free to adjust any way you want. Seriously, the possibilities are endless.

blt-6


Print
BLT Sandwich with Avocado

Ingredients

  • 2 slices of bread
  • butter or margarine
  • mozzarella
  • 2 slices of bacon, cooked
  • half of an avocado
  • handful of spinach
  • cherry tomatoes, cut into halves

Directions

  1. Heat a pan (one big enough that will hold your sandwich!) over medium heat.
  2. Butter both sides of your bread and put them on the pan to warm.
  3. Flip the pieces of bread over and add all of your ingredients to one side. I like to put the cheese as the first layer so it's thoroughly melted. Put the other piece of bread on top of your ingredients to close the sandwich.
  4. Using a spatula, gently press down so that the bread becomes a nice, golden brown. Once the level of crispiness has been reached, flip the entire sandwich over and repeat for the other side of bread.
3.1
https://lovintheoven.com/blt-sandwich-with-avocado/

Filed Under: lunch, sandwich, vegetables

  • « Previous Page
  • 1
  • …
  • 3
  • 4
  • 5
  • 6
  • Next Page »

hi! i'm kim-- a girl mom, baker, blogger, and ex-flight attendant. welcome!

Search

  • Facebook
  • Instagram
  • Pinterest
  • Twitter

Categories

RODELLE-BABadge


Categories

  • Facebook
  • Instagram
  • Pinterest
  • Twitter

Copyright © 2026 · Foodie Pro Theme by Shay Bocks · Built on the Genesis Framework · Powered by WordPress