Lovin' From the Oven

  • Home
  • About Me
  • Recipes
  • FAQ
  • My Lifestyle Blog
  • Disclaimer

Caramelizio Chocolate Cupcakes

April 9, 2015 by kim 1 Comment

IMG_5921

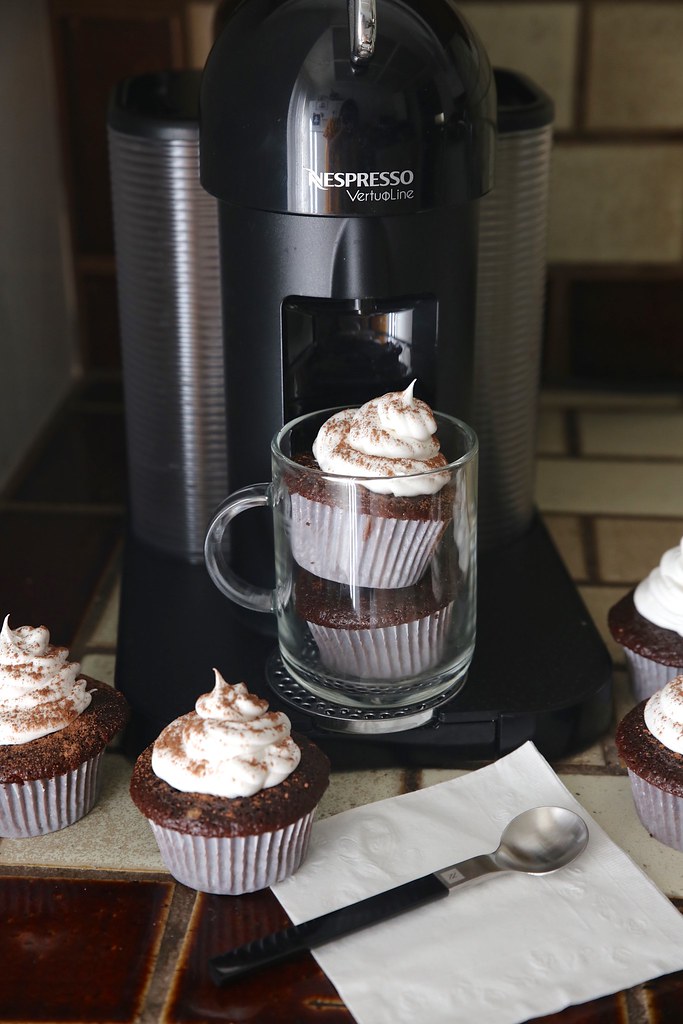
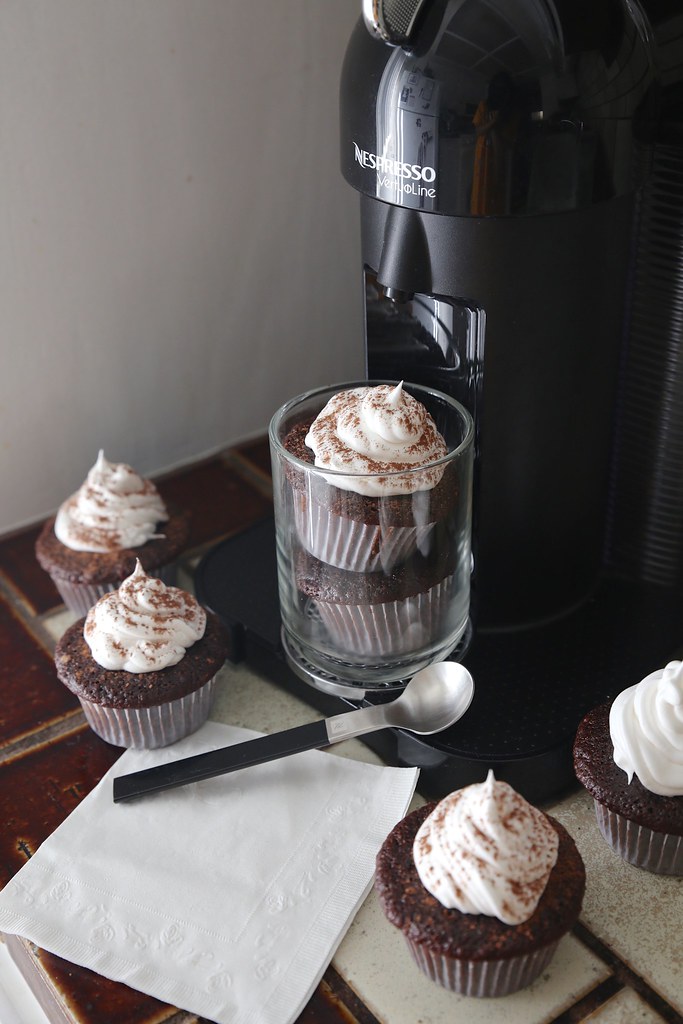
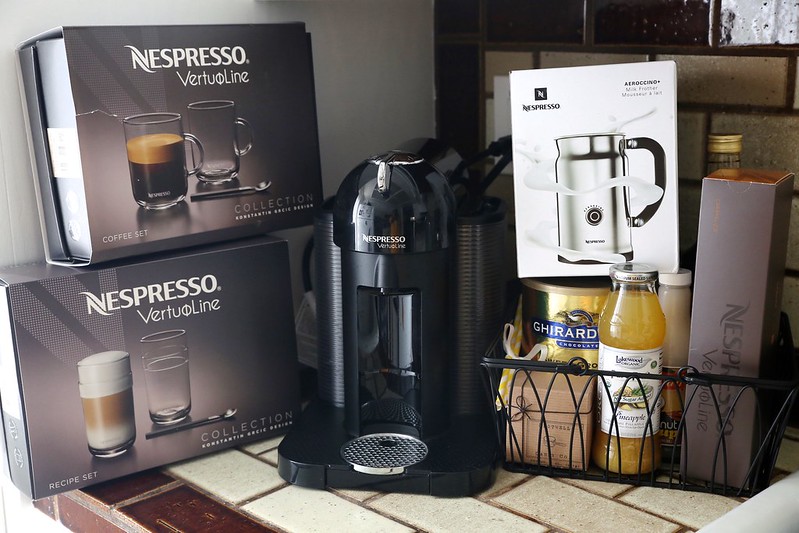
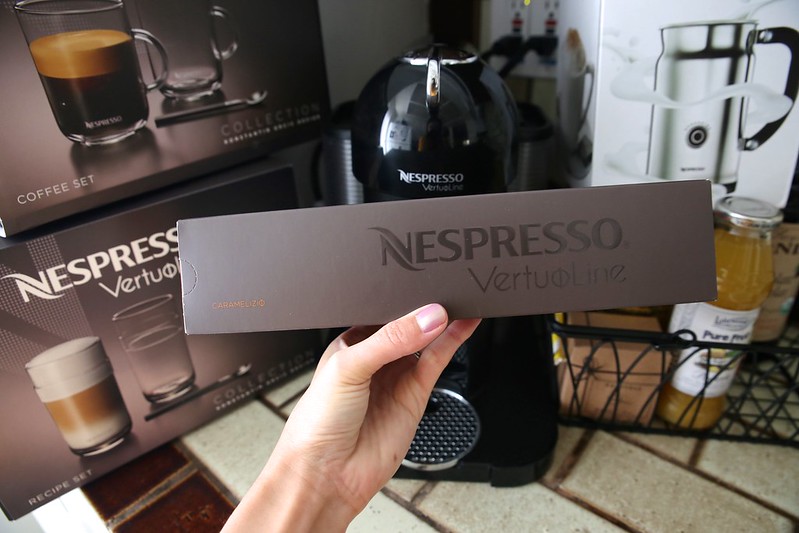
You might remember my last Nespresso post, where I was a little spoiled and got to go on a mini shopping spree. Well, they’ve done it again by sending me their latest flavor, Caramelizio, to try out!

IMG_5916

I was really excited when this new flavor was announced because there aren’t that many flavors to begin with since it’s a newer machine. I tend to drink sweeter coffee, so I usually stuck to the Vanizio (vanilla) and the Hazelino (hazelnut). Caramelizio is right up my aisle in terms of taste. It has subtle scents of vanilla and delicate notes of caramelized sugar.

IMG_5887

I was sent the tools to create my own drink recipe, but I couldn’t help but think of dessert when I had my first sip of Caramelizio. It was just begging me to make it into dessert! Who am I kidding, I’m a dessert person. I’ll try to make dessert out of everything. Is that so bad?

IMG_5897

One capsule made the perfect amount of coffee for a batch of cupcakes. All I needed was one cup, and it made exactly that. It was meant to be, I tell ya.

IMG_5944

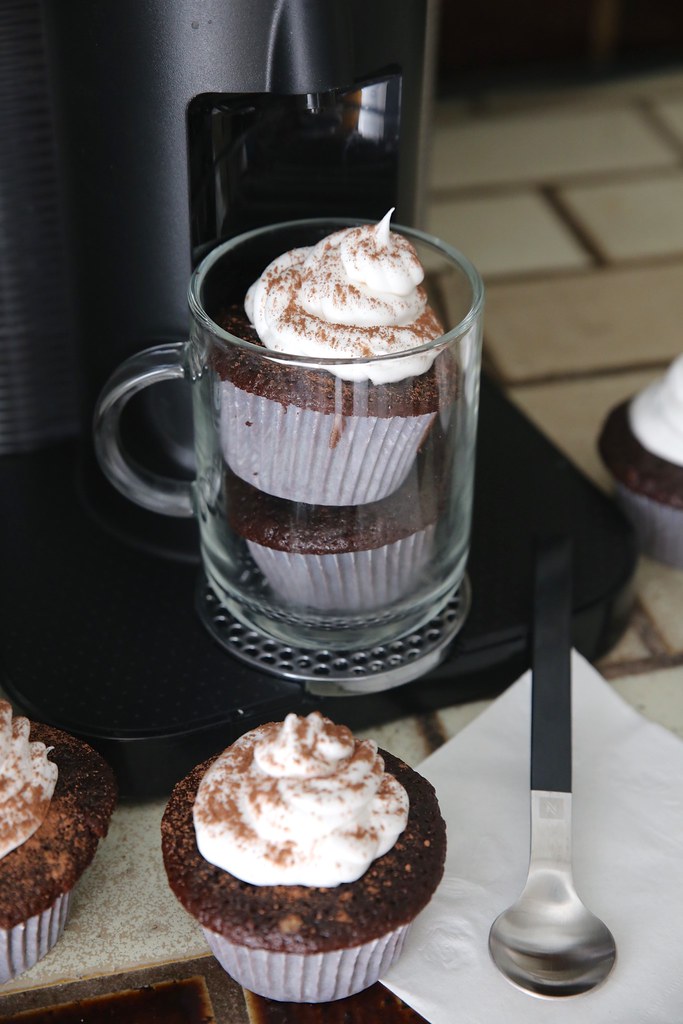
If I had caramel on hand, I definitely would have drizzled some on top. Since I didn’t, I sprinkled some cocoa powder instead. The more chocolate, the better.

IMG_5933

I whipped up some cream in my mixer to ice the cupcakes, but a cream cheese frosting would be divine as well. Actually, any frosting would do it. These cupcakes are so good that it doesn’t matter what you put on top.

IMG_5956

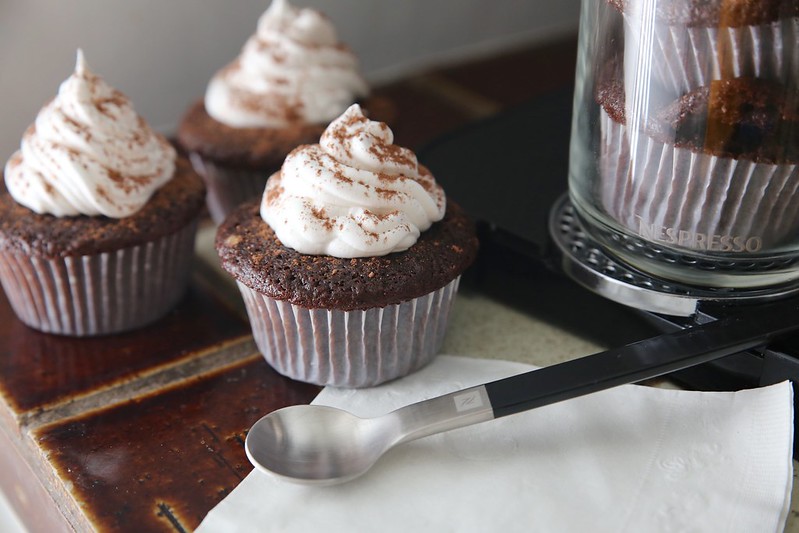
The coffee flavor is very subtle. It’s really only apparent to me in the aftertaste. It does, however, bring out that strong cocoa flavor. The buttermilk and oil trap in the moisture, ensuring the perfect cake texture. This recipe is going to be added to my permanent selection!

To check out other coffee/espresso flavors, recipes, or even buy your own VertuoLine machine, visit Nespresso here. The VertuoLine retails for $299 and is available in five colors: black (like mine!), red, titan, white, and chrome. It brews 7.77 oz of coffee or 1.35 oz of espresso, depending on the pod you’re using.

Print
Caramelizio Chocolate Cupakes

Ingredients

  • 1 3/4 cups all-purpose flour
  • 2 cups sugar
  • 3/4 cup dark cocoa powder (I used Rodelle)
  • 2 teaspoons baking soda
  • 2 teaspoons baking powder
  • pinch of salt
  • 1 cup buttermilk
  • 1/2 cup olive oil (you could also use vegetable oil)
  • 2 large eggs
  • 2 teaspoons vanilla extract (I used Rodelle)
  • 1 pod of Nespresso's Caramelizio, brewed

Directions

  1. Preheat oven to 350 degrees. Line 24 cupcakes.
  2. In a large mixing bowl, mix together the buttermilk, olive oil, eggs, vanilla, and the Caramelizio.
  3. Gradually stir in the flour, sugar, cocoa powder, baking soda, baking powder, and salt until evenly mixed.
  4. Fill each cupcake liner 3/4 of the way full with batter. Bake for 20-22 minutes or until toothpick comes out clean.
3.1
https://lovintheoven.com/caramelizio-chocolate-cupcakes/

This is a sponsored post, but the opinions expressed are my own.

Filed Under: cake, cocoa, coffee, cupcake, dessert

Dark Chocolate Coffee Bean Frappe

March 25, 2015 by kim 223 Comments


IMG_4891 I’m a Frappuccino kind of girl. The weather in southern California makes it easy to want cold drinks twenty four-seven. Thanks to Born Sweet™ Zing™ Zero Calorie Stevia Sweetener, I’m able to recreate some fraps at home. Zing™ is made with only real ingredients — nothing artificial, and zero calories, so you don’t have to feel guilty about consuming it. IMG_4895 A little goes a long way! In fact, 1 packet equals the sweetness in 2 teaspoons of sugar. I only had to use one packet to get my drink to the level of sweetness that I like, and I like my drinks pretty sweet. The powder inside is very fine and white so it dissolves quickly. IMG_4921 These packets are great to carry around with you since they come in individual pieces. Leave some in your purse or your car! I carry them around in my lunch bag for work. You can add them to your oatmeal in the morning, sweeten your coffee, or sprinkle onto some fresh fruit. Pour Zing™ Zero Calorie Stevia Sweetener into your teas, smoothies, and lemonades. IMG_4927 I was surprised at how easy it was to make blended coffee drinks at home. All you need is a good shot of espresso! If you can’t make that at home, you can sub it for a cup of strongly brewed coffee and add some more ice to the blender. I threw in a handful of dark chocolate espresso beans for a little crunch, but you can omit those if you’d like. You can also use dark chocolate chips instead if you have those sitting in your pantry. IMG_4932   I used the banana to add a smoother texture to the drink, but you could still kind of taste it. I’m still brainstorming other ingredients to use that don’t have that strong of a taste. Perhaps plain Greek yogurt? Next time, I’ll try taking the banana out and adding more ice in general so the coffee flavor is the only one there. I’m already thinking of all the other drinks that I’ll be creating in my kitchen. Green tea fraps, chai tea lattes, earl grey teas, and even freshly squeezed juices! Sometimes, even the freshest of juices need a little pick me up. ADD ZING™ TO YOUR LIFE!  Give your taste buds something new and amaZING to be excited about — try new Zing™ Zero Calorie Stevia Sweetener for yourself! Visit www.zingstevia.com to request a Free Sample of Zing™ Zero Calorie Stevia Sweetener, plus a $1.50 Coupon. Plus, look for Zing™ in the Sweetener Aisle at mass merchandiser and grocery stores nationwide. 
Print
Dark Chocolate Coffee Bean Frappe

Ingredients

  • 5 ice cubes
  • 1/2 banana, frozen
  • 1/2 cup almond milk
  • 1/2 tsp vanilla extract
  • 1 shot of espresso
  • couple of dark chocolate covered espresso beans (I found these at Trader Joe's)
  • 1 packet Born Sweet™ Zing™ Stevia Sweetener

Directions

  1. Blend all of the ingredients together until smooth. Enjoy!
3.1
https://lovintheoven.com/dark-chocolate-coffee-bean-frappe/

Which one of your favorite beverages are you most excited to mix Zing™ Zero Calorie Stevia Sweetener into first? Leave a comment below to enter for a chance to win a $100 Visa gift card!

Entry Instructions:

No duplicate comments.

You may receive (2) total entries by selecting from the following entry methods:

  1. Leave a comment in response to the sweepstakes prompt on this post
  2. Tweet (public message) about this promotion; including exactly the following unique term in your tweet message: “#SweepstakesEntry”; and leave the URL to that tweet in a comment on this post
  3. Blog about this promotion, including a disclosure that you are receiving a sweepstakes entry in exchange for writing the blog post, and leave the URL to that post in a comment on this post
  4. For those with no Twitter or blog, read the official rules to learn about an alternate form of entry.

This giveaway is open to US Residents age 18 or older (or nineteen (19) years of age or older in Alabama and Nebraska). Winners will be selected via random draw, and will be notified by e-mail. The notification email will come directly from BlogHer via the sweeps@blogher email address. You will have 2 business days to respond; otherwise a new winner will be selected.

The Official Rules are available here.

This sweepstakes runs from 3/25/15 – 4/21/15.

Be sure to visit the Zing™ Zero Calorie Stevia Sweetener brand page on BlogHer.com where you can read other bloggers’ posts!

Filed Under: banana, candy, coffee, drinks

Classic French Madeleines

January 6, 2015 by kim 19 Comments

IMG_3621Happy New Year, fellow blog readers! I was a bit ambitious for our New Year’s party and tried my hand at madeleines for the first time. Thanks to this Madeleines book by Barbara Feldman Morse, it was a cinch.

IMG_3661Madeleines are the perfect excuse for having a party. After prepping and baking a couple of different flavors, you can set up a sprinkles/toppings bar for guests to decorate their own madeleines. Kids, especially, would love it!

IMG_3624I chose to try classic french madeleines and dark chocolate espresso madeleines so I could have the best of both worlds. To be honest, my first batch was a disaster. Not because they turned out terrible, but because I thought I could hold the pan with one hand right out of the oven. The corner of the pan just bumped the side of the oven when they came out and the whole batch went tumbling down.

IMG_3639It wasn’t all bad, though. I managed to salvage two and a half madeleines. My DH ate the half and then quickly finished off the other two so I knew they were good. Not to worry, I was planning on making a couple of batches anyway. I only had one madeleine pan to bake with, so I was making twelve at a time (half a batch). The pan that Quick Books sent me is awesome. Nothing stuck, the madeleines shaped wonderfully (assuming you put in just the right amount of batter), and it’s lightweight and heavy duty at the same time.

IMG_3649I enjoyed the madeleines plain, but my DH preferred them dipped in dark chocolate. I threw an assortment of sprinkles on top for the new year. Plus, they’re more eye-catching with bold and bright colors.

IMG_3655

IMG_3659This is the first time that I’ve baked with vanilla bean paste and let me tell you, it’s a game changer. The little specks of vanilla bean laced throughout the layers of each madeleine enhanced the flavor. As for the dark chocolate madeleines, the large amount of coffee added into the batter deepened the cocoa.

IMG_3666From what I’ve learned after my many batches, here are a couple of tips for your first time:

  1. Filling up the pan cavity almost all the way was too much for me. They overflowed. It’s better to start out with a little less than a little too much.
  2. When they say to mix the eggs and sugar together for five minutes, do it! The aerating is necessary for a light and fluffy madeleine. A mixer is your best friend when it comes to making madeleines.
  3. Use top of the line ingredients. Since there are so few ingredients in making a basic madeleine, it makes a huge difference the quality of your butter, vanilla, and chocolate.
  4. Baking spray is your best friend. If you generously cover your pan, those babies will slip out with little effort.
  5. Speaking of getting them out of a pan, I inverted them over a cooling rack and gently tapped the back of the pan to let them fall out. For the ones that didn’t come out out on their own, I used my finger to gently push one corner of the madeleine and they’d just slide out without a problem.
  6. You must let them cool on a baking rack. Leaving them on a flat surface will not cut it because both sides need to cool.
  7. The texture changes dramatically straight from the oven to after cooling. They’ll be a lot more dense after being cooled. I prefer to eat them warm and fluffy, but that timeframe’s very small.

IMG_3669Now, thanks to my friend over at Quirk Books, I’m giving away a copy of Madeleines and a madeleine pan for one reader to bake with this new year! The book has more recipes than you’ll ever need to entertain. There’s sweet, savory, light, heavy, fruity, and indulgent. Enter via the Rafflecopter below.IMG_3678

Print
Classic French Madeleines

Ingredients

  • 8 tbsp (1 stick) unsalted butter
  • 1 cup all purpose flour
  • 1/2 tsp baking powder
  • 3 large eggs
  • 1/2 cup granulated sugar
  • 1 tsp vanilla bean paste or vanilla extract
  • 1 1/2 tsp freshly grated lemon zest (I subbed this with grated vanilla beans)

Directions

  1. Place a rack in the center of the oven and preheat oven to 350 degrees F. Coat two 12-shell pans with baking spray.
  2. In a small bowl, whisk together flour and baking powder.
  3. Place butter in another bowl and microwave on low power for 1 minute, or until melted. Allow to cool to room temperature.
  4. Place eggs and sugar in a 2-quart glass bowl or measuring cup and beat with a hand or stand mixer on medium-high speed until mixture is light and fluffy, about 3 to 5 minutes.
  5. Add vanilla and zest and continue beating for another minute or so. Fold in the flour mixture until just blended, then drizzle the cooled butter over the batter and incorporate completely.
  6. Using a 1 1/2 inch-diamter scoop or a teaspoon, fill shell molds with bater until almost full. Gently press batter to distribute it evenly.
  7. Bake for 10 to 12 minutes, until madeleines puff up and are golden brown.
  8. Remove pans from oven and let cool on a wire rack for 2 to 3 minutes, then invert and tap madeleines onto the rack. You may also use a small offset spatula to remove each one individually. Let cool completely if planning to store and/ or freeze. Otherwise, serving madeleines warm from the oven is best!
3.1
https://lovintheoven.com/classic-french-madeleines/

a Rafflecopter giveaway

This is a sponsored post, but the opinions expressed are my own.

Filed Under: book review, cake, chocolate chip, cocoa, coffee, dessert, food porn, giveaway, lemon, white chocolate

  • « Previous Page
  • 1
  • 2
  • 3
  • 4
  • 5
  • Next Page »

hi! i'm kim-- a girl mom, baker, blogger, and ex-flight attendant. welcome!

Search

  • Facebook
  • Instagram
  • Pinterest
  • Twitter

Categories

RODELLE-BABadge


Categories

  • Facebook
  • Instagram
  • Pinterest
  • Twitter

Copyright © 2026 · Foodie Pro Theme by Shay Bocks · Built on the Genesis Framework · Powered by WordPress