Lovin' From the Oven

  • Home
  • About Me
  • Recipes
  • FAQ
  • My Lifestyle Blog
  • Disclaimer

Day 4: Rocky Road Cookies

December 9, 2017 by kim Leave a Comment

I’ve always liked cookies that had a meringue texture.. you know, the ones that are light and fluffy with a crunchy exterior? These rocky road cookies are just that. I give you day 4 of my 12 days of cookies!

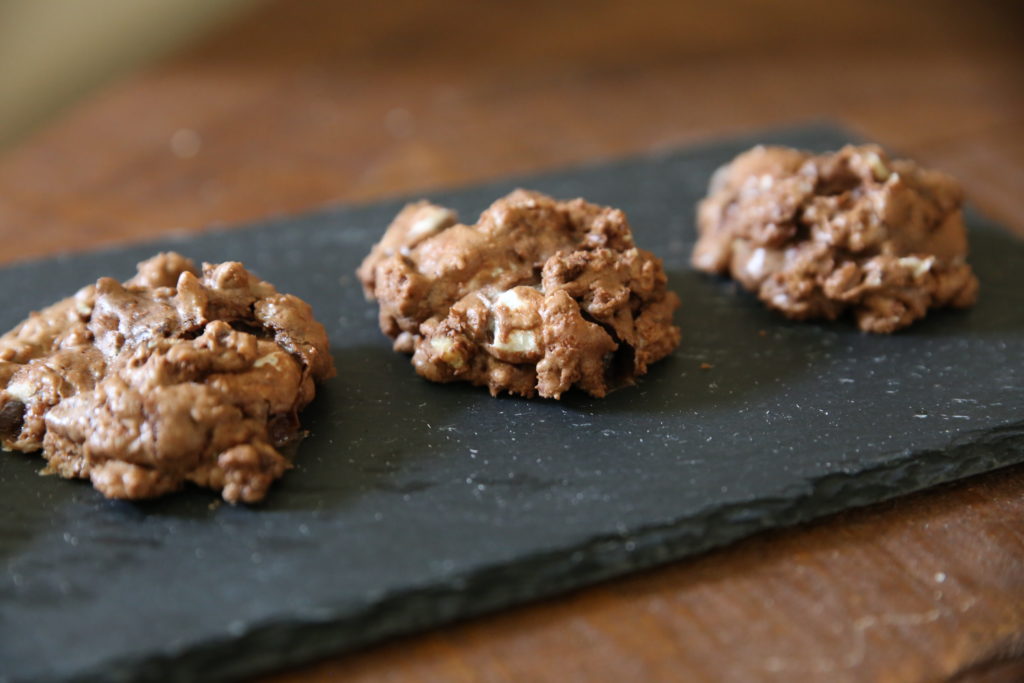
These have nuts in them, but if you’re allergic, feel free to completely leave them out. That won’t affect the texture much, so don’t stress over it.

I always get worried when I’m mixing if there’s such a thing as “over whipping” the batter. I stuck pretty true to the recipe and timed my whipping. They turned out perfect. 
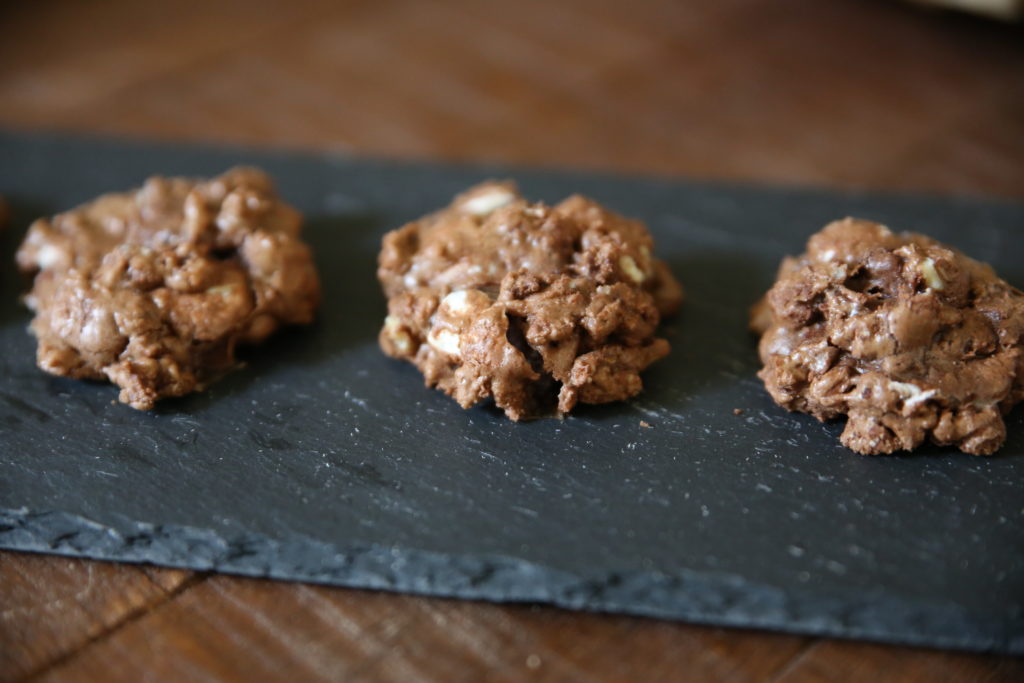
This is where a stand mixer comes in handy the most. Just turn the button on and let the machine do its thing. Recipe from Momables.

Print
Rocky Road Cookies

Ingredients

  • 2 cups dark chocolate chips, divided
  • 6 tablespoons butter
  • ¾ cup flour
  • ¼ cup cocoa powder
  • ¼ teaspoon salt
  • 1 teaspoon baking powder
  • 2 large eggs
  • ⅔ cup sugar
  • 1½ teaspoons vanilla extract
  • ½ cup marshmallows
  • 2 cups chopped walnuts

Directions

  1. Melt 1 cup of the chocolate chips with the butter in the top of a double boiler until smooth. Remove from the heat, and let it cool to room temperature.
  2. Preheat the oven to 325F. Line cookie sheet pans with silpat and set aside.
  3. In a large bowl, beat the eggs, sugar, and vanilla until thick and light yellow, about 2 minutes.
  4. Gradually stir in the flour, cocoa, salt, baking powder, and cooled chocolate. Beat for a minute.
  5. Fold in the remaining 1 cup chocolate chips, the marshmallows, and the nuts.
  6. Drop a tablespoon of batter onto the prepared cookie sheet pans about 2 inches apart.
  7. Bake for approximately 10 minutes, or until just firm.
3.1
https://lovintheoven.com/day-4-rocky-road-cookies/

SaveSave

SaveSaveSaveSave

Filed Under: chocolate chip, cocoa, cookies, dessert

Day 8: M&M Brownie Cookies

December 22, 2016 by kim Leave a Comment

img_0234

Day 8 of my 12 days of cookies: M&M brownie cookies! These are gooey, dark, chocolate cookies. img_0237

They truly have a brownie texture (well, probably because I used a brownie box). I used Christmas M&M’s to add into the mix, but feel free to use whatever you can find in the store.img_0241

3 more days until Christmas! Are you guys ready? I’ve been mixing up cookie dough and putting them into the fridge. This year is a little more complicated for me, so I won’t be baking all of the cookies at once. I’ve been slowly baking batch by batch for when I actually see people. img_0244

The first batch of cookies were done over the weekend for my DH’s secretaries at work. The next batch will be made for friends. My last batch will be for our family Christmas celebrations! Are you guys ready?

Recipe from Something Swanky

Print
M&M Brownie Cookies

Ingredients

  • 18.25 ounce box brownie mix (JUST the dry mix)
  • 2 eggs
  • 1/4 cup canola or vegetable oil
  • 1/4 cup flour
  • campaignIcon
  • 1/2 cup chocolate chips
  • 1 cup miniature M&Ms

Directions

  1. Preheat oven to 375ºF.
  2. Beat all of the ingredients (except for the chocolate chips and M&M's) together until smooth.
  3. Fold in the chocolate chips and M&Ms.
  4. Scoop dough by rounded tablespoons and drop onto lined baking sheet.
  5. Bake for 9 minutes. Let cool for 2-3 minutes before transferring to wire rack to cool completely.
3.1
https://lovintheoven.com/mm-brownie-cookies/

Filed Under: candy, chocolate chip, cocoa, cookies, dessert

Simply Chocolate Cupcakes

October 24, 2016 by kim Leave a Comment

fullsizeoutput_3eea

Can I tell you how much better the holidays are when you have kids? Or in my case, a kid? I’m SO excited to dress Ellie up for her first Halloween, eat tons of food for her first Thanksgiving, and wrap presents to leave under the tree for her first Christmas! I know she’s not even one yet so she won’t remember any of these events, but I’m going to go all out anyway.

Let’s start with Halloween. I bought Ellie her costume before she was born (hellooooo 80% off-after-Halloween-sale! How could I resist?). She’s a little too young to help me in the kitchen right now, but I’m counting down the days until she can wear a mini apron and stand beside me watching cupcakes rise through the oven glass door. img_5053
img_5064

When that day comes, I’ll have Pillsbury’s Purely Simple mixes to help me out. With a toddler on hand, it’ll be difficult to bake things truly from scratch. I’ll need a little help to get me started and that’s where these mixes come in. It makes everything a little homemade, while giving me more time to spend with family.

Plus, there is so much you can do with these mixes! I love using them in the kitchen. For these simply chocolate cupcakes, I doctored up the normal recipe by adding a couple of my finishing touches. From there, I used Halloween candy to dress up the tops.

Kids will love choosing their favorite Halloween candy to put on top of their very own dessert. Cupcakes are the perfect size for tiny hands to hold and devour. I played it safe with chocolate and peanut butter based candies, but you can be adventurous with taffy, gummies, or even hard candies.
fullsizeoutput_3eeb

I like using Pillsbury’s Purely Simple mixes because they’re free of preservatives and they don’t use any bleached flour. It’s easy to make them at home and it tastes like every ingredient was thoughtfully mixed in, one by one. img_5117

You can always use the recipe on the back of the box, but if you have a little extra time, you can use this recipe to make it even more personal.
fullsizeoutput_3ee9

I made the buttercream exactly as listed on the package. Believe it or not, you only need to add butter and water to the mix. That’s it! Just two ingredients that are almost always readily available in your refrigerator.img_5135 img_5146 fullsizeoutput_3ee7

The result is this deliciously moist, fluffy, and tasteful cupcake. It took me less than half an hour total to make these cupcakes. Yes, that even includes the baking time! That’s faster than doing a load of laundry, going grocery shopping, or running the dishwasher.

Use up that leftover Halloween candy and turn it into gold!

Print
Simply Chocolate Cupcakes

Ingredients

  • 1 package Pillsbury Purely Simple Chocolate Cake Mix
  • 1 package (3.9 oz) instant chocolate pudding mix
  • 2 tbsp dark cocoa powder
  • 1 1/2 cup half and half
  • 1/4 cup vegetable oil
  • 2 eggs
  • 1 package Pillsbury Purely Simple Buttercream Frosting Mix, prepared using the directions on the package

Directions

  1. Preheat the oven to 350 degrees. Line a muffin pan with 18 cupcake liners.
  2. In a large bowl, mix all of the ingredients together until smooth.
  3. Evenly distribute the batter into the 18 cupcake liners.
  4. Bake for 20 minutes, or until toothpick comes out with only a few crumbs.
  5. Wait until cool and then frost with the buttercream. Top with chopped candy.
3.1
https://lovintheoven.com/simply-chocolate-cupcakes/

You can check out more Pillsbury ideas here:

  • Website – http://www.pillsburybaking.com/
  • Facebook – https://www.facebook.com/PillsburyBaking
  • Pinterest – http://www.pinterest.com/pillsburybaking/
  • Instagram – https://instagram.com/pillsburybaking/

This is a sponsored post, but the opinions expressed are my own.

Filed Under: cake, candy, cocoa, cupcake, dessert

  • « Previous Page
  • 1
  • 2
  • 3
  • 4
  • …
  • 23
  • Next Page »

hi! i'm kim-- a girl mom, baker, blogger, and ex-flight attendant. welcome!

Search

  • Facebook
  • Instagram
  • Pinterest
  • Twitter

Categories

RODELLE-BABadge


Categories

  • Facebook
  • Instagram
  • Pinterest
  • Twitter

Copyright © 2026 · Foodie Pro Theme by Shay Bocks · Built on the Genesis Framework · Powered by WordPress