Lovin' From the Oven

  • Home
  • About Me
  • Recipes
  • FAQ
  • My Lifestyle Blog
  • Disclaimer

Melt in Your Mouth Baked Chicken

August 29, 2013 by kim 33 Comments

meltchicken-7


How hard is it to size a ring? For me, it’s extremely difficult. I’ve had to have my ring resized… wait for it… three times already! It only took three appointments before the ring finally fit. How is this possible, you ask? Well, on my first appointment, I was so excited that I slid the size 4 ring sizer over my finger and called it a done deal. A sizing appointment that normally takes an hour took us four hours because of the drastic size change, but I did get it back that day.

meltchicken

The next morning, I’d be working on things around the house and the ring would slide like crazy to my knuckle. A quick google search later and I learned that if you have your fingers pointing the floor and shake vigorously, your ring should stay put. I sat on my bed, flicking my wrist left and right. Expecting the ring to fall somewhere on the bed, I was caught off guard when it went flying across the room and hit the wall. Whoops.

meltchicken-2

I told my DF that the ring was too large and we had to go back to the jeweler to have it resized again. Luckily, they had an opening that evening and were able to finish it in an hour. The jeweler told me to try and apply a little force to get the 3.5 over my knuckle, and it went over just fine. I was nervous the first time trying to put on a 3.5 because I was afraid my finger would get stuck. 3.5 it was.

meltchicken-3

The ring fit fine… until I started working. Most people swell in the air, but apparently I shrivel like a prune. While I was working in the air, the ring would slip off with ease, not even stopping at my knuckle. I had to wear my ring on a different finger for the rest of my flights because I was afraid I’d lose it if worn on my wedding ring finger.

meltchicken-5

By this time, my DF and I had already moved back up north and there were no Robbins Brothers around. If we went down to Southern California to get it resized, we would need a car to drive to the closest Robbins Brothers. I found out that they had a location in Downtown Seattle, which would be easily accessible from the airport/linklight rail. My DF called, and sure enough, they would see what they could do.

Since the sizing I needed was a bit abnormal, they didn’t want to guarantee that they could resize it until they saw the actual ring. The next day, my DF and I were on the first flight to Seattle for the day.

meltchicken-4

The weird thing was that when trying on the ring sizer for a 3 and a 3.5, it wouldn’t budge anywhere over my knuckle. There was no way that I was getting either of them on. They re-measured my engagement ring and verified that it was indeed a 3.5. Since the band was so thin, it gave my finger more room to budge, which is why my ring fit me and the ring sizer didn’t.

meltchicken-6

Such a complicated situation, huh? Well, the actual jeweler came out with the salesperson and we were all debating on what size to make the ring now. Since it was the third sizing, we wanted to make sure it was the last one and that it’d fit. We left the ring with the jeweler and he said it’d be done in the next hour.

My DF and I went to go eat lunch and then we returned to Robbins Brothers. Finally, it was the moment of truth. When I tried to put it over my knuckle, it wouldn’t fit. No matter how much I forced it and budged, there was no way it was going over my knuckle after walking a mile in 82 degree weather (I blame it on me being the most “swollen” since I hardly work out). I had a split second of panic before the sales guy asked if I wanted some shea butter to help slip the ring on. When I exclaimed yes, he took a step and pulled out a bottle of Windex instead. Apparently Windex works just as well. A couple of sprays on my finger and the ring slid right over the knuckle. Thank goodness!

meltchicken-8

The ring still has room to move around my finger and is not tight at all, but this time there’s no way the ring can slide over my knuckle on its own. The summer is when your body is the most swollen, so I would only shrivel in the winter. I’m pretty sure I’m not using the correct scientific words, but oh well. I swell and I shrivel, deal with it.

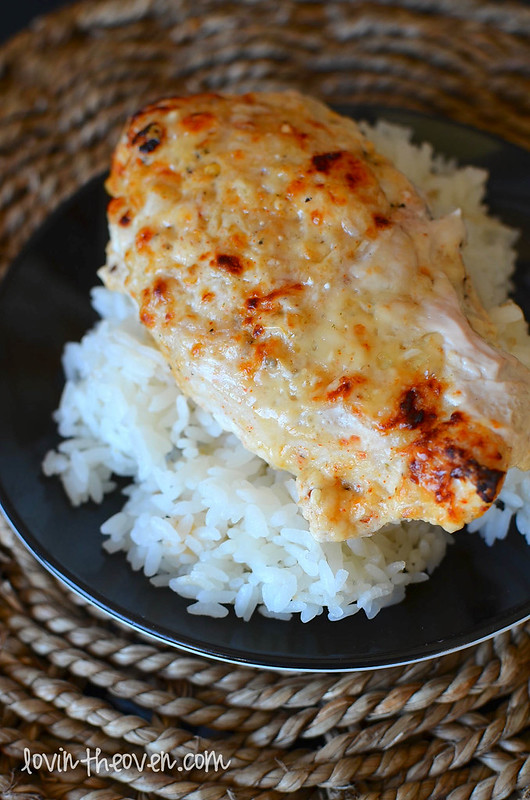
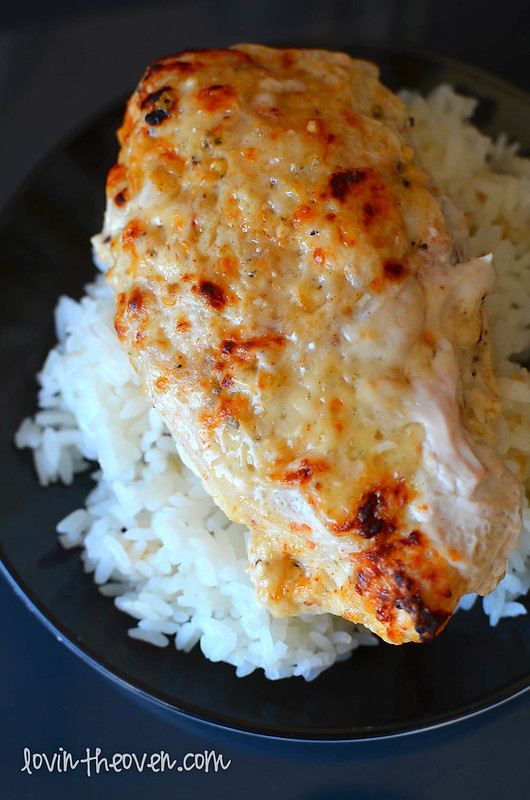
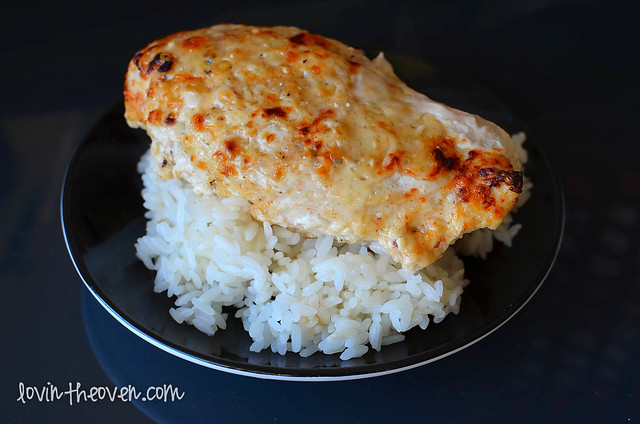
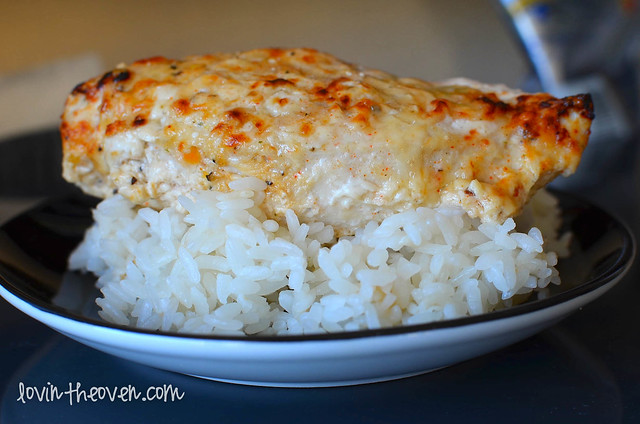
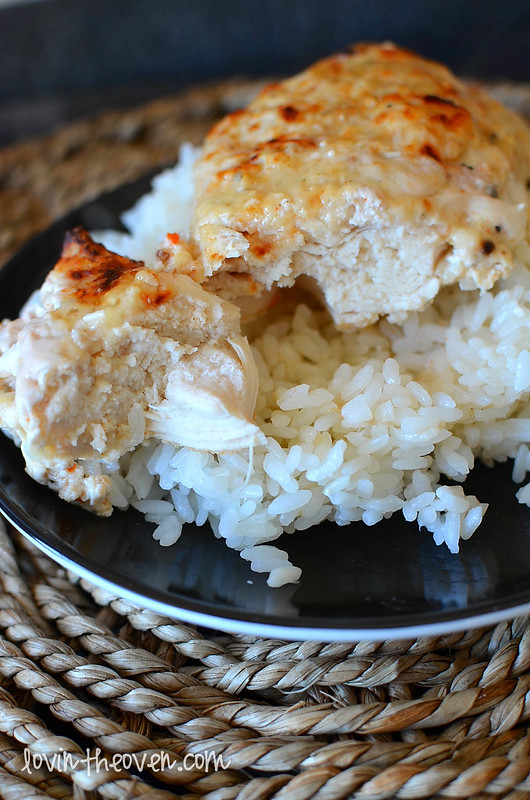
This chicken is an easy dish to whip up for dinner in the oven. By coating the meat and wrapping it in foil, you are trapping all the juices to ensure a moist and flavorful meal. I loved the browning on the top and the nice layer that the sauce gives. Enjoy!

Print
Melt in Your Mouth Baked Chicken

Ingredients

  • 3-4 frozen chicken breasts
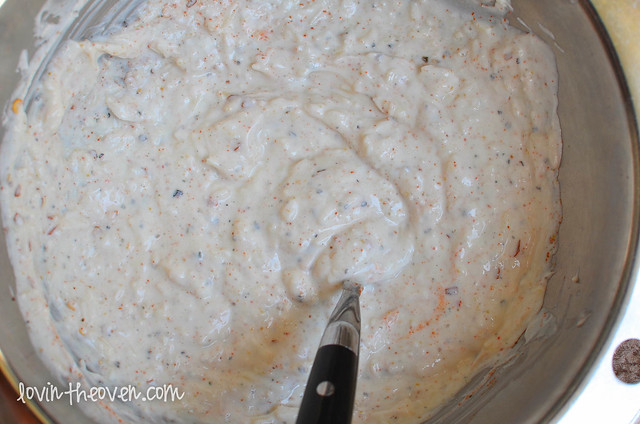
  • 1 cup plain greek yogurt (I used Chobani)
  • 1/2 cup freshly grated parmesan cheese
  • 1 tsp garlic salt
  • 1/2 tsp Mrs. Dash, any flavor
  • 1/2 tsp ground black pepper
  • 1 tsp garlic powder
  • 2 tsp red chili flakes
  • pinch of cayenne pepper

Directions

  1. Mix all of the ingredients (except the chicken) together in a small mixing bowl.
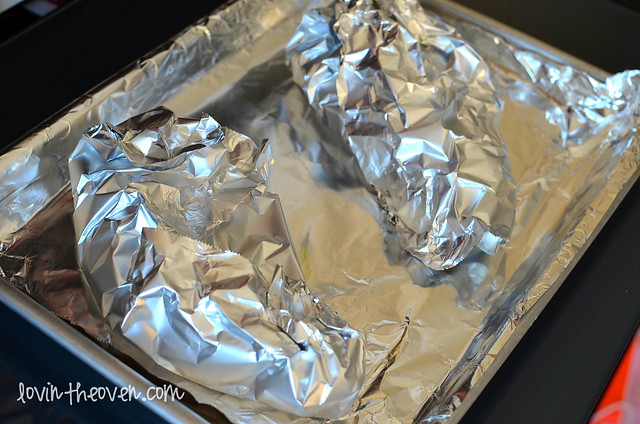
  2. Evenly coat the chicken with the mixture on both sides.
  3. Wrap each breast in foil and bake at 400 degrees for 45 minutes.
3.1
https://lovintheoven.com/melt-in-your-mouth-baked-chicken/

Filed Under: chicken, dinner

Bacon Pizza Puffs

August 26, 2013 by kim 4 Comments

baconpuff-3

Have you ever spent hours cleaning the whole house before guests come over, and in the end they don’t go anywhere but your kitchen?

Kitchens have a knack for instantly drawing guests in, becoming a comfort zone for conversation and catching up along with eating and drinking. You may even be left frustrated because you spent all your time cleaning the dining room, the patio, and the living room, only to have no one spend any time in those spots.

baconpuff

Instead of trying to push guests into the other rooms of your home, why not embrace the fact that they’re loving being in your kitchen? What says home — enjoying meals, gathering together — like a kitchen? You may even spend most of your time in there, which makes it even more natural that your guests gravitate towards it. At least everyone is in one place!

Nothing makes a kitchen more inviting to guests like homemade, bite-sized treats. I’m usually all about the sweets, but I think a savory snack can bring more people into the kitchen when they first come over. Who doesn’t like snacking while catching up on life?

baconpuff-2

These bacon pizza puffs are so enticing that no one can resist them. Trust me. One flavor-packed bite, they’re light and airy, with a little bit of bacon to make them satisfying. Serve them on colorful, eye-catching plates and place mats, and you’ll draw the attention of anyone who walks through the front door.

These puffs are baked in a mini-muffin tin, so they’re less messy to eat. You really don’t even need to bring out any plates, forks, or knives. Just pop them in your mouth, one at a time.

baconpuff-4

Here are some other ideas for attracting your guests into the kitchen:

Keep it tidy. No one wants to hang out in a messy room, and you’ll be able to relax more if your space if neat and organized.

Let guests know that they are welcome to any beverages you have on hand by leaving glasses out on the counter, or in a pretty display.

Use warm and inviting colors in your decor. When I walk into a kitchen and the only color I see is white, I’m afraid to touch anything for fear that I’ll mess it up. I would hate to be the one that “dirties” a white kitchen.
If I were to see blue, yellow, and orange, like in the pictures above, I’d feel much more comfortable making myself at home.

Last but not least, the food! Line up a couple plates of mini appetizers, including these bacon pizza puffs, and everyone will be sure to enjoy their time visiting.

This recipe is slightly adapted from Hannah and Bryan.

Print
Bacon Pizza Puffs

Prep Time: 10 minutes

Cook Time: 20 minutes

Yield: 24 mini puffs

Ingredients

  • 3/4 cup flour
  • 3/4 teaspoon baking powder
  • 1 tablespoon Italian seasoning
  • 2 teaspoons of red pepper flakes (optional)
  • 3/4 cup whole milk
  • 1 egg, lightly beaten
  • 1 cup shredded mozzarella cheese
  • 1/4 cup grated Parmesan cheese
  • 1 cup cubed cooked and crumbled bacon
  • 1/2 cup store-bought pizza sauce

Directions

  1. Preheat oven to 375 degrees. Lightly grease a 24-cup mini muffin pan and set aside.
  2. In a large bowl, whisk together flour, baking powder, Italian seasoning, salt and red pepper flakes.
  3. Stir in the egg and milk, mozzarella, Parmesan and bacon.
  4. Pour the mixture equally into the mini muffin cups. Bake 20-25 minutes.
  5. Warm the pizza sauce in the microwave or on the stove. Serve with the puffs.
3.1
https://lovintheoven.com/bacon-pizza-puffs/

So, if your guests gravitate to your kitchen, embrace it. Keep the space open, inviting, and stocked with snacks, and everyone will enjoy the party.

This post is part of BlogHer’s Kitchen Entertaining editorial series, made possible by KitchenAid.

Filed Under: dinner sides, muffins

Baked Parmesan Zucchini

August 22, 2013 by kim Leave a Comment

bakedzucchini-3


Talk about a whirlwind of a week. How do girls plan weddings when they’re working/doing anything else in life but wedding planning? Also, how are weddings so dang expensive? That industry is a goldmine to be working in.

You know what else is impossible? Guests lists. After going through 16 years of school (19 years for my fiance), how do you keep the number down when both of your families make your head count already near 200? I’ve emailed at least 50 venues asking for a quote, and 80% of them are out of our budget with that many people. This. Is. Impossible.

bakedzucchini


Let’s take a break from my overflowing mailbox and blog, shall we? Baking vegetables makes them a lot easier to eat. I’m not saying I hate vegetables, I’m saying I prefer my veggies seasoned and steaming. Since I don’t have a grill at my apartment, I opted to cook zucchini in the stove.

bakedzucchini-2


The result? A perfect summer side. The paprika brings out the green in the zucchinis and create a festive plate.

bakedzucchini-4

I served it alongside some skinny chicken pesto bake and even cooked them in the oven at the same time.

Print
Baked Parmesan Zucchini

Ingredients

  • 2 zucchinis, sliced in half lengthwise
  • 1/2 tsp minced garlic
  • 3 tablespoons grated parmesan cheese
  • salt and pepper, to taste
  • paprika and red cayenne pepper, to taste

Directions

  1. Preheat oven to 400 degrees.
  2. Lay out speared zucchinis on a baking sheet, cut side facing up. Evenly spread the garlic on all four pieces.
  3. Add the parmesan cheese on top of each spear.
  4. Season with salt, pepper, paprika, and red cayenne pepper, to taste. I add a lot of red cayenne pepper because I like the extra kick.
  5. Bake for 15-20 minutes.
3.1
https://lovintheoven.com/baked-parmesan-zucchini/


Filed Under: dinner sides, vegetables

  • « Previous Page
  • 1
  • …
  • 117
  • 118
  • 119
  • 120
  • 121
  • …
  • 289
  • Next Page »

hi! i'm kim-- a girl mom, baker, blogger, and ex-flight attendant. welcome!

Search

  • Facebook
  • Instagram
  • Pinterest
  • Twitter

Categories

RODELLE-BABadge


Categories

  • Facebook
  • Instagram
  • Pinterest
  • Twitter

Copyright © 2026 · Foodie Pro Theme by Shay Bocks · Built on the Genesis Framework · Powered by WordPress