Lovin' From the Oven

  • Home
  • About Me
  • Recipes
  • FAQ
  • My Lifestyle Blog
  • Disclaimer

Pesto Breakfast Burritos

September 16, 2013 by kim Leave a Comment

breakfastburrito-5


Burritos are probably one of the most versatile foods out there. I mean, you can eat it while you’re walking, you can eat it while you’re driving, and you can eat it when you’re trying to get from point A to point B. If you make them right, then you don’t need a fork or a knife (or a napkin!). Folding the perfect burrito is a very talented skill, my friends, one of which I have not acquired yet.

breakfastburrito


I am all about time sensitive meals because life for me is always on the go, especially in the mornings. I’m usually out the door rushing to work at 4AM in the morning. You can even make these breakfast burritos ahead of time and keep them stored in the refrigerator or freezer, depending on how long it takes for you to eat them.

breakfastburrito-3


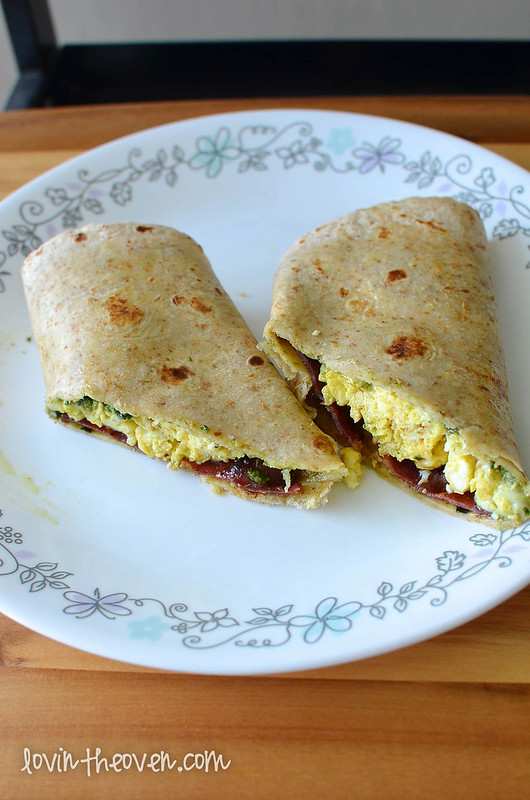
This burrito take a little longer just because you to scramble the eggs, cook the bacon, and then melt the cheese, but it shouldn’t take you any more than 10-15 minutes from start to finish.

breakfastburrito-4

I used a low carb tortilla wrap (if anyone tells you that there’s no difference in taste between low carb and normal tortillas, they’re lying to you), but regular flour tortillas are best if you plan on storing the burritos in the icebox for later.

I used my basil pesto from this previous recipe here.

Print
Pesto Breakfast Burritos

Prep Time: 15 minutes

Yield: 1 burrito

Ingredients

  • 1 large tortilla
  • 2-3 tsp basil pesto
  • 2 eggs, scrambled
  • 2 pieces of bacons, cooked to desired crispness
  • sprinkle of Mexican cheese blend

Directions

  1. Warm up the tortilla on both sides in a large flat pan over medium low heat.
  2. Spread pesto onto one side of the tortilla, facing up in the pan.
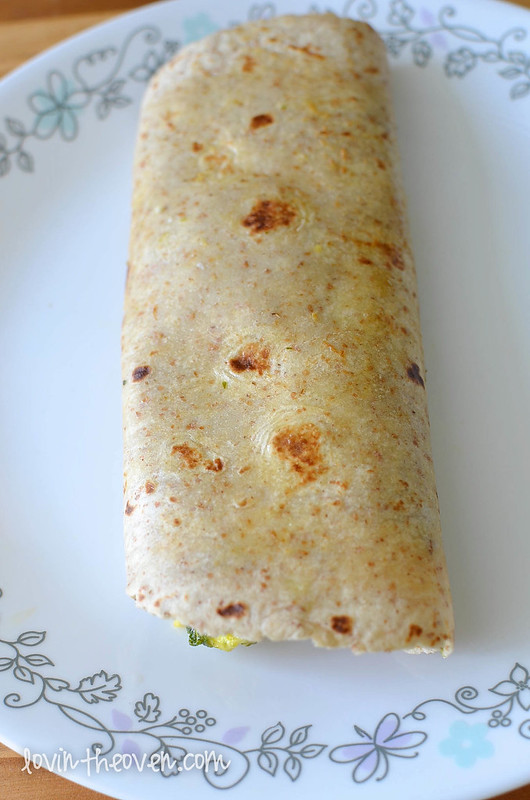
  3. Add the eggs, bacon, and cheese. Fold in opposite sides of the tortilla and then rolls the ends to create a burrito.
  4. Let the burrito warm for a minute or two with the seam side facing down.
  5. Serve hot.
3.1
https://lovintheoven.com/pesto-breakfast-burritos/


Filed Under: breakfast

Aunt Val’s Caramel

September 13, 2013 by kim 5 Comments

caramel-5

I have about a million pictures to upload from my camera right now and I feel like there’s never enough hours in a day to do everything. I had all these plans for yesterday afternoon to look at venues, but work didn’t exactly go my way and I was stuck working. Go figure.

caramel caramel-2 caramel-3

But hey, that’s my problem, not yours. So let’s talk about some caramel. Most of the recipes that I find for caramel involve a candy thermometer, which I don’t have. This particular recipe didn’t need one and it’s a soft, dip-able caramel that I used to eat in my childhood. Do you guys remember that little white tub of caramel that was always conveniently placed next to the apples in the grocery store? I always begged my mom to buy it, and she would give in one out of a hundred times. I’d consider that a win win situation for me.

caramel-6

After the caramel finished finished cooking, I couldn’t help but mix it with my other favorite snack: popcorn. All I did was pop some plain popcorn without seasonings in the microwave and pour the warm caramel on top while constantly stirring. The only issue I had was that the popcorn got stale pretty quickly. Anyone know how to fix that? How does the caramel popcorn sold in stores stay so crunchy? Maybe this soft caramel wasn’t meant for coating popcorn.

caramel-7

Oh well, at least it still looked pretty.

caramel-8 caramel-9

Also for some words of advice, remember to remove the unpopped kernals from the popcorn prior to mixing in the caramel. If not, you might be breaking someone’s teeth real soon! Recipe from Pretty Providence

Print
Aunt Val’s Caramel

Ingredients

  • 1 C. Brown Sugar
  • 1/2 cup butter
  • 1 C. light Karo syrup
  • 1 can sweetened condensed milk

Directions

  1. All you do is melt all the ingredients in a saucepan over medium-low heat. Once caramel is boiling cook for approximately two minutes stirring constantly.
3.1
https://lovintheoven.com/aunt-vals-caramel/

Of course, I saved some of the caramel for apple dipping, which was much better than the popcorn.

caramel-10 caramel-11

The caramel can be easily stored in an air tight container in the refrigerator for a couple of weeks (if it even lasts that long!).

caramel-12 caramel-14

Filed Under: apple, dessert, snack

Meyer Lemon Coffee Cake

September 10, 2013 by kim 5 Comments

lemoncoffeecake-11


Can you imagine waking up to a big pan of this on your birthday morning? How glorious would that be? Give me a chai tea latte and you’ve got my perfect breakfast. Working as a flight attendant, coffee cakes are my achilles heal. I can bring them with me in my luggage and I can eat it on the go– no utensils needed. That makes it convenient and delectable.

lemoncoffeecake-16


Chinet sent me over some disposable bakeware to try out, and I thought this Meyer lemon coffee cake would be the perfect thing for the 8×8 inch pan. I hardly ever bake with disposables, so I was eager to see how it compares with regular heavy duty baking pans.

lemoncoffeecake-2

lemoncoffeecake

lemoncoffeecake-3

lemoncoffeecake-4


The pan itself is actually rather light. It’s made of a paper/cardboard feeling material and is textured. The inside is coated with a dark layer and the outside remains white. All of Chinet’s bakeware comes with a lid, making it easy to take with you to a party or just for transferring in general. The only issue was that the top didn’t actually “snap” into place. It loosely covers your baked good and moves around on its own. I just used some tape to keep it shut while transporting it.

lemoncoffeecake-5

lemoncoffeecake-7

lemoncoffeecake-8


It sure looks pretty, though. It’s nice to be able to take a coffee cake to someone and not worry about bringing the bakeware back. One and done.

lemoncoffeecake-9


I was very impressed with how evenly the cake baked in the pan. There was no sinking in the middle and it seemed as if the edges browned normally. There was no “weak spot” of the pan.

lemoncoffeecake-12


I was also curious as to how the bakeware would keep its shape, but sure enough, it proved me wrong. There was no sagging, bending, or melting (wouldn’t that be terrible?!). It was sturdy. I could hold it from one end and it wouldn’t fold.

lemoncoffeecake-13


Bottom line is that you should definitely bring a cake to someone… for breakfast! Let them celebrate in the morning instead of having to wait all day for celebrating in the evening.

lemoncoffeecake-14

lemoncoffeecake-15


I have to be honest about this lemon coffee cake. I didn’t try it because I don’t like lemon desserts. I actually packed it up and brought it with me to work so that my coworkers can enjoy their mornings. I even left it on the counter in the communal area for everyone to enjoy. From the feedback that I got, the cake seemed to be a hit with everyone. It wasn’t too strong in lemon flavor.

lemoncoffeecake-17

This streusel recipe made a lot and I only used 2/3 of it. I’m saving the rest to top off some muffins. Recipe is slightly adapted from Martha Stewart.

Print
Meyer Lemon Coffee Cake

Ingredients

  • Streusel:
  • 1 ¾ cups all-purpose flour
  • ¾ cup brown sugar
  • pinch of salt
  • ¾ cup (1 1/2 sticks) cold unsalted butter
  • Cake:
  • 2 cups all-purpose flour
  • 1 teaspoon baking powder
  • 1 teaspoon baking soda
  • ¼ teaspoon salt
  • ½ cup unsalted butter, room temperature
  • 1 cup sugar
  • 3 tablespoons finely grated lemon zest (from 3-4 Meyer lemons)
  • 2 large eggs
  • 1 teaspoon pure vanilla extract
  • 1 cup plain greek yogurt (I used Chobani)
  • Glaze:
  • 1 cup powdered sugar
  • juice of half a lemon

Directions

  1. First make the streusel by cutting together the butter and the rest of the ingredients until crumbly. I used a food processor for ease.
  2. Preheat oven to 350 degrees F.
  3. Cream together the butter and sugar until fluffy. Mix in the lemon zest, eggs, vanilla, and yogurt.
  4. Gradually stir in the flour, baking powder, baking soda, and salt until combined.
  5. Pour the batter into an 8x8 pan and top with the streusel (I only used 2/3 of it).
  6. Bake for 50-60 minutes, or until toothpick comes out clean.
  7. Let cool completely before mixing the powdered sugar and lemon juice together and drizzling.
3.1
https://lovintheoven.com/meyer-lemon-coffee-cake/

*This is a sponsored post by Chinet, but the opinions expressed are my own.*

Filed Under: breakfast, cake, dessert, frosting, lemon

  • « Previous Page
  • 1
  • …
  • 116
  • 117
  • 118
  • 119
  • 120
  • …
  • 289
  • Next Page »

hi! i'm kim-- a girl mom, baker, blogger, and ex-flight attendant. welcome!

Search

  • Facebook
  • Instagram
  • Pinterest
  • Twitter

Categories

RODELLE-BABadge


Categories

  • Facebook
  • Instagram
  • Pinterest
  • Twitter

Copyright © 2026 · Foodie Pro Theme by Shay Bocks · Built on the Genesis Framework · Powered by WordPress