Lovin' From the Oven

  • Home
  • About Me
  • Recipes
  • FAQ
  • My Lifestyle Blog
  • Disclaimer

DIY Handkerchief Save The Dates

June 25, 2014 by kim 14 Comments

savethedates-24

I’ve been slacking on the wedding posts. I sent my save the dates out months ago and I still haven’t shared them on my blog with you guys!

Generally, you send out save the dates if you’re having a lot of people come from far away or if you’re having a destination wedding. This was not the case for us since most of our family are local and we’re getting married a short drive away from our hometown. I chose to send them out anyways because A: I love sending and receiving snail mail, B: We’re getting married on a holiday weekend, and C: It’s a great excuse for an arts and crafts project!

savethedates-29

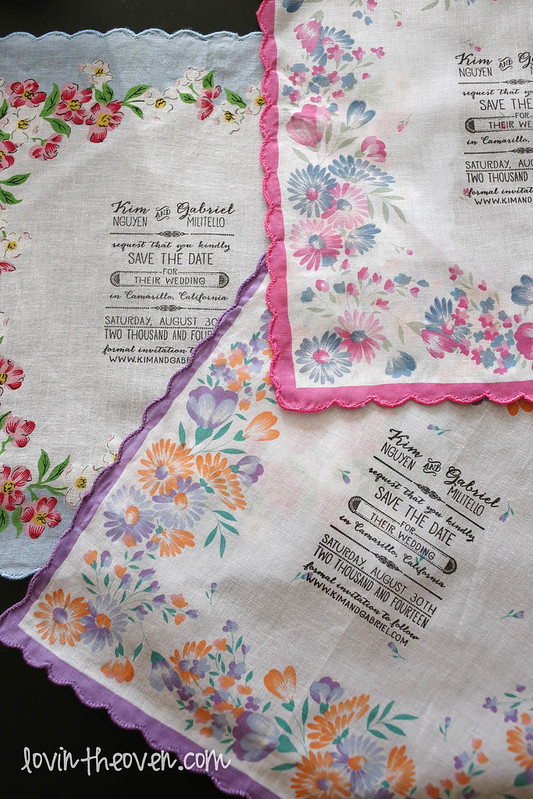
They turned out to be exactly what I was envisioning in my head. That’s a huge accomplishment because that never happens! I’ll show you exactly how I made mine.

First, you have to start and get your handkerchiefs. You can go to estate sales and find them one by one (which is a pain in the butt, but some people love the hunt), buy new ones in the store (places like Dollar Tree or the 99 Cent Store even have them! Of course, they’re very limited in the design), or buy them online. Since I wanted a more vintage feel, I bought mine online from eBay (don’t worry, they’re still brand new!). You can also find some on Amazon.

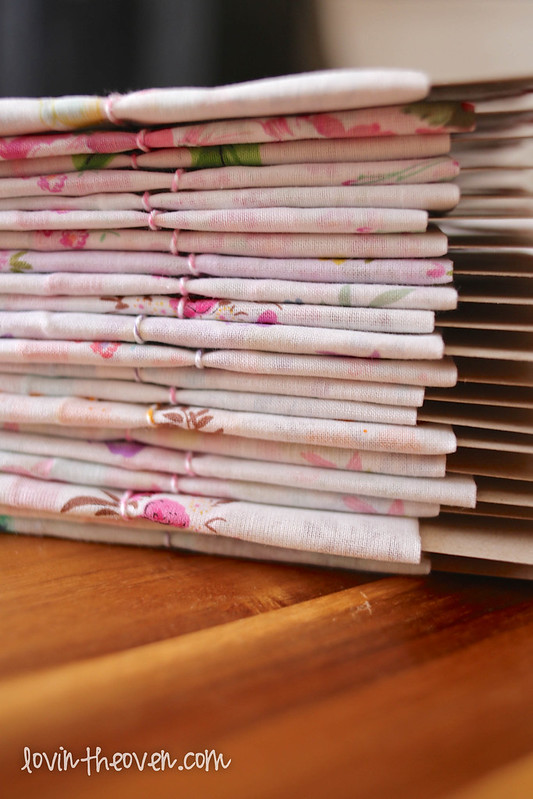
Once I received them in the mail, I washed, dried, and ironed each one.

savethedates

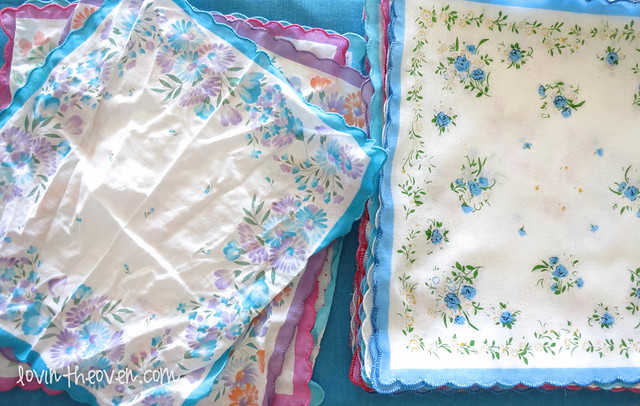
Ah, is there a better sight than a pile of freshly pressed hankies? Probably.

savethedates-2

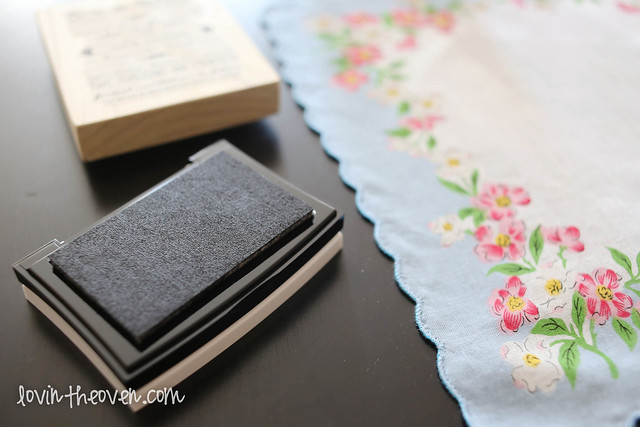
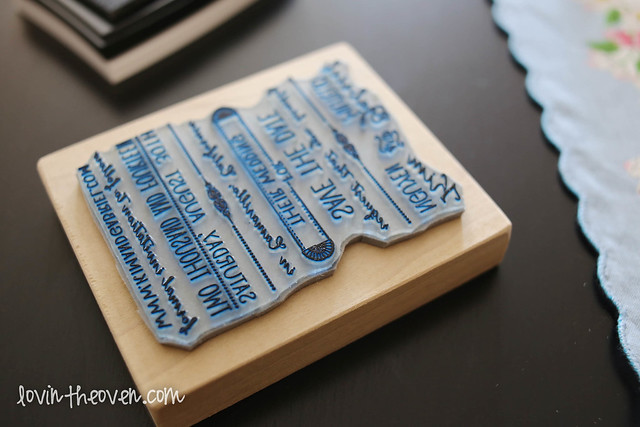
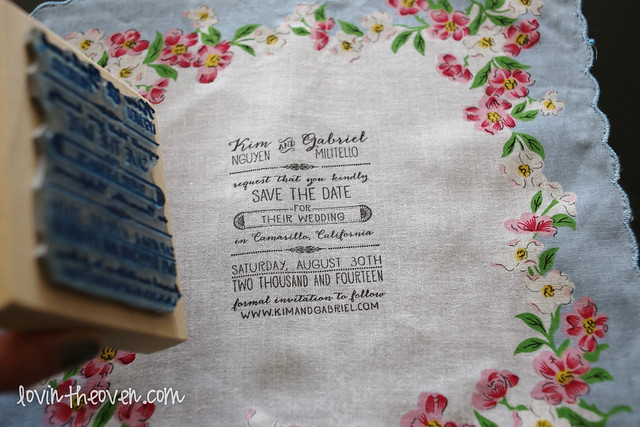
Now for the stamp… I worked with an Etsy seller, TheRUBBERPress, to design a stamp that I loved since nothing that I found jumped out to me. After a couple of revisions, I had my stamp. In fact, we both loved it so much that TheRUBBERPress made it a staple in the store! You’re welcome, guys. 🙂

Etsy truly has some amazing, creative people on there. Now for the stamp pad. I took a lot of time researching the best stamp pads for fabric. I needed a stamp pad that wouldn’t bleed or fade, had a strong pigment, and must be great with fine lines.

savethedates-3

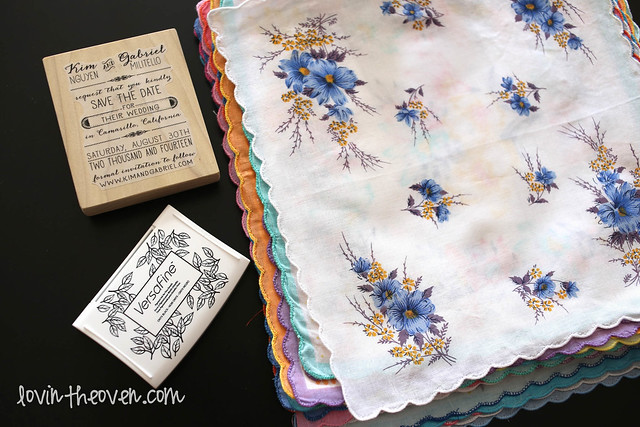
I ended up getting Tsukineko’s unique pigment called Versafine in Onyx Black. Yes, just yes. This stamp pad made my life so much easier. It’s a miracle worker.

savethedates-6

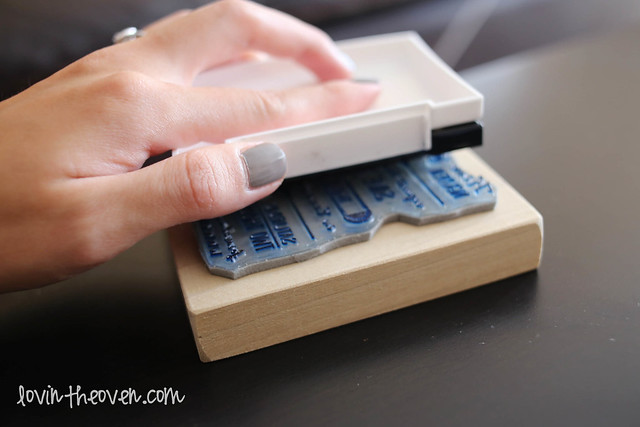
I laid my stamp down with the rubber facing up and gently patted the ink pad across the surface.

savethedates-9

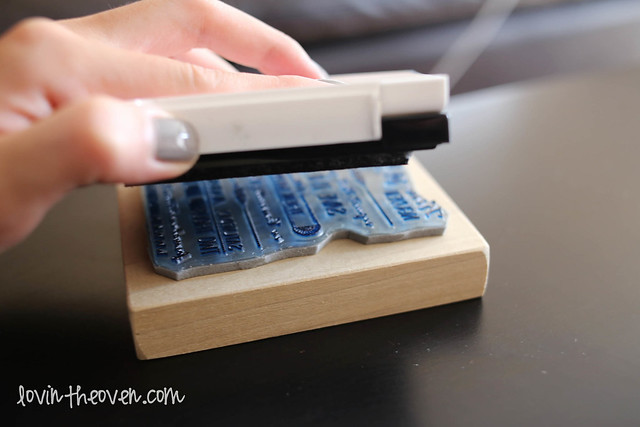
Cover every centimeter!

savethedates-12

savethedates-15

Carefully place the stamp where you want it to be.
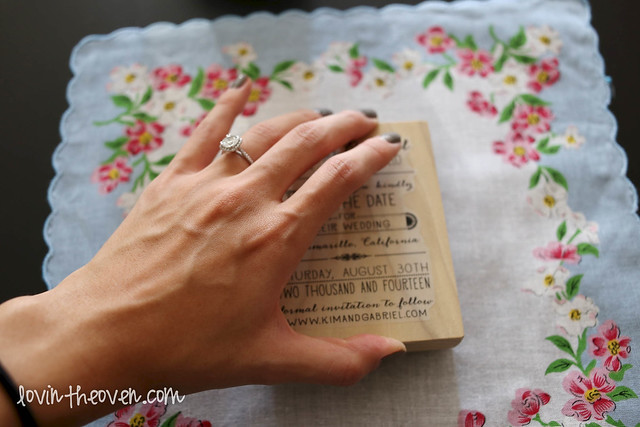
savethedates-16

Apply pressure.

savethedates-17

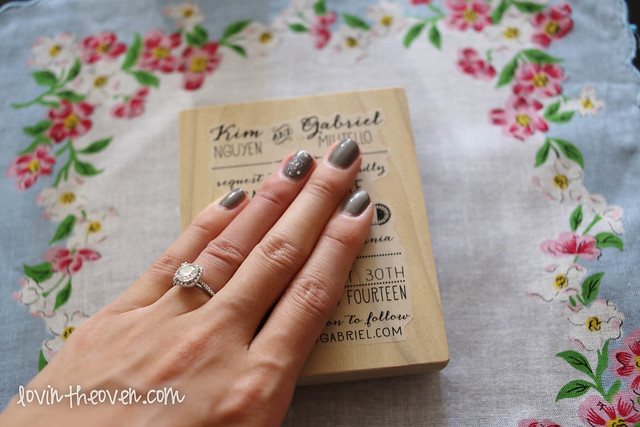
Make sure to press down on all the edges! You don’t want any missed spots or illegible writing.

savethedates-18

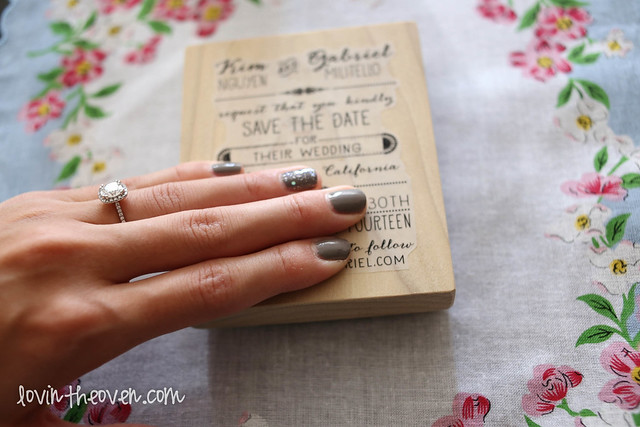
Voi-la! That’s one done. Now you have 150 more to go.

savethedates-20

savethedates-21

Think you’re done? Not even close. After letting them dry overnight (you definitely didn’t need to, the ink was dry almost instantaneously, but I just wanted to be safe and I was tired!), it’s time to assemble them to fit nicely into an envelope.

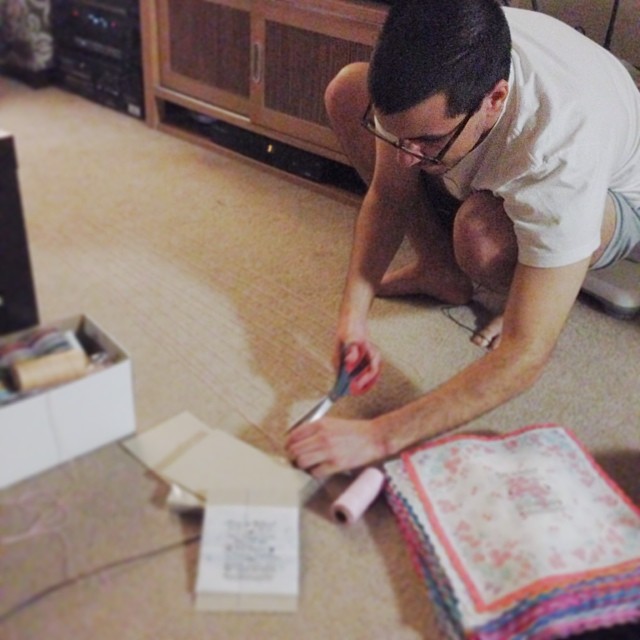
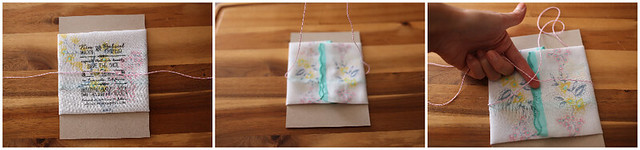
Get out your twine. I have this pack and I love it! So many colors to choose from.

savethedates-22

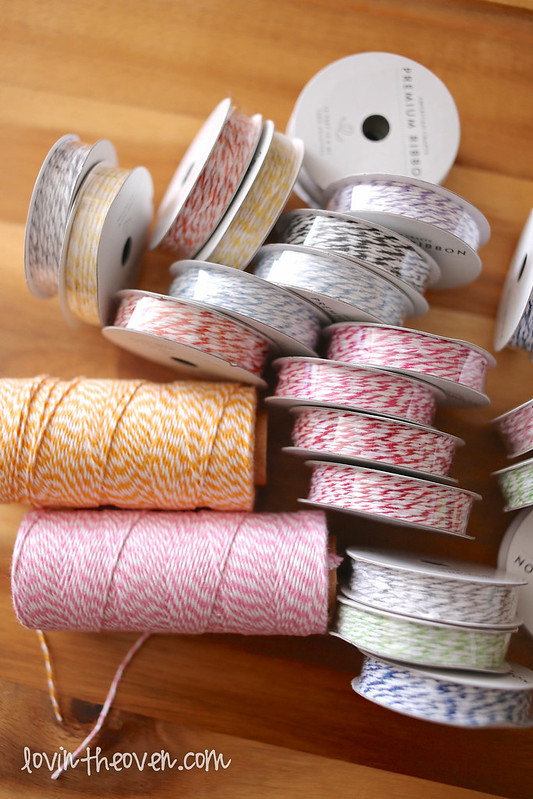
It’s nicer to buy in bulk if you have a lot of hankies to wrap. Here are some other great twine buys:

one.
two.
three – as pictured.
four – I own this twine too and it’s never ending! Great for wrapping gifts and cookies.

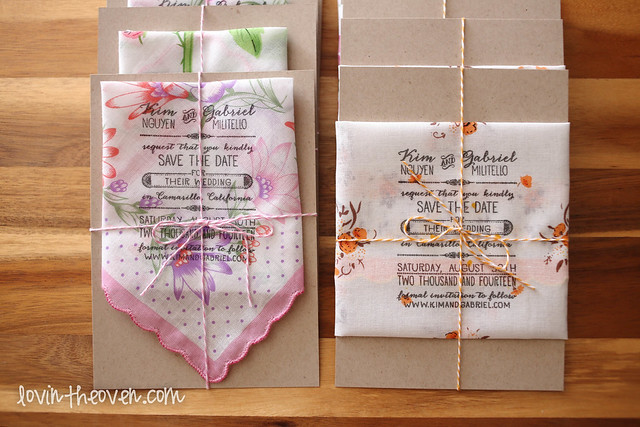
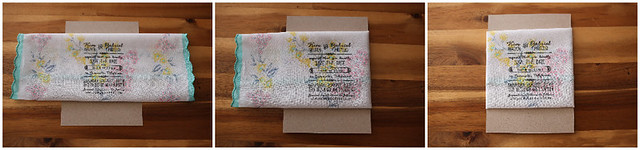
I bought 5″x7″ cardstock online as well from Paper and More. I found that they had the best price for the quantity that I needed. If you don’t need that many, it’s probably better to walk into your local crafts store with their 40% off coupon and get it there.

savethedates-23

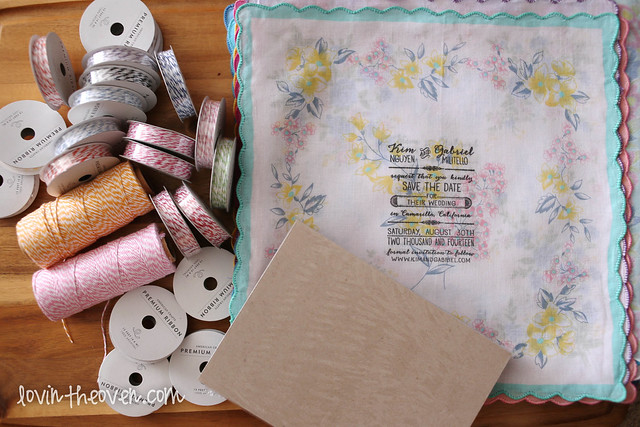
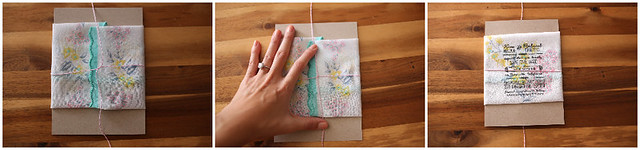
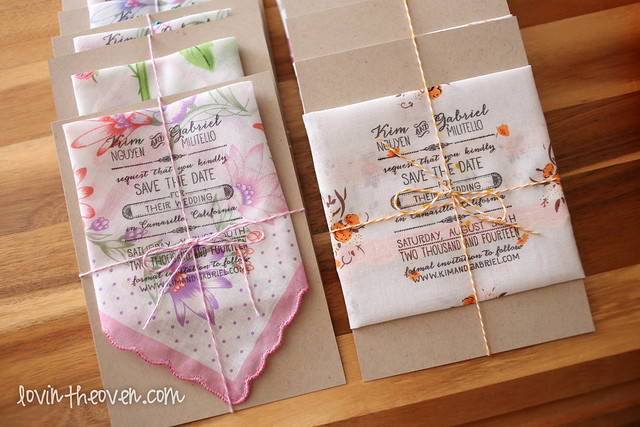
Here’s how I chose to wrap mine with a centered stamp:

FotoFlexer_Photo

FotoFlexer_Photo2

FotoFlexer_Photo3

FotoFlexer_Photo4

savethedates-31

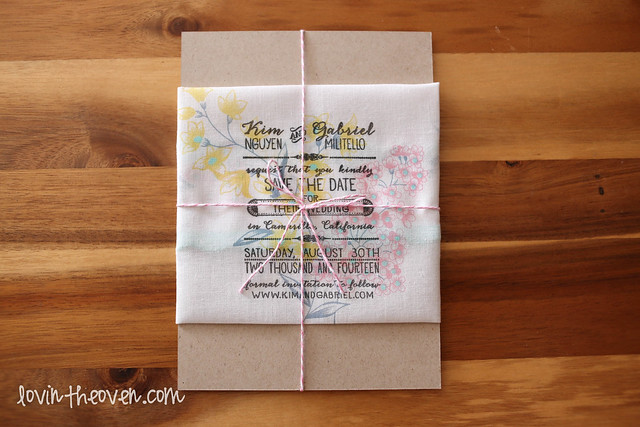
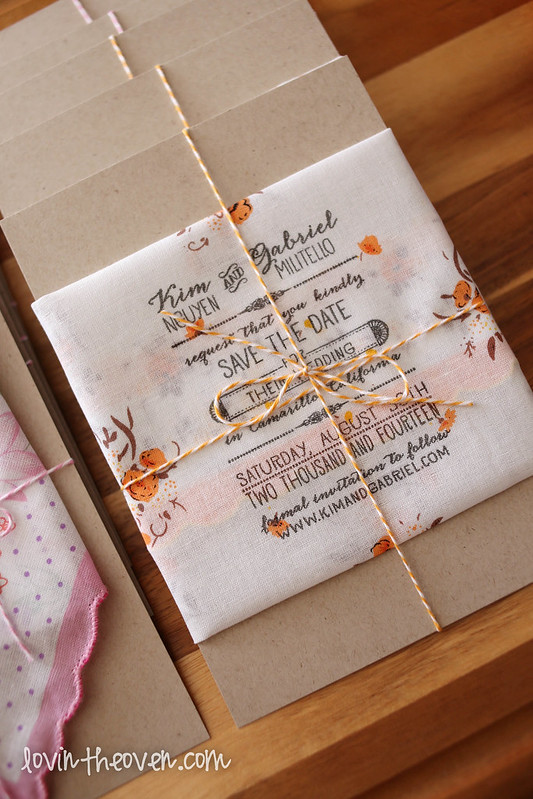
Easy peasy! Some of my hankies had designs in the middle, so I stamped them in one corner. I couldn’t fold them the same way, so they ended up looking like the ones on the left:

savethedates-28

It was a wonderful project and I’d highly recommend making your own save the dates at home! With some smart shopping, these didn’t break the bank and didn’t go over the weight for a regular postage when mailing. Score!

Oh, I used these envelopes for mailing. They safely packaged my precious hankies all the way to the recipient!

savethedates-30

As for the groom’s tasks during this project? He cut twine for me. I love that man.

1538401_247605745416647_1443198771_n

Filed Under: DIY, scrapbooking, tips

Andes Chocolate Mint Cookies

May 6, 2009 by kim 20 Comments


Is it just me or has time been FLYING lately? We’re already in 6th week! Goodness! Where does the time go? I graduate in 37 days!!! I just bought my cap and gown last week and my senioritis has officially kicked in… who am I kidding, I’ve had a bad case of senioritis ever since freshman year. My schedule has been so busy lately with midterm after midterm, baking & mailing out cookies, making my grad invites (see below), and spring cleaning! I actually got my boyfriend to vacuum and clean the bathroom today, which is probably one of my biggest accomplishments of my life. Haha.

Speaking of my boyfriend, his birthday just passed two days ago and I had the hardest time figuring out what to get him. I couldn’t bake him anything because he’s dieting (ridiculous, I know.. it’s like I’m dating a girl. Shhhh don’t tell him I said that) and he already has everything that he wants! I was going to buy him a Gucci wallet but then he wouldn’t appreciate it nearly as much as I would since he doesn’t know anything about brand names and can care less for them. He actually thinks it’s ridiculous, but of course being the girl that I am, I tend to differ. I have this die hard love for Chanel and have made quite the collection in the past couple of years. I long for the Chanel Cerf Tote and the Chanel Medallion Tote, which I think I’ll be selling a purse to get soon. Basically… he’ll never understand why I pay so much for a purse when I can get a decent working purse for less than ten bucks. Honestly, I have no idea either… all I know is that it makes me so gosh darn happy.

I ended up buying him some RVCA t shirts and shorts, and a button up t shirt. He needs to update his wardrobe and he hates shopping… so it all worked out nicely. I then took him to a restaurant called Buenos Aires Grill for dinner and it was delicious! One of the best salmon and sauteed vegetables plates that I’ve had (he had the rib eye steak with creamed spinach.. we’re big on our meat, can you tell?). I’m getting hungry just talking about it. Moving on…

This is actually one of the cookies I made to mail out this month, along with two others. This is my favorite cookie– it’s hard to eat just one! The cookie is not too sweet or too chocolatey; they’re soft and crumbly with the perfect amont of sweetness. I’m an avid fan of mint chocolate, so you should definitely give this recipe a try if you are, too! I’ve made this recipe before on my blog, found HERE. However, they were posted a million years ago and I didn’t post recipes back then. So here it is!

  • 3/4 cup butter
  • 1 1/2 cups packed brown sugar
  • 2 tablespoons water
  • 12 ounces semi-sweet chocolate chips (2 cups)
  • 2 large eggs
  • 2 1/2 cups AP flour
  • 1/2 teaspoon salt
  • 1 1/4 teaspoons baking soda
  • Andes mints candies, broken in half
  1. Heat oven to 350°F.
  2. Over low heat, combine butter, sugar and water. Heat until melted and add chocolate chips until partly melted. Remove from heat and stir. Pour into large mixing bowl. Let stand 10 minutes to cool slightly.
  3. Beat in eggs one at a time on high speed. Reduce mixer to low speed and add flour, salt and baking soda. Beat until well-blended.
  4. Chill one hour.
  5. Roll into balls, place two inches apart on parchment paper-lined baking sheets. Bake for 10 minutes.
  6. Place an Andes Mint half on top after taking them out from the oven. Allow to melt slightly and spread with a spoon.

I took a lot of time making/decorating my graduation invitations because I’m a grandma like that and love scrapbooking & stationary. It’s also way cheaper than buying announcements from the school.. I mean, $40 for 25 cards?! I would’ve needed 50, spending $80 total just on cards… and they’re not even pretty! They’re actually pretty bland… so no, thank you. I’d much rather make my own since they’re more personalized and unique that way. I just had to share with you how they turned out!

This is how it looked all put together, how it would look when taking it out of the envelope:

take off the band and it slowly opens up…

there’s the invitation placed inside!

and voi-la! my invite. 🙂 (don’t mind the blur, I took out my personal info)

It’s so close I can feel it!

Filed Under: candy, chocolate chip, cookies, craft, dessert, scrapbooking

Heath Bar Toffee Cookies

December 27, 2008 by kim 15 Comments


As if 12 days of cookies wasn’t enough for me, I had to keep on baking some more before the new year. I try to bake candies into my baked goods a lot, particularly the candies that I adore (HERE‘s a list of all the baked goods containing candy). I’m a total sucker for Heath Bar/Skor bars, along with my boyfriend, so I knew that I had to incorporate them into a cookie somehow. The result? A definite keeper. I underbaked my cookies, as usual, to keep them on the softer side. I also upped the brown sugar amount. My boyfriend loved these cookies the best out of everything that I’ve baked for the holidays. DO NOT skip the step on chilling the dough, otherwise your cookies will come out flat and spread! No one likes flat cookies, so refrigerate them! Overnight, if you have to. If you do, they’ll come out nice and fluffy like the ones pictured. 🙂

Ingredients

  • 2 1/2 cups all-purpose flour
  • 1 teaspoon salt
  • 1 teaspoon baking soda
  • 1 cup (2 sticks) unsalted butter, softened
  • 3/4 cup brown sugar
  • 3/4 cup white sugar
  • 2 eggs
  • 1 teaspoon vanilla
  • 3/4 cups chopped Heath Bar pieces (Four 1.4 ounce bars)
  • 1/2 bag of Heath toffee pieces
  • 1/2 cup chopped walnuts

Directions

1 Sift together the flour, salt, and baking soda. Set aside. In a separate bowl, combine Heath Bar pieces & tofee with chopped walnuts. Set aside.

2 Cream butter until fluffy. Add the sugar and continue to beat until light and fluffy (a couple minutes). Beat in eggs one at a time, and vanilla.

3 Alternatively mix in the Heath Bar mixture and the flour mixture, a third at a time, until well blended. Chill cookie dough for at least 45 minutes.

4 Preheat oven to 350°F. On cookie sheets lined with parchment paper or Silpat, spoon out the cookie dough in small 1-inch diameter balls. Place dough balls 3 inches away from each other on the cookie sheets.

5 Bake for 10-12 minutes, until the edges are just starting to brown. Remove from oven and let cool for a few minutes. Then transfer the cookies to a wire rack to cool completely.

*********************************************
I hope everyone had a great holiday and are preparing for the new year! I just have to blog about my Christmas because I’m still so excited about it. First off, I got my boyfriend tickets to the Lakers/Celtics game for his xmas present. Premiere seats! It was one of the most amazing games to be at and I had such a blast. My boyfriend is a die hard lakers fan, so he was ecstatic that he go to go. Plus, the Lakers won!! Boston sucks! (no offense to any celtics lovers) :]

Getting ready to go in our matching lakers shirts. Him with his favorite: Gasol and me with mine: Fisher.
Our view of the game from our seats. (We got there really early.. hence the reason why so many seats are empty)

Ok so the real thing I wanted to show you was this:
You’re probably wondering, “What the heck is that space looking thing?” Well, I’ve been wanting this for years and my boyfriend gave it to me for Christmas (along with Kurt Halsey art and something else coming in the mail, idk what yet.) 🙂 If you open it up, it looks like this..
It’s a Cricut machine! I know, best boyfriend ever, right?!? It’s basically an electronic die cut machine for scrapbooking. I’m seriously the happiest girl on earth and I’ll probably be scrapbooking for the next couple of days… there may be a delay on updating my baking blog. Haha, but don’t worry.. I’ll be back soon enough!

Filed Under: candy, cookies, dessert, nuts, scrapbooking

  • 1
  • 2
  • Next Page »

hi! i'm kim-- a girl mom, baker, blogger, and ex-flight attendant. welcome!

Search

  • Facebook
  • Instagram
  • Pinterest
  • Twitter

Categories

RODELLE-BABadge


Categories

  • Facebook
  • Instagram
  • Pinterest
  • Twitter

Copyright © 2026 · Foodie Pro Theme by Shay Bocks · Built on the Genesis Framework · Powered by WordPress