Lovin' From the Oven

  • Home
  • About Me
  • Recipes
  • FAQ
  • My Lifestyle Blog
  • Disclaimer

Day 1: Rainbow M&M Cookies

December 1, 2015 by kim 2 Comments

IMG_7910

It’s officially December! YESSSSSSS! Guess what that means… I get to kick off my 12 days of cookies! Follow along the rest of the month for the remaining 11 cookies. Hint: All the ones I made for Thanksgiving will be featured. Hooray for my favorite time of the year! We’re starting the countdown with a colorful and chewy cookie: Rainbow M&M Cookies.

They’re simple, easy to make, and will please the majority of the crowd. There’s no crazy ingredients that people won’t like. It’s just dough and M&M’s.

IMG_7900

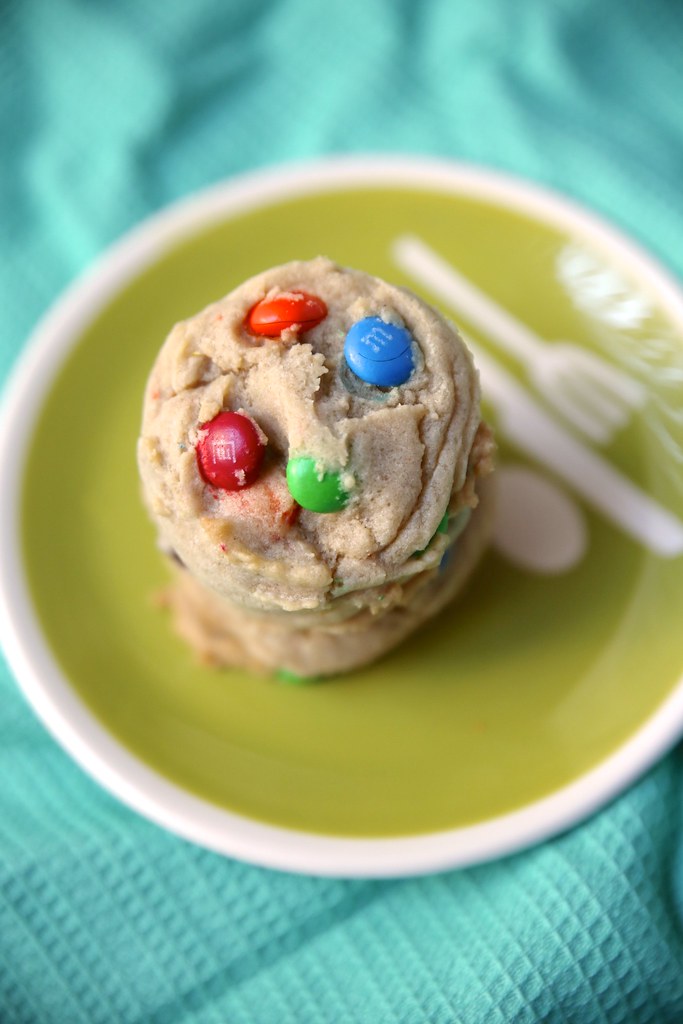
Sometimes, chocolate chip cookies need a little sprucing up. That’s where M&M’s come in. Children always pick the most colorful cookie when you ask them which one they want (same goes for cupcakes). They also make Christmas M&M’s this time of year, so you can easily substitute these for the red and green ones if you’re planning to make them for the holidays.

The refrigeration of the dough is absolutely necessary in this recipe. It has a ton of Rodelle vanilla extract, which really meshes into the dough while it’s chilling. Let the dough sit! It’s even better if it’s overnight.

IMG_7895

These cookies are soft as can be, chewy, and have just the right amount of sweetness. The chocolate to cookie ratio is also spot on, which I can certainly appreciate. If you ask me, mini M&M’s are much better for baking in cookies. I like biting into little chunks of chocolate, not humongous bites of it. That’s just me, though. Some people like a 50/50 ratio of chocolate to dough. Add more M&M’s if you wish! Heck, you can even mix in some regular chocolate chips or chocolate chunks. I won’t tell.

Recipe from Sally’s Baking Addiction.

Print
Rainbow M&M Cookies

Ingredients

  • 2 cups + 2 tablespoons all-purpose flour
  • 1/2 teaspoons baking soda
  • 1 teaspoon cornstarch
  • 3/4 cup (1.5 sticks) salted butter, softened
  • 1 cup light brown sugar
  • 1/2 cup sugar
  • 1 egg, at room temperature
  • 1 egg yolk, at room temperature
  • 2 teaspoons Rodelle vanilla extract
  • 1 cup mini M&Ms

Directions

  1. Preheat oven to 325F degrees.
  2. Cream together the butter and both sugars. Mix in the egg, egg yolk, and vanilla.
  3. Gradually stir in the flour, baking soda, and cornstarch until just combined.
  4. Fold in the mini M&Ms. Cover and refrigerate dough for at least an hour.
  5. Drop by rounded tablespoonfuls onto baking sheet and press a few more M&Ms onto the tops for decoration.
  6. Bake for 8-10 minutes.
3.1
https://lovintheoven.com/rainbow-mm-cookies/

Filed Under: candy, cookies, dessert

Big Soft M&M Cookies

August 27, 2015 by kim Leave a Comment

IMG_5045

Okay, so these are called “Big Soft M&M Cookies,” but I didn’t make them so big. I actually made them a little on the smaller side because I wanted my M&M’s to be a good chunk of the cookie. Every kitchen should always have M&M’s on hand because they’re so versatile! I stock up when they go on sale (the ones pictured are Super Bowl M&M’s. Can you even tell after baking them?).IMG_5047These cookies taste exactly as they look. I hate when I bite into a deceiving cookie. You think it’s going to be soft and after your first nibble, the cookie is crumbling into a million pieces like a Nature Valley bar. The. Worst. Or how about when you pick up a cookie that looks like oatmeal raisin, only to find out there’s coconut and chocolate chips instead? I don’t like surprises when it comes to my dessert. I want everything to taste exactly how it looks.

IMG_5049

That’s why these cookies and I get along so well. No tricksters here. Just a good ol’ soft, M&M cookie. IMG_5052

On an unrelated note, I’m officially out of my first trimester now. It basically still feels the same. I did a little recap on my other blog HERE.

IMG_5059

This delicious recipe from Punch of Yum

Print
Big Soft M&M Cookies

Ingredients

  • 1 cup packed brown sugar
  • ½ cup white sugar
  • 1 cup shortening
  • 2 eggs
  • 1 tablespoon vanilla
  • 2½ cups flour (+ 2-3 tablespoons)
  • 1 teaspoon baking soda
  • 1 teaspoon salt
  • 1½ cups M&M's

Directions

  1. Preheat the oven to 350 degrees. Line baking sheets with silicone mats.
  2. Cream together both sugars, shortening, eggs, and vanilla.
  3. Gradually mix in the 2½ cups flour, baking soda, and salt until just combined. If the dough is still wet, add in the tablespoons of flour until the dough is no longer sticky. Stir the M&M's into the dough.
  4. Use a large cookie scoop to place balls of dough 2 inches apart onto baking sheet.
  5. Bake for 8-10 minutes.
3.1
https://lovintheoven.com/big-soft-mm-cookies/

Filed Under: candy, cookies, dessert

Chocolate Peanut Butter Cup Cookies

June 15, 2015 by kim 2 Comments

IMG_4609

There are a lot of things to do living in Los Angeles that I still haven’t gotten around to. Last night, I was able to cross another “to do” off of my list. My DH took me to the Zelda symphony at the Disney Concert Music Hall downtown.

IMG_4621

Obviously, it was more for him than me since I never played Zelda growing up and he played every single game. I went as his plus one because that’s what spouses do. We support each other’s interests. My DH reminded me of the time he went with me to a Mae concert when we first started dating. He had no idea who they were and didn’t know any of the songs, but he went for me.

IMG_4583

First of all, the outside of the music hall is impressive. No matter how many times you see it, it still blows your breath away. It’s mesmerizing. Secondly, I’ve never seen so many…. unique people in my life. I’m talking about die-hard Legend of Zelda fans. Some even came in full costumes! I even saw a girl with a full on Zelda tattoo on her back. That’s intense.

IMG_4574

I guess that’s an obvious for most people, but I don’t know! It’s not part of my world so I’m oblivious. I don’t understand why people would stand in line for an hour to buy a ten dollar program. TEN DOLLARS for a little paper book? My DH was totally one of those people, btw.

IMG_4594

But the overall experience was fun. The venue itself is very intimate and smaller than I expected. I would say that I enjoyed it, even though I didn’t know any of the songs that they played. Would I go again? Only if it was for something that I was totally into. It makes a difference when you know the songs.

IMG_4603

I loved these cookies. I’m normally not a fan of peanut butter and chocolate, but the texture and balance in these did it for me.

IMG_4605

Not only that, but they’re beautiful! I’d call this a perfect cookie. IMG_4619

Recipe from Annie Eats

Print
Chocolate Peanut Butter Cup Cookies

Ingredients

  • 1½ cups plus 2 tbsp. all-purpose flour
  • 6 tbsp. Dutch-process cocoa (I use Rodelle)
  • ½ tsp. baking soda
  • ½ tsp. coarse salt
  • ¾ stick (6 tbsp.) unsalted butter, at room temperature
  • ¼ cup plus 2 tbsp. creamy peanut butter
  • ½ cup sugar
  • ½ cup brown sugar
  • 1 large egg
  • 2 tsp. vanilla extract
  • 2 tbsp. milk
  • 1 1/2 cups coarsely chopped peanut butter cups, divided

Directions

  1. Preheat oven to 350 degrees F.
  2. Cream together the butter, peanut butter, and both sugars. Mix in the egg, vanilla extract, and milk.
  3. Gradually stir in the flour, cocoa, baking soda, and salt until combined.
  4. Mix in 1 cup chopped peanut butter cups by hand.
  5. Form into large 2-tablespoon sized balls and place onto baking sheet. Gently press the remaining 1/2 cup onto the top of each dough ball.
  6. Bake for 12-14 minutes.
3.1
https://lovintheoven.com/chocolate-peanut-butter-cup-cookies/

Filed Under: candy, cocoa, cookies, dessert, peanut butter/peanuts

  • « Previous Page
  • 1
  • …
  • 5
  • 6
  • 7
  • 8
  • 9
  • …
  • 35
  • Next Page »

hi! i'm kim-- a girl mom, baker, blogger, and ex-flight attendant. welcome!

Search

  • Facebook
  • Instagram
  • Pinterest
  • Twitter

Categories

RODELLE-BABadge


Categories

  • Facebook
  • Instagram
  • Pinterest
  • Twitter

Copyright © 2026 · Foodie Pro Theme by Shay Bocks · Built on the Genesis Framework · Powered by WordPress