Lovin' From the Oven

  • Home
  • About Me
  • Recipes
  • FAQ
  • My Lifestyle Blog
  • Disclaimer

Mini Apple Pies

October 31, 2013 by kim 1 Comment

baking-31

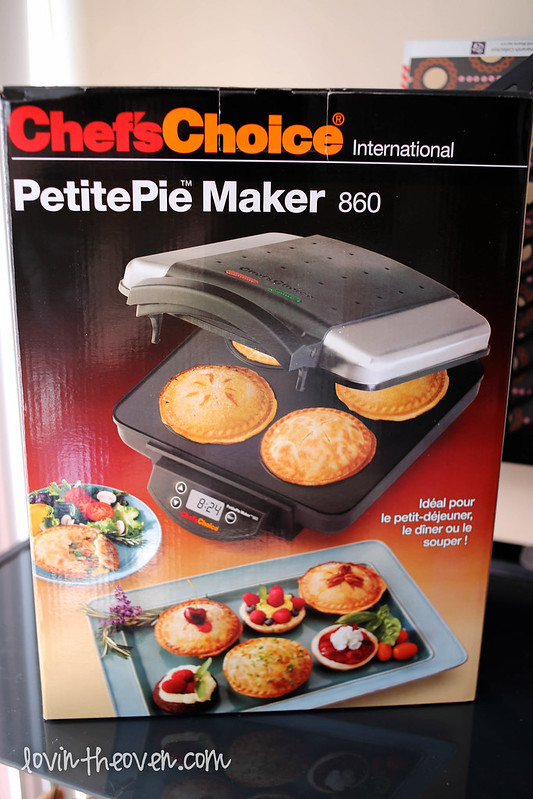
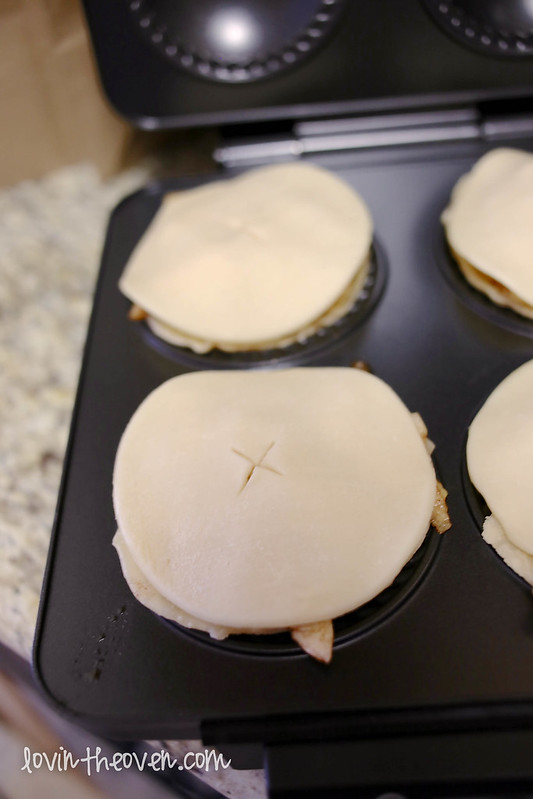
Normally, I’m not much of a pie maker because of all the time it takes to make one. Not only that, but it’s such a hassle to eat one. You need a knife, forks, plates, plenty of napkins, and lots of patience to not make a huge mess. That’s why when Chef’s Choice asked if I’d like to try their PetitePie™ Maker Model 860 by EdgeCraft, I was more than thrilled to give it a shot. It makes four 4″ individual pies with “Baking” and “Ready” LED lights to let you know what’s going on inside.

baking-21

Baking individual pies would be a lot easier than making one huge one. They’re also a lot easier to eat; People can just pick up one and put it on their plate. There’s no portioning or cutting involved.

baking-23

baking-22

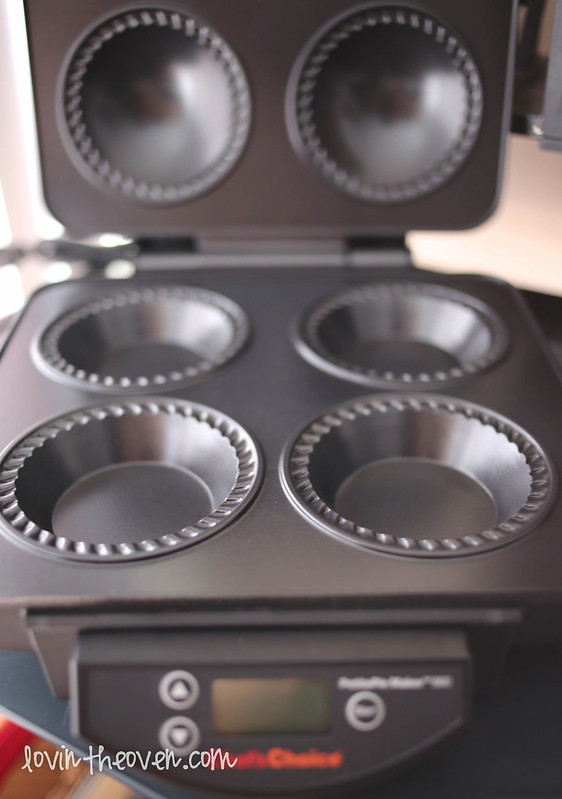
Each pie mold has a built in crimper that will seal your pie together, making your job a lot easier. It’s all about efficiency, folks.

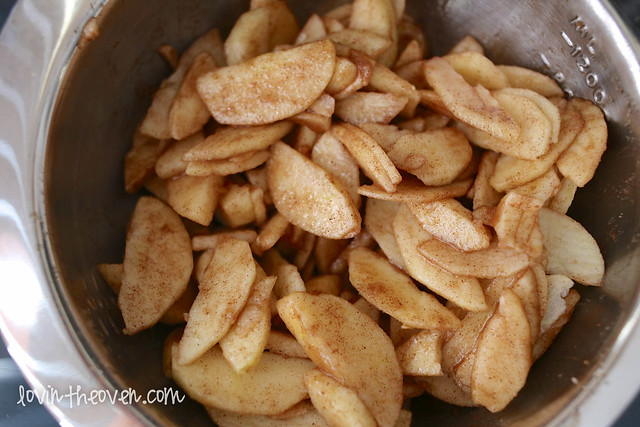
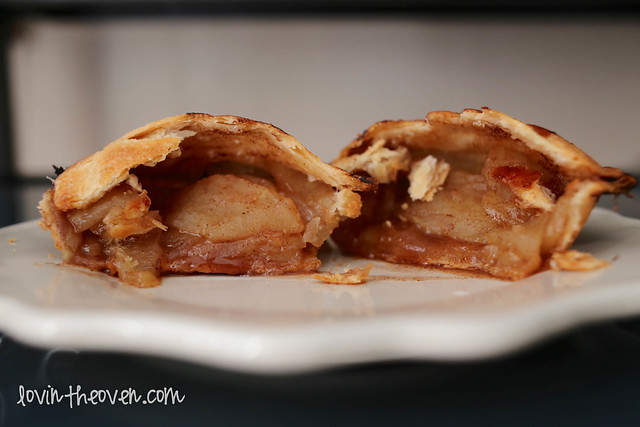
Since I had plenty of Honeycrisp apples to use, I decided to go with a classic and make mini apple pies.

baking-24

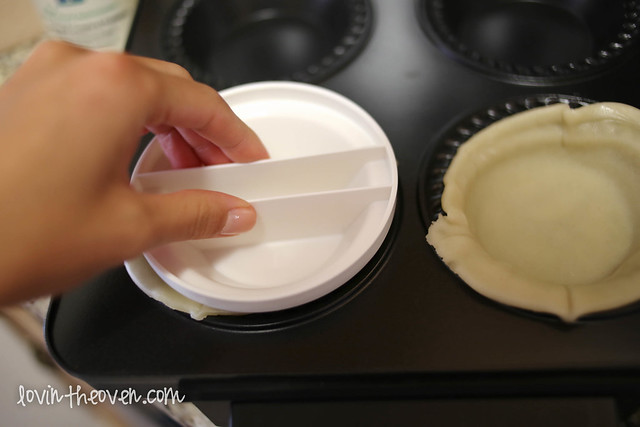
The machine is kind of brilliant. It comes with a multi-use pie cutter that will cut both the bottom and top shapes of the pie crust for you. There’s no guessing involved. Then, this other gadget presses your pastry into the mold so you get the perfect fit without burning your fingers.

baking-25

baking-26

This was my first time ever using a machine like this, so I tried to follow the directions in their little booklet as much as possible.

baking-27

baking-28

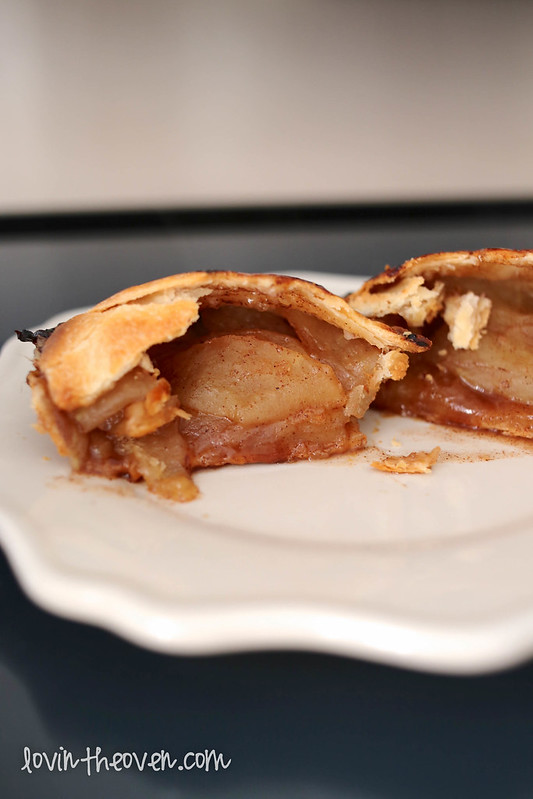
On my first run, I burnt the edges of the pies a little bit. I think I filled them with too much apple mixture liquid and baked them for too long. The instructions said to bake the pie per the directions on the recipe, but the machine cooks it a lot faster. It makes sense… I mean, would you bake mini loaves for as long as you would a big loaf? Absolutely not. The little ones always cook faster.

Even though I hardly make pies, every baker knows to score the top of a pie crust! Actually, looking back on it, maybe  I shouldn’t have done that in the machine. That was where apple liquid came out of and burnt on the sides.

baking-29

Despite the mess, it was a charm cleaning up. Everything slid right off of the non-stick surface, including the burnt pieces. I was amazed at how easy it was to wipe up.

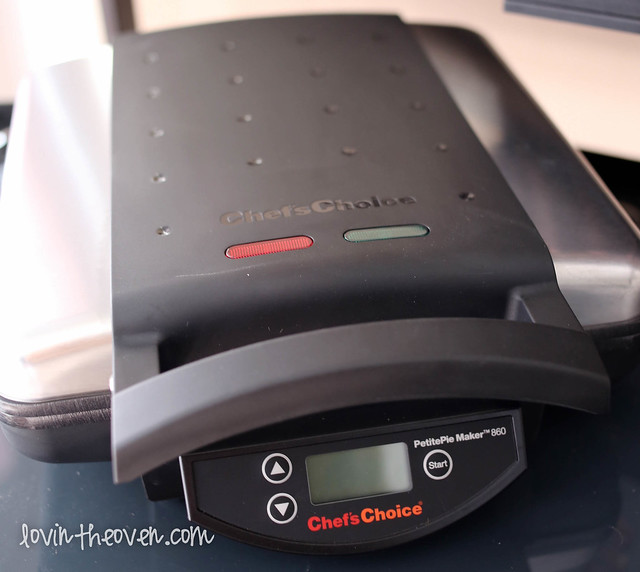
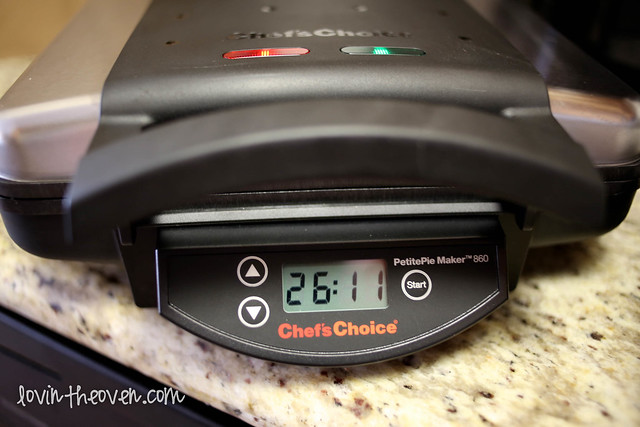
I loved how simple the interface of the PetitePie maker is. There are only three buttons: two to adjust the cooking time and the third to start/pause. That’s it.

baking-30

I will definitely be taking all my notes and using them again on my next round. Perhaps I’ll try making a pie without a top crust and see how that goes. You could even use it to make savory pies instead of sweet. The possibilities are endless!

You can find the new Chef’sChoice® PetitePie™ Maker Model 860 at major department stores, mail-order catalogs, and specialty stores for $79.99.

As for this apple pie recipe, it’s simple. Toss some apples with sugar and cinnamon, throw them in a pie crust, and let it bake.

Print
Mini Apple Pies

Ingredients

  • 1 package pie crust dough
  • 4 small apples (I used honeycrisp), thinly sliced
  • 1/4 cup brown sugar
  • 1/4 cup white sugar
  • 2 tsp cinnamon

Directions

  1. Preheat your PetitePie Maker as directed.
  2. In a mixing bowl, toss the apples with the sugars and cinnamon. Set aside.
  3. Cut out the bottom piece of the pie dough and gently press it into the pan. Cut out the tops as well.
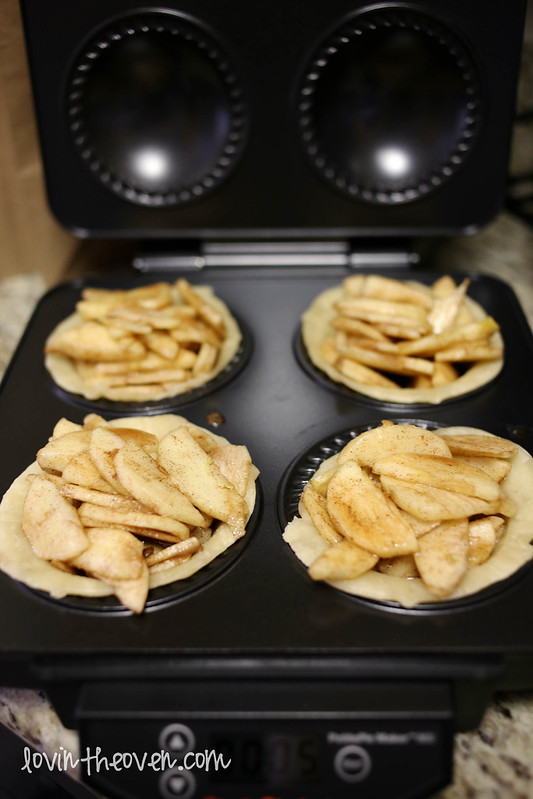
  4. Fill each mold with about 1/2 cup apples mixture. Cover with the remaining pie dough. Score the top.
  5. Tightly close the PetitePie Maker and set the timer for 30 minutes.
3.1
https://lovintheoven.com/mini-apple-pies/

I was sent product to review, but the opinions expressed are my own.

Filed Under: apple, dessert, pie

Aunt Val’s Caramel

September 13, 2013 by kim 5 Comments

caramel-5

I have about a million pictures to upload from my camera right now and I feel like there’s never enough hours in a day to do everything. I had all these plans for yesterday afternoon to look at venues, but work didn’t exactly go my way and I was stuck working. Go figure.

caramel caramel-2 caramel-3

But hey, that’s my problem, not yours. So let’s talk about some caramel. Most of the recipes that I find for caramel involve a candy thermometer, which I don’t have. This particular recipe didn’t need one and it’s a soft, dip-able caramel that I used to eat in my childhood. Do you guys remember that little white tub of caramel that was always conveniently placed next to the apples in the grocery store? I always begged my mom to buy it, and she would give in one out of a hundred times. I’d consider that a win win situation for me.

caramel-6

After the caramel finished finished cooking, I couldn’t help but mix it with my other favorite snack: popcorn. All I did was pop some plain popcorn without seasonings in the microwave and pour the warm caramel on top while constantly stirring. The only issue I had was that the popcorn got stale pretty quickly. Anyone know how to fix that? How does the caramel popcorn sold in stores stay so crunchy? Maybe this soft caramel wasn’t meant for coating popcorn.

caramel-7

Oh well, at least it still looked pretty.

caramel-8 caramel-9

Also for some words of advice, remember to remove the unpopped kernals from the popcorn prior to mixing in the caramel. If not, you might be breaking someone’s teeth real soon! Recipe from Pretty Providence

Print
Aunt Val’s Caramel

Ingredients

  • 1 C. Brown Sugar
  • 1/2 cup butter
  • 1 C. light Karo syrup
  • 1 can sweetened condensed milk

Directions

  1. All you do is melt all the ingredients in a saucepan over medium-low heat. Once caramel is boiling cook for approximately two minutes stirring constantly.
3.1
https://lovintheoven.com/aunt-vals-caramel/

Of course, I saved some of the caramel for apple dipping, which was much better than the popcorn.

caramel-10 caramel-11

The caramel can be easily stored in an air tight container in the refrigerator for a couple of weeks (if it even lasts that long!).

caramel-12 caramel-14

Filed Under: apple, dessert, snack

Baked Apple Walnut Oatmeal

February 26, 2013 by kim 5 Comments

oatmealbars-7

It’s that time of the year again, folks; It’s girl scout season! That means plenty of cookies to buy and devour. You’re either lucky or unlucky when it comes to finding them. When you’re most craving some Samoas, there won’t be any girl scout in sight. You’ll drive to all of your Targets, grocery stores, and school campuses to see if there’s a table stationed anywhere, but you’ll always drive away disappointed. Welcome to my life.

oatmealbars-2

Lucky for me, I have a niece that just started her first year in girl scouts. I have to be the good auntie and buy boxes from her, of course! That makes my life so much easier because I don’t have to walk around stalking troops. Not that that has stopped us from buying boxes from anyone else. My DB came home from school with a box of Thin Mints that we could rip open immediately. No waiting necessary.

oatmealbars-3

Not only that, but working at the Y has its perks. There are at least three kids in every grade that are determined to win that mini Ipad by selling 3,000 boxes.

By the way, that’s ridiculous. How can one child sell 3,000 boxes?! They probably know 30 people in their lives. That means everyone they know would have to buy 100 boxes from them. That’s like when I was in elementary school and we tried to sell rolls of wrapping paper. They always enticed us by having the “money hurricane machine.” Thinking back on it, I have no idea what the big prize was. Now, they have Ipods, Ipads, Shuffles, and all those electronics, but that certainly didn’t exist when I was in grade school. Does anyone remember?

oatmealbars-5

Either way, I never sold anything. My parents would buy two rolls of wrapping paper so I wouldn’t feel so bad and then call it a day. I never walked door to door asking neighbors to buy from my catalog. My parents would kill me if I ever did that.

oatmealbars-4

Here’s an easy breakfast meal that you can make for the week. Just store the portion you don’t eat in the fridge and warm it in the microwave whenever you want it. You can also make this bake for guests. It’s nutritious, has a pleasant cinnamon spice taste to wake you up, and can be served alongside eggs if you want just a little sweet treat to finish your breakfast.

oatmealbars-8

The oatmeal is soft without being gooey or mushy. If you want it for dessert, serve a piece with a scoop of ice cream. I promise I won’t tell anyone. 🙂 From Sweet Pea’s Kitchen.

Print
Baked Apple Walnut Oatmeal

Ingredients

  • 2 cups uncooked quick-cooking oats
  • 1/2 cup packed brown sugar
  • 1 teaspoon cinnamon
  • 1/3 cup cranberries
  • 1 tablespoon chopped walnuts
  • 1 teaspoon baking powder
  • 1 1/2 cups fat-free milk
  • 1 teaspoon vanilla extract
  • 1 apple, grated
  • 2 tablespoons butter, melted
  • 1 large egg, beaten
  • Cooking spray

Directions

  1. Preheat oven to 375° F. Spray an 8x8 inch pan with cooking spray.
  2. In a mixing bowl, combine oats, brown sugar, cinnamon, cranberries, walnuts, and baking powder.
  3. Gradually stir in the milk, vanilla, grated apple, butter, and egg and mix until well combined.
  4. Pour into prepared pan, leveling it out.
  5. Bake for 20 minutes and serve warm.
3.1
https://lovintheoven.com/baked-apple-walnut-oatmeal/

Filed Under: apple, berry, breakfast, nuts, oatmeal

  • « Previous Page
  • 1
  • 2
  • 3
  • 4
  • 5
  • …
  • 9
  • Next Page »

hi! i'm kim-- a girl mom, baker, blogger, and ex-flight attendant. welcome!

Search

  • Facebook
  • Instagram
  • Pinterest
  • Twitter

Categories

RODELLE-BABadge


Categories

  • Facebook
  • Instagram
  • Pinterest
  • Twitter

Copyright © 2026 · Foodie Pro Theme by Shay Bocks · Built on the Genesis Framework · Powered by WordPress