Lovin' From the Oven

  • Home
  • About Me
  • Recipes
  • FAQ
  • My Lifestyle Blog
  • Disclaimer

Dark Chocolate & Almond Cookies

August 5, 2010 by kim 8 Comments


When I was little, I used to be allergic to chocolate. Crazy, right? How could anyone be allergic to such a divine substance? Whenever I ate chocolate, I got a nosebleed momentarily after. It was weird because all of my siblings were the same way; chocolate equals nosebleed. Of course, that never stopped us from eating Crunch ice cream bars or nibbling a bit of chocolate every now and then. It just meant that we had to be prepared later on with wads of tissues and a comfortable place to sit down.

I actually got so many nosebleeds in elementary school that I became BFFs with the nurse, Barbara. She was the sweetest little lady and knew me by name. She always knew to grab the ice pack and tons of tissues the moment she saw me walking through the door. Why did this happen? I’ll never know. All I know is that I eventually grew out of it and was able to eat all the chocolate in the world without a worry. Thank goodness!

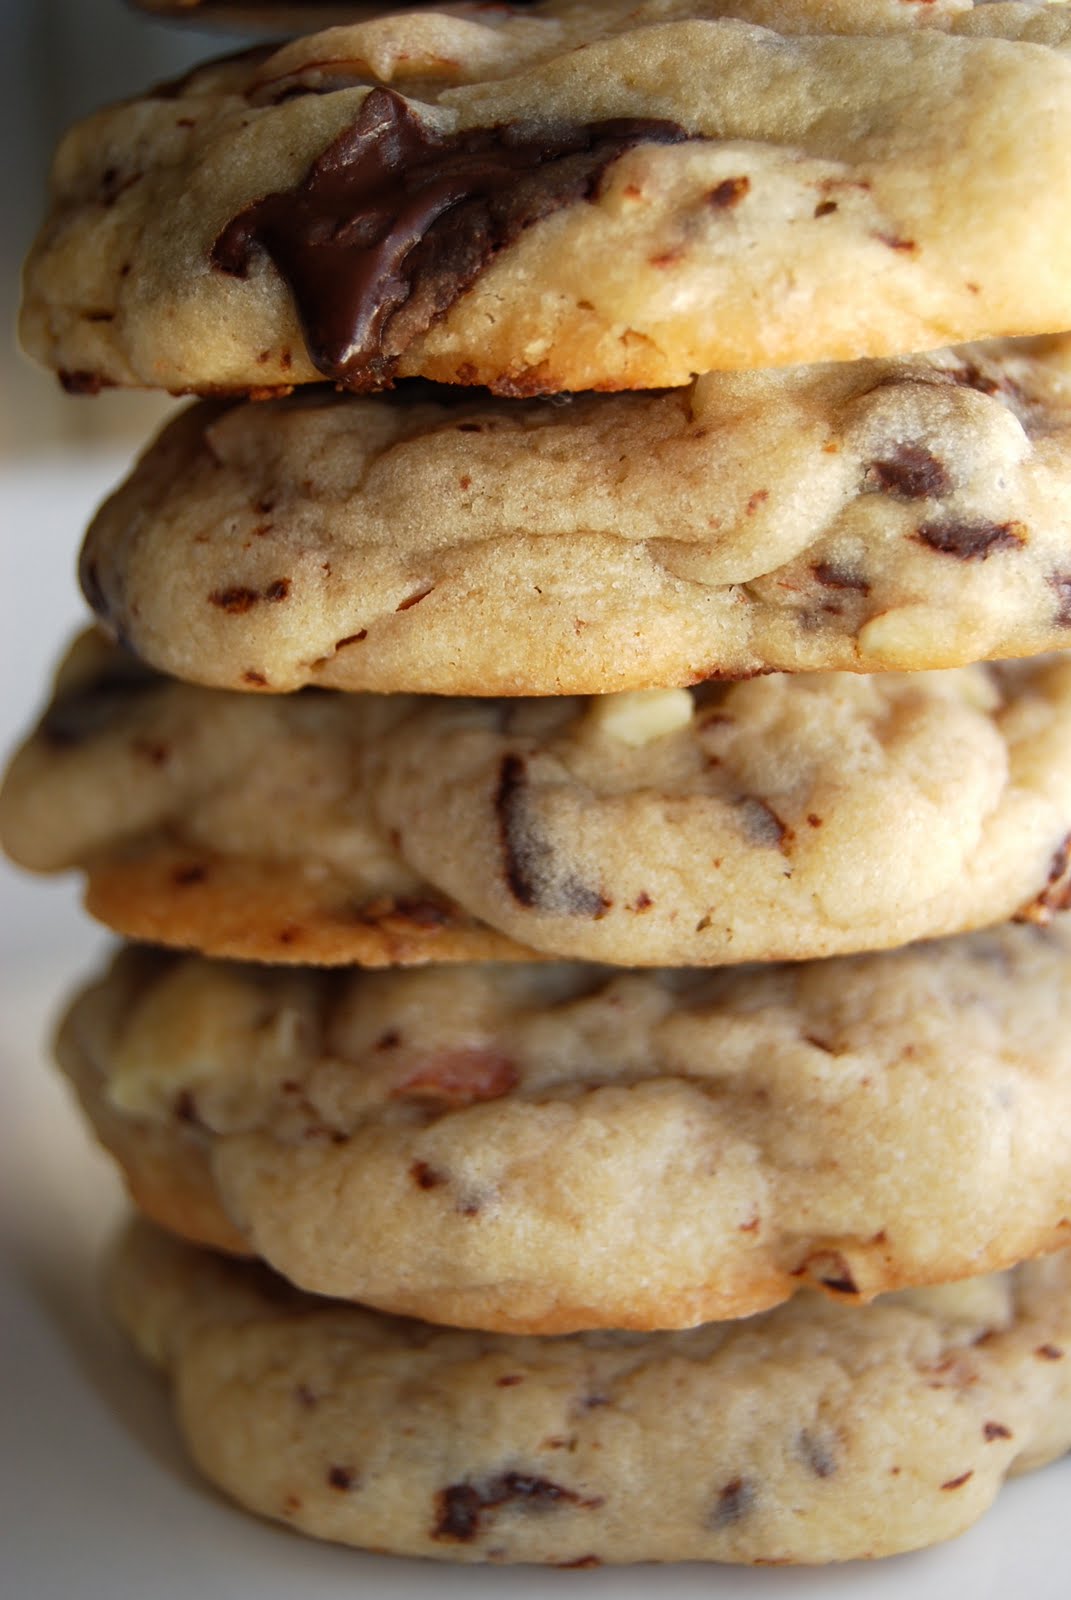
This recipe is adapted from pixie baker and I’d say it’s a good base for a cookie. I’ve come to the conclusion that baking cookies with bread flour is my favorite way to make cookies. It always results in a firm and chewy cookie. I used 72% dark chocolate, but that may have been a bit much for some people, so feel free to use whatever kind of chocolate you want!

Ingredients

  • 1 cup (two sticks) unsalted butter, at room temp.
  • 3/4 cup granulated sugar
  • 3/4 cup brown sugar
  • 2 eggs, beaten
  • 2 teaspoon vanilla extract
  • 3 cups Bread flour
  • 3/4 teaspoon of salt
  • 1 teaspoon baking Soda
  • 1 1/3 cups dark or bittersweet chocolate chips (I used Trader Joe’s Pound Plus Dark Chocolate Bar)
  • 1 to 1 1/3 cups coarsely chopped almonds
  1. In a large bowl, cream butter and both sugars just until they come together. Add the egg and vanilla extract, beat just until incorporated. In a seperate medium-sized bowl, whisk together the flour, salt and baking soda. When thoroughly mixed, add to batter and stir just until blended. Stir in chocolate chips and nuts. The dough should be neither sticky nor dry. Cover the bowl and refrigerate the dough for at least two hours.
  2. Preheat oven to 350.
  3. Form the cookie dough into balls.
  4. Place the cookies on an ungreased insulated cookie sheet or an upside down rimmed cookie sheet. Bake for 12-15 minutes. Let cool on cookie sheet for five minutes before removing.

A Pile of Style
Facebook Fan Page
Ask me anything on Formspring

Filed Under: chocolate chip, cookies, dessert, nuts

Cranberry Bliss Bars

July 30, 2010 by kim 4 Comments


Now, for something that’s even prettier than these bars to look at.. crystallized ginger!:

just look at how the sugar sparkles..

but these don’t look too bad, either. 🙂


I have to say that as a blogger, there’s nothing more I love to do than to blog. I get to share a little snippet of my life by documenting it however I wish. All day, I think about what subject I can blog about next. What pictures can I post? How much posting is too much and how much is too little? What do my readers want to see?

So naturally, it only makes sense that I have so many side projects that I want to do. I want to have a blog for my scrapbooking, for my card making, for my photography, for my food, for my clothes, for my dog, for my silly family, for how my sister and I should have our own reality tv show, etc. Sometimes, I actually get enough motivation to start another blog (see HERE), but they’re never as successful as my main one (which is this one, of course!).

Which leads me to this… some of you may know that I had a style blog with my sister, but she never updated so I deleted it. For the past two days, I’ve been putting my efforts into a new blog, which I’m happy to introduce to you today. This is my very own personal style blog:
A Pile of Style
No more depending on anyone else to update.. just me (and my DB to take the photos)! So if you’re ever bored, feel free to venture over there. I know I won’t be able to update daily, but I hope to update just as much as I do here. Here’s to hoping!

These bars are supposed to be a knockoff of Starbuck’s Cranberry Bliss Bars, but I’ve actually never even tried theirs so I can’t compare. They were very flavorful and the frosting was light enough to not overwhelm the bar, but strong enough complement and tone down the ginger flavor. Next time I make them, I would definitely cut down the amount of ginger used. They’d be the perfect treat for Christmas, just look at how pretty they are! This recipe comes slightly adapted from the Wine Imbiber.

  • 2 sticks (1 cup) unsalted butter, softened
  • 1–1/4 cups brown sugar, packed
  • 3 large eggs
  • 1 teaspoon vanilla
  • 1–1/2 cups all purpose flour
  • 1 teaspoon ground ginger
  • 1/4 teaspoon salt
  • 1/4 cup plus 2 tablespoons Dried Cranberries, minced
  • 1/4 cup plus 1/4–1/3 cup White Chocolate Chips
  • 1/4 cup Crystallized Ginger Slices, minced
  • 4 ounces cream cheese, softened
  • 2 tablespoons unsalted butter, softened
  • 1 teaspoon vanilla
  • 1–1/2 cups powdered sugar
  1. Preheat oven to 350° F. Lightly grease a 9×13 pan or line it with parchment paper for easy removal.
  2. Beat together the butter and sugar. Mix in the eggs and vanilla.
  3. Add the flour, ginger, and salt into the batter. Beat well. Lightly stir in the 1/4 cup cranberries, 1/4 cup chocolate chips and minced ginger.
  4. Pour the batter into the pan and bake for about 20-25 minutes, depending on your oven.
  5. Make the frosting by beating the cream cheese, butter, and vanilla until smooth. Slowly add the powdered sugar and beat until you reach the desired consistency.
  6. Spread the frosting onto the cooled cake.
  7. Cut the frosted cake as desired into bars or triangles. Sprinkle the remaining minced cranberries and chocolate chips on the top.

The Darling Foodie
Facebook Fan Page
Ask me anything on Formspring

Filed Under: bars/brownies, berry, dessert, frosting, white chocolate

Dulce de Leche Cheesecake Bars

July 27, 2010 by kim 9 Comments


I can’t stop watching 500 Days of Summer. I’ve already seen this movie before and have always loved it, but for some reason this week, I REALLY love it. I do have to say that my ultimate favorite scene of this movie is when the boy gets lucky and does a whole little pitter patter to Hall & Oates “You Make My Dreams Come True.” I’ve secretly always wanted to break out in a choreographed dance in public slash wish I witnessed one. I’ve watched this movie three days in a row and have it playing in the background while I’m scrapbooking, taking photos of food, or blogging (like right now). Maybe because this movie is so real.. maybe because I can relate to it so well… maybe because Joseph Gordon Levitt is so gosh darn adorable.. maybe because I love love stories, whether they’re love stories or stories about love. Either way, I just can’t get enough of it.

It reminds me of all the cute awkwardness of when relationships start (which I kinda miss a little bit after being in a relationship for +two years) and that no matter what, life can always throw you curveballs when you least expect it.

These cheesecake bars were an example of the curveball that life threw at me when I definitely did not need or expect it. I went to the store and bought all the ingredients necessary.. or so I thought. When I got home and finished making the crust and the cheesecake, I realized that I didn’t buy a can of dulce de leche, but rather, a disguised can of condensed milk. Since it was much too late to go back to the grocery store and I had no time to, I decided I’d try to conquer this problem by making my own dulce de leche.

Keep in mind that I started baking around 9PM and started the dulce de leche around 9:30PM. I chose the stovetop method, which was a disaster because you really need like six hours to make it right (or so the DB’s grandma tells me) and I only had three. My dulce de leche turned out to really just be a thicker condensed milk and never achieved the right color or consistency. I wish I bought the right can and saved all this time! 🙁

Anyways, this recipe is from Handle the Heat. Make sure to actually buy dulce de leche or have plenty of time to make your own! They would’ve turned out amazing, otherwise. Perhaps a little on the sweet side. Another note, for the crust, use regular graham crackers instead of cinnamon ones (like I always do). They take away from the flavor!

Crust

  • Nonstick vegetable oil spray
  • 2 1/4 cups finely ground graham crackers (from about 17 whole graham crackers)
  • 2 tablespoons sugar
  • 1/4 teaspoon ground cinnamon
  • 10 tablespoons (1 1/4 sticks) unsalted butter, melted

Filling

  • 3 8-ounce packages cream cheese, room temperature
  • 1 cup sugar
  • 3 large eggs
  • 1/2 cup purchased dulce de leche*
  • 2 teaspoons vanilla extract

Glaze

  • 2/3 cup purchased dulce de leche
  • 3 tablespoons (or more) heavy whipping cream
  • Fleur de Sel

*A thick, sweet sauce made from caramelized sugar in milk or from sweetened condensed milk; available at some supermarkets and specialty foods stores and at Latin markets.

1. Preheat oven to 350°F. Coat 13x9x2-inch metal baking pan with nonstick spray. Mix graham cracker crumbs, sugar, and cinnamon in medium bowl. Add melted butter; stir until coated. Transfer crumb mixture to pan. Press evenly onto bottom of pan. Bake until crust is light golden, about 10 minutes. Cool completely on rack.

2. Blend cream cheese and sugar in processor until smooth and creamy, about 1 minute, stopping occasionally to scrape down sides of bowl. Add eggs 1 at a time, processing 3 to 5 seconds to blend between additions. Add dulce de leche and vanilla; process until blended, about 10 seconds. Spread batter evenly over cooled crust. Bake until just set in center and edges are puffed and slightly cracked, about 38 minutes. Transfer to rack; cool completely.

3. Heat dulce de leche and 3 tablespoons cream in microwave-safe bowl in 10-second intervals until melted. Stir to blend, adding more cream by teaspoonfuls if too thick to pour (amount of cream needed will depend on brand of dulce de leche). Pour glaze over cooled cheesecake; spread evenly. Refrigerate until chilled, about 1 hour (glaze will not be firm). DO AHEAD Can be made 2 days ahead. Cover; chill.

4. Cut cheesecake lengthwise with a sharp knife or scraper into 4 strips, then crosswise into 6 strips, forming 24 bars. For cleaner squares, dip knife in hot water then wipe off excess water before each cut. Sprinkle bars with fleur de sel.

The Darling Foodie
Facebook Fan Page
Ask me anything on Formspring

Filed Under: bars/brownies, cheesecake, dessert

  • « Previous Page
  • 1
  • …
  • 224
  • 225
  • 226
  • 227
  • 228
  • …
  • 289
  • Next Page »

hi! i'm kim-- a girl mom, baker, blogger, and ex-flight attendant. welcome!

Search

  • Facebook
  • Instagram
  • Pinterest
  • Twitter

Categories

RODELLE-BABadge


Categories

  • Facebook
  • Instagram
  • Pinterest
  • Twitter

Copyright © 2026 · Foodie Pro Theme by Shay Bocks · Built on the Genesis Framework · Powered by WordPress