Lovin' From the Oven

  • Home
  • About Me
  • Recipes
  • FAQ
  • My Lifestyle Blog
  • Disclaimer

Apple Streusel Bars slash Send Me to NY for the Martha Stewart Show, please? :)

April 22, 2010 by kim 68 Comments


Okay before I go on with the pictures, I should probably explain the title of this post. The Martha Stewart Show is filming a food bloggers special in NY on May 12th, and I was invited to go! Just to make note so there’s no confusion, I was invited to be in the audience because they wanted to target food bloggers, not as an
actual guest on her show. That would be SUPER amazing!!… and I’m sure they would’ve taken care of my traveling expenses if that was the case.


Anyways, I really really really want to go because it’d be such a great experience, especially for networking! Who knows who I’ll meet and maybe I can even get hooked up in the baking world. Oh wait, that’s just me dreaming again.


BUT (of course, there’s always a “but”)… I just can’t afford to fly to NY from LA right now. I have to RSVP for the show by April 28th, which gives me a solid week to raise funds. I know this is asking a lot, but I’m asking for any donations, small or big, to help me fund this short NY trip! In return, if I get enough donations for the trip, I promise to post 5 recipes a week for the month of May. Trust me, that’s A LOT! I’d do that just for you guys, it’s true. Of course, I’d post tons about the trip and the show as well so I can share my entire experience with you all.

Thank you for even considering donating, I know it really is asking a lot. If you feel gracious enough to donate anything, you can do so by clicking on the link below or even snail mailing me (contact me through my email: kim@lovintheoven.com for mailing address). Thank you, thank you, thank you in advance!


If I don’t raise enough to go, I’ll add the people that donated to the NY funds to
my cookie mailing list so at least the money doesn’t go to waste.


This recipe comes from Our Best Bites— that blog never fails me. Actually, most apple desserts never do. I baked this in a 9″x9″ dish rather than a 9″x13″ that the recipe calls for because I, personally, enjoy thicker bars. This means I had to bake it about 10 minutes longer. The ratio of crust to apples to crumb topping was perfect. I wouldn’t change a thing about it… or maybe I’d add more apples next time because that’s the best part of the whole thing. My sister and I always end up picking out the apples to eat first.

The only thing I would change is to maybe leave off the glaze because the bars were sweet enough without it. Or if you wanted it to look pretty, you could use 1/4 of the glaze instead of the whole recipe. Here’s the recipe with my adjustments in green italics:

SWEET PASTRY:
  • 2 c. flour
  • 1/2 c. sugar
  • 1/2 tsp. baking powder
  • 1/2 tsp. salt
  • 1 c. real butter, softened (no substitutions!)
  • 1 egg, beaten
APPLE FILLING:

  • 1/2 c. white sugar
  • 1/4 c. flour
  • 1 tsp. cinnamon (I used about 3 teaspoons.. I LOVE cinnamon)
  • 4 c. (about 3 medium) sliced, peeled baking apples (I used 4 Braeburn apples)
GLAZE:
  • 2 c. powdered sugar
  • About 3 Tbsp. milk (whole milk is best)
  • 1 tsp. almond extract (I used vanilla extract)
To prepare crust, mix flour, sugar, salt, and baking powder in a medium bowl. Cut in butter with a pastry blender or two knives until you have pea-sized crumbles. Gently mix in beaten egg.

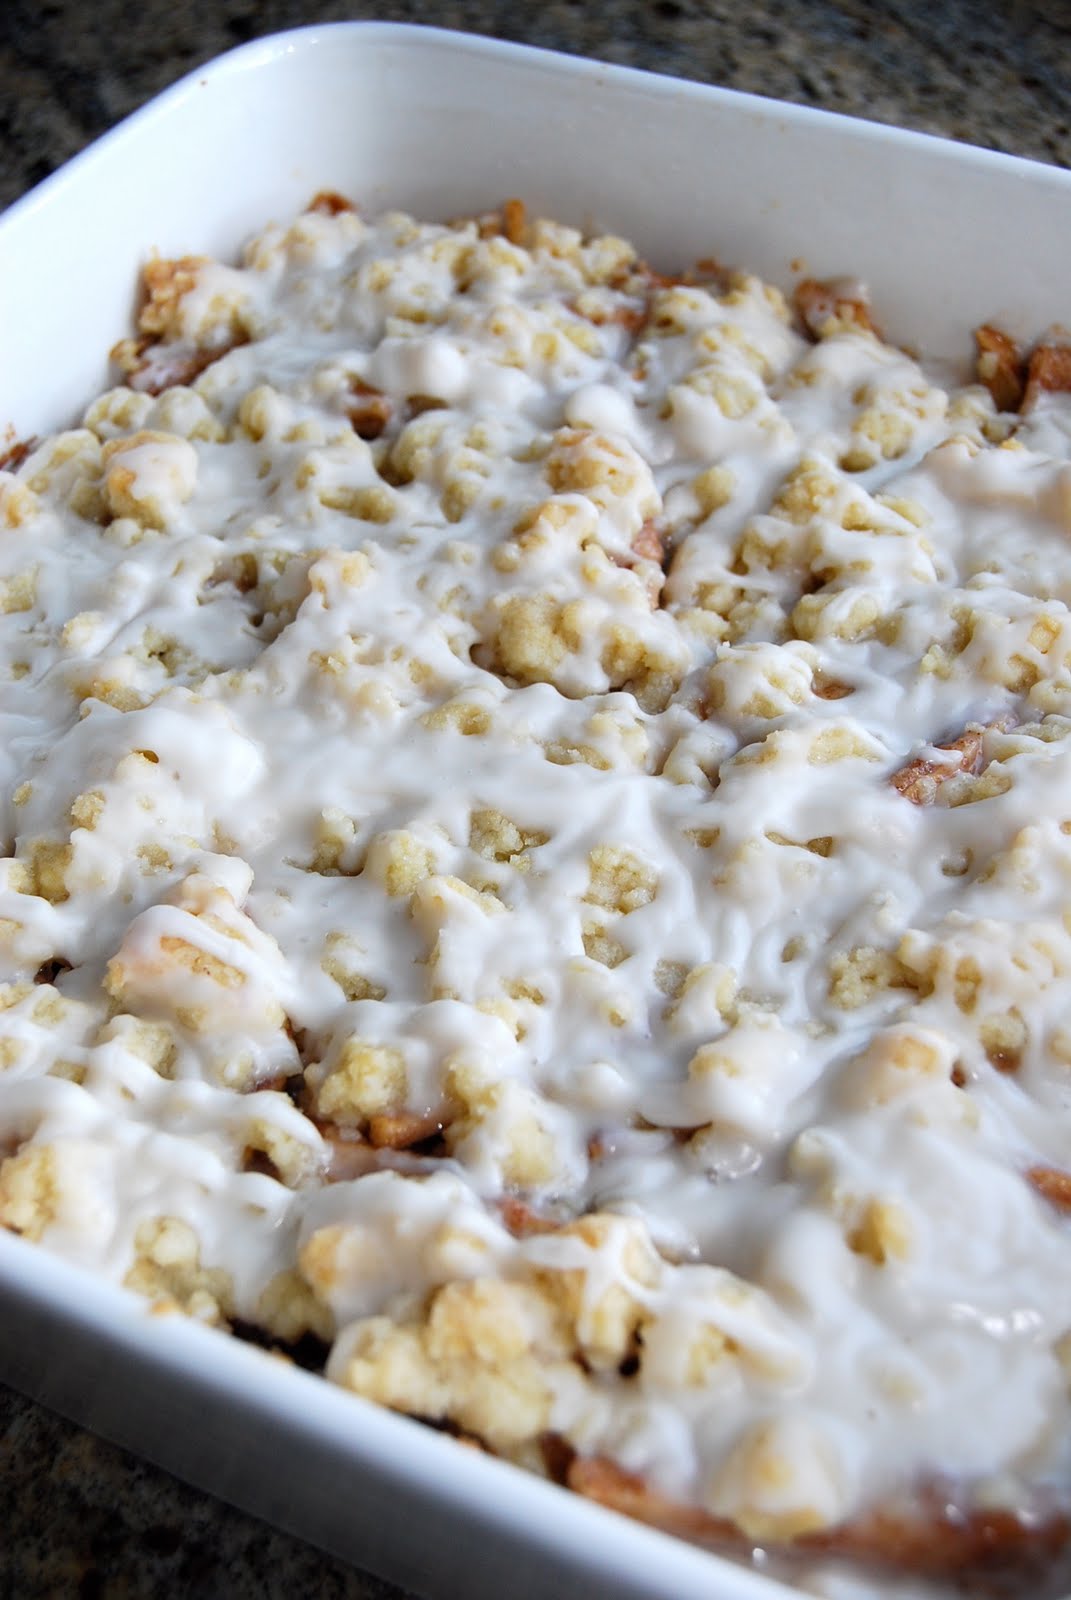
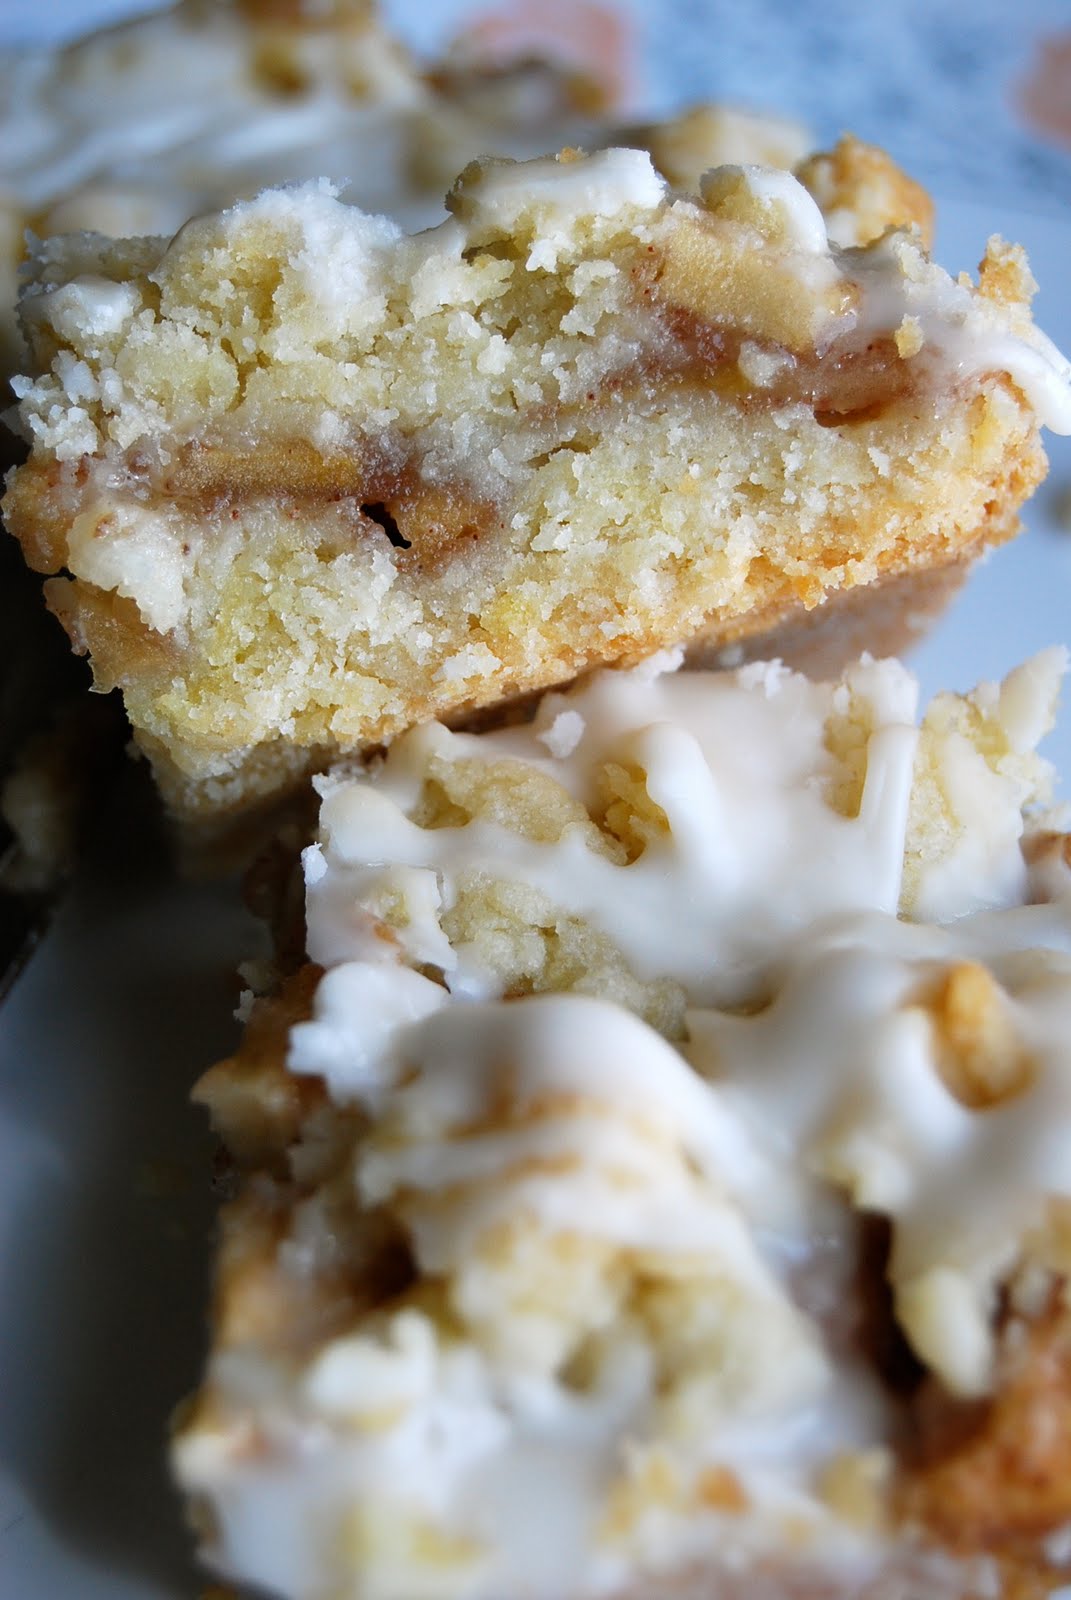
Spray a 9×13 baking dish (I used a 9×9) with non-stick cooking spray. Gently pat about 2/3 of the crumb mixture onto the bottom of the dish. Preheat oven to 350 and set aside.
To prepare apple filling, combine flour, sugar, and cinnamon. Toss with apples and spread apples out on prepared crust. Sprinkle reserved crust mixture over apples evenly and bake in preheated oven for 40 minutes
(mine took just less than 50 minutes). When finished, allow to cool completely.

To prepare glaze, whisk together powdered sugar, almond extract, and enough milk to achieve desired consistency. Place glaze in a Ziploc bag and cut off a very small portion of one of the corners. Drizzle glaze over cooled pastry and allow to harden (you can place it in the freezer to hurry things along). Cut into bars and serve.


The Darling Foodie
Facebook Fan Page
Ask me anything on Formspring

Filed Under: apple, bars/brownies, dessert

Chocolate Chip Oreo Cookies

April 19, 2010 by kim 140 Comments


I procrastinate from my homework the best when I’m baking. Seriously. Instead of writing a 1000 word paper, I browse through my bookmarks on my computer and decide what I want to bake. After figuring out my next culinary mission, I get right to it and start mixing my little heart away. Once everything is set and cooled, I figure, “Well… I already have all my materials out, why not bake something else?” This is where the process starts all over again; It’s like a never-ending circle of baking that will, in turn, doom my academic career.

Were these cookies worth it? Totally. The concept of a cookie in a cookie is just genius. Kind of like cookie dough in cookie dough. Wait, what? Is that even possible? Anyways, I made these cookies into little itty-bitty baby ones because I wanted bite sized treats. That resulted in me eating a million cookies instead of one. Oops. They’re full of flavor (taste just like cookies n’ cream ice cream, really) and the oreo texture in it is wonderful! They’re also chewy, not crumbly. I subbed baking powder for baking soda because I didn’t have any on hand, which is why my cookies are a bit puffy than normal. That actually works even better for mini cookies! Adapted from Picky Palate.

Print
Chocolate Chip Oreo Cookies

Ingredients

  • 1 stick softened butter
  • 6 Tablespoons sugar
  • 6 Tablespoons brown sugar
  • 1 egg
  • 1 teaspoon vanilla
  • 1 ¼ cup flour
  • ½ teaspoon baking soda
  • ½ teaspoon salt
  • 11 broken pieces Oreo Cookies
  • 1 cup chocolate chips

Directions

  1. Preheat oven to 350 degrees F.Cream butter, and sugars until well combined.Add egg and vanilla until mixed well.
  2. Place flour, baking soda and salt into a large bowl, stir to combine.Slowly add dry ingredients to wet ingredients then stir in oreos and chocolate chips until just combined.
  3. With a medium cookie scoop, scoop onto baking sheet.Bake for 10 minutes or until cooked, but still soft.Let cool on baking sheet for 3 minutes before transferring to cooling rack.
3.1
https://lovintheoven.com/chocolate-chip-oreo-cookies-mailing/

Filed Under: chocolate chip, cookies, dessert

Jam Cake

April 13, 2010 by kim 7 Comments

I have to share with all of you this coincidence that arose from my kitchen today. I did the norm–baked a cake, let it cool for a whole two seconds before I gave in to cutting it, and then made 16 even pieces. I pulled a piece out and then carefully placed it on my plate before going to grab my camera. When I came back, the slice shifted a bit because it wasn’t completely cooled and turned into this beauty. A heart! Just itching for a photoshoot!

I find a lot of things cute, but this is SUPER cute! Heart shaped desserts make them taste ten time better. I can attest to it.


Can you tell it’s not cooled yet? The jam’s oozing everywhere!

Life is beginning to take its toll on me. Too much work and not enough baking, in my opinion. This is why this little heart shaped piece of cake made me so happy! It’s a sign that I need to reevaluate my schedule and find the time to do what I love again. 🙂 Someone please tell me why I’m not in culinary school already? ::sigh:: A girl can dream.


This is my second recipe from Framed, and it turned out just as good as the first recipe. Her pictures are truly stunning and she has a lot of recipes that I want to try. The cake was very fluffy and light, perfectly accompanied by the jam. The cake didn’t have too much flavor, so don’t be afraid to use the whole cup of jam as listed in the recipe. Feel free to change up the jam flavors to whatever floats your boat. The crumble topping had the perfect texture and crumbled perfectly. Every dessert should have a crumb topping, don’t you think?

I did adjust this recipe quite a bit because I didn’t have milk on hand, but it still turned out great. I’m posting the original recipe with my changes in italics.
  • 2 cups sifted all-purpose flour
  • 1/2 cup sugar
  • 1 tablespoon baking powder
  • 1/2 teaspoon salt
  • 1/3 cup butter
  • 1 egg, beaten
  • 3/4 cup milk (I substituted this for one serving of strawberry yogurt, 2 tablespoons of vegetable oil, 1/3 cup of evaporated milk, and a splash of water)
  • 1/2 cup apricot jam (I used raspberry)
  • 1/2 cup cherry jam (I used strawberry)

Topping:

  • 1/3 cup light brown sugar, firmly packed
  • 2 tablespoons flour
  • 2 tablespoons butter
  • 1/2 cup chopped walnuts or pecans (I used about 1/3 cup finely chopped walnuts)

1. Combine flour, sugar, baking powder, and salt. Cut in butter with pastry blender to make a fine crumbly mixture – or you can use a food processor.

2. Add egg and milk; stir just until dry ingredients are moistened.

3. Spoon batter into a generously buttered 9-inch square pan. Spoon both jams over the batter, then swirl through the batter with a knife.

4. Mix topping ingredients until crumbly and sprinkle evenly over batter.

5. Bake at 400° for 25 to 30 minutes, until done. Cut into squares and serve while still warm


The Darling Foodie
Facebook Fan Page
Ask me anything on Formspring

Filed Under: berry, cake, dessert

  • « Previous Page
  • 1
  • …
  • 112
  • 113
  • 114
  • 115
  • 116
  • …
  • 159
  • Next Page »

hi! i'm kim-- a girl mom, baker, blogger, and ex-flight attendant. welcome!

Search

  • Facebook
  • Instagram
  • Pinterest
  • Twitter

Categories

RODELLE-BABadge


Categories

  • Facebook
  • Instagram
  • Pinterest
  • Twitter

Copyright © 2026 · Foodie Pro Theme by Shay Bocks · Built on the Genesis Framework · Powered by WordPress