Lovin' From the Oven

  • Home
  • About Me
  • Recipes
  • FAQ
  • My Lifestyle Blog
  • Disclaimer

Chocolate Chip Lava Cookies

September 12, 2012 by kim 9 Comments

As much as I love living up here in the bay area, I HATE that B.J.’s is quite a journey from me. I have to either pay a bridge toll or drive over half an hour just to get to one. I crave pizookies on a daily basis, so this situation is quite unfortunate for me.

On the other hand, I could try and make a substitute at home in my kitchen. This recipe may not be the exact one, but it comes close enough to subdue my pizookie cravings.

chocolava

chocolava-2

chocolava-3

chocolava-4

chocolava-5

chocolava-6

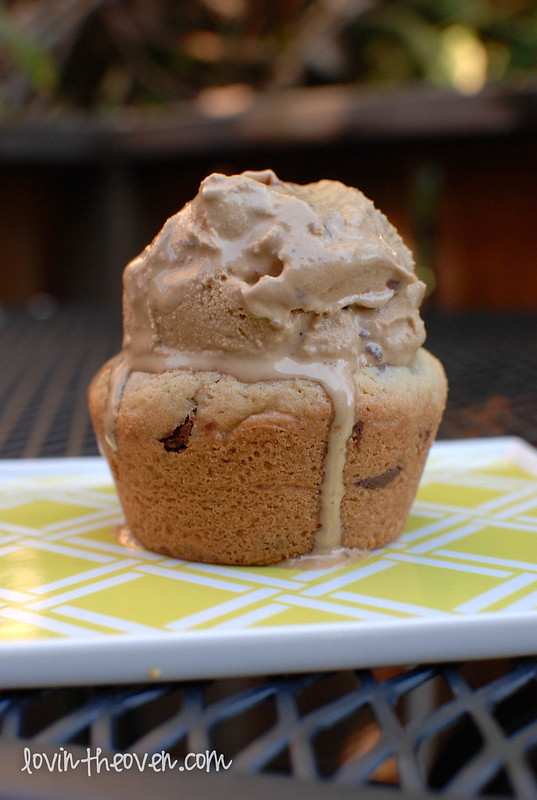
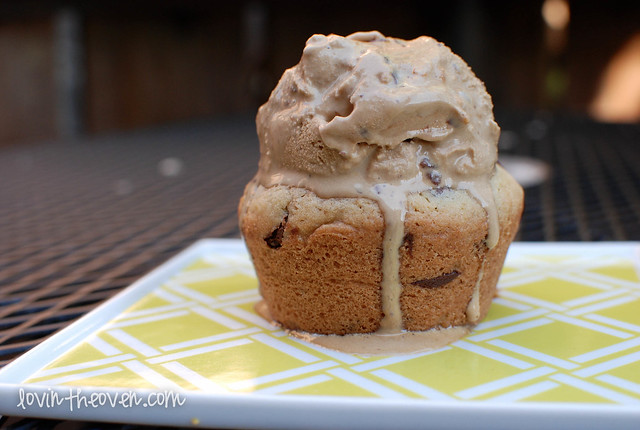
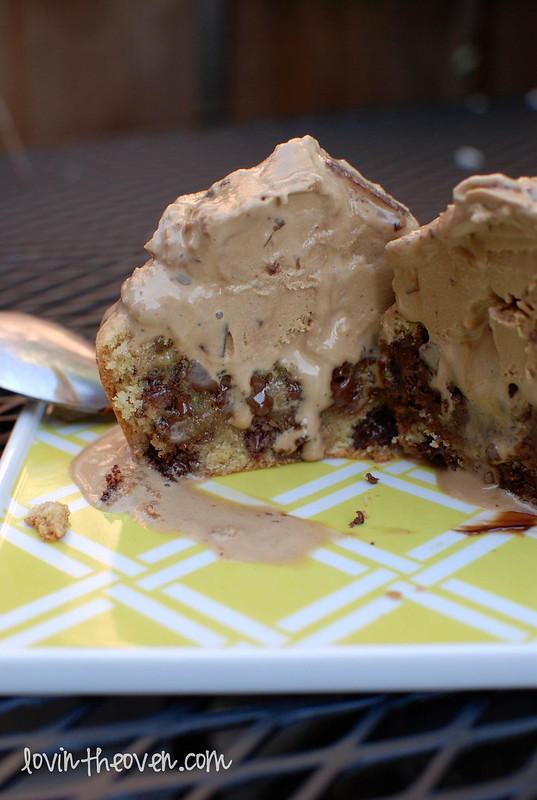
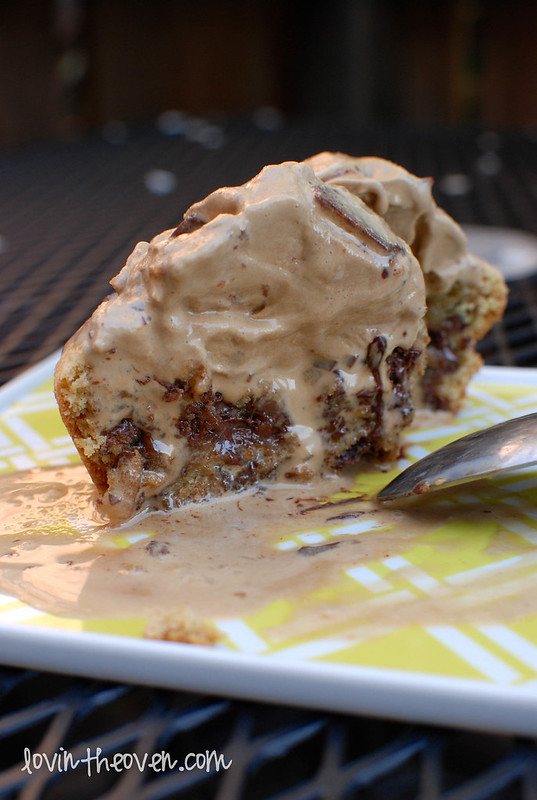
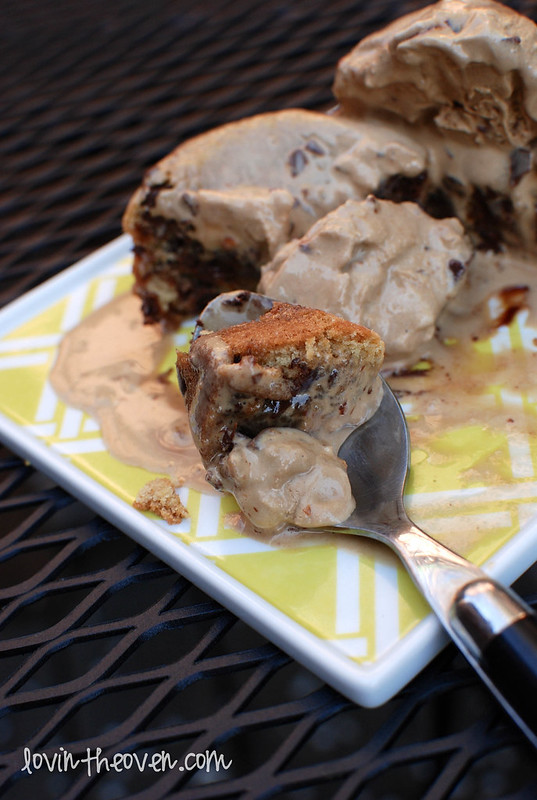
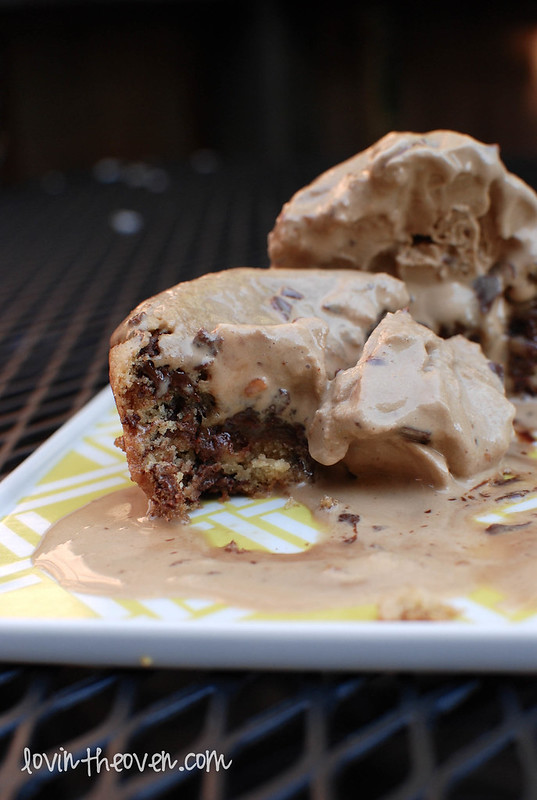
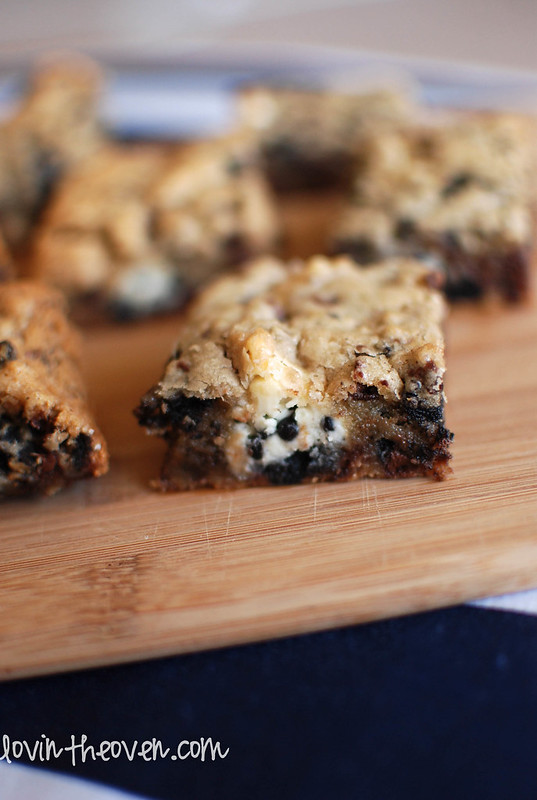
I served the cookies warm, straight from the oven. I also nuked them in the microwave for 20 seconds the next day before serving and it was just as good. I topped it with a generous scoop of Ben and Jerry’s Coffee Heath Bar Crunch ice cream, but feel free to use any ice cream flavor you’d like. Everything goes good with chocolate chip cookies! … except maybe sherbet.

Seriously. These babies were delicious. I may or may not have eaten all ten lava cookies by myself and am not one bit ashamed. Recipe from Kevin & Amanda.

Print
Chocolate Chip Lava Cookies

Ingredients

  • 1/2 cup (1 stick) butter, softened
  • 1/2 cup light brown sugar, packed
  • 1/2 cup granulated sugar
  • 1 large egg
  • 1/2 tablespoon vanilla extract
  • 1 3/4 cups all purpose flour
  • 1/2 teaspoon salt
  • 1/2 teaspoon baking soda
  • 1 (11.5 oz) bag milk chocolate chips

Directions

  1. Preheat oven to 350 degrees F. Grease a muffin tin.
  2. Put 1/2 cup of the chocolate chips in a Ziploc bag and microwave laying flat for 30 seconds. Remove bag and flip over, microwaving for an additional 10-15 seconds until all the chips are softened. Set aside to cool.
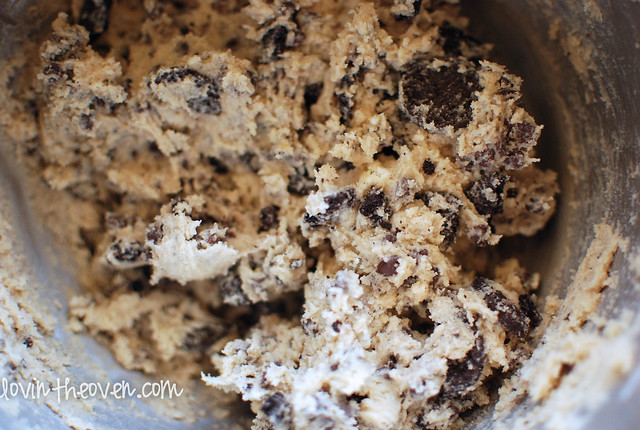
  3. In a mixer, cream together the butter and both sugars. Stir in the egg and vanilla. Once that is well blended, mix in the flour, salt, and baking soda until just combined. Add the remaining chocolate chips (1 cup) and stir to combine.
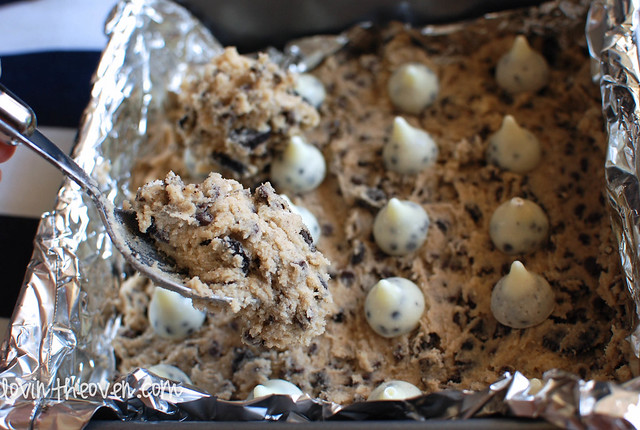
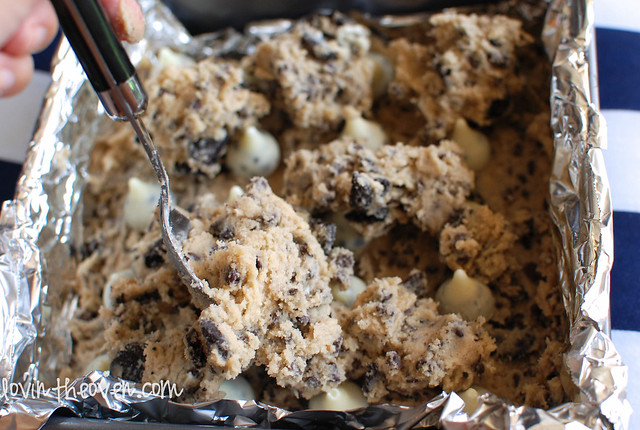
  4. Using half of the cookie dough, scoop 1.5-2 tbsp of dough, flatten it, and place in the bottom of the muffin tin. Repeat for a total of 10 cookies.
  5. Snip off a corner of the Ziploc bag and gently squeeze a layer of chocolate over the cookie. Scoop and flatten the remaining dough and place on top of the chocolate layer.
  6. Bake at 350 for 15-20 minutes, until the edges are just browned. As soon as they come out of the oven, run a knife around the edges to make for easy removing later. Cool completely before removing from the muffin tin, running a knife around the edge to help loosen.
3.1
https://lovintheoven.com/chocolate-chip-lava-cookies/

Filed Under: chocolate chip, cookies, dessert

Chocolate Chip Brownies with In the Raw

September 10, 2012 by kim 70 Comments

I was lucky enough to receive some “In The Raw” products to use in my baking. I headed over to recipes section on their website and after searching through several different options, I decided on this one: Chocolate Chip Brownies.

I was actually surprised with the variety of food you can make using Stevia In The Raw. You can make breakfast, lunch, dinner, or dessert! I chose to stick with what I knew best … dessert.

DSC_2769

DSC_2770 DSC_2781

DSC_2783 DSC_2784

I have used Sugar In The Raw before, but only for coffee. I’ve never tried Stevia In The Raw and was surprised at how soft and light the product was. It was like a cloud zipped up in a bag, weighing close to nothing. How is that even possible? Oh well .. all that matters is that it tasted great, and I couldn’t even taste the difference between that and normal sugar (and let me tell you, I LOVE my sugar)!

When I bake something, I share the results with the people around me. By using In The Raw products, I know I’m sharing a better creation because of the all-natural ingredients inside. The better your ingredients, the better the outcome. Living in Berkeley, I’m more aware of fresh produce and food. Why wouldn’t I want the same for all of my other ingredients? You are responsible for everything you put into your body, and by using all natural ingredients, you are taking a step toward a healthier lifestyle.

It didn’t take any additional time for me to sub my regular baking sugar for In The Raw sugars. Actually, it didn’t affect my normal prepping at all. The only difference was the outcome. These chocolate chip brownies were much more cake-like, and they weren’t as heavy as normal brownies. I would love to sub dark cocoa powder in for the normal unsweetened cocoa powder next time to give it a stronger and richer taste. Instead of the chocolate chips, I used dark chocolate discs, which I loved and would highly recommend doing.

If you make this recipe expecting a brownie, you’ll be disappointed. If you make this recipe expecting a cake, then you’ve got yourself a recipe. Throw some icing on top and you’ve really got a keeper. Again, the recipe is from In The Raw.

Print
Chocolate Chip Brownies with In the Raw

Yield: 16 bars

Ingredients

  • 1/4 cup unsalted butter, melted
  • 1/3 cup unsweetened cocoa powder
  • 2 eggs
  • 1/3 cup Stevia In The Raw Bakers Bag
  • 1/3 cup Sugar In The Raw
  • 1/2 cup whole wheat flour
  • 1/2 cup all purpose flour
  • 1 teaspoon baking powder
  • 1/8 teaspoon salt
  • 1/4 cup vegetable oil
  • 1/4 cup low fat buttermilk
  • 1 teaspoon vanilla extract
  • 1/4 cup semi sweet chocolate mini chips

Directions

  1. Preheat oven to 350F. Prepare 8-inch square baking pan with non-stick spray. Set aside.
  2. Combine melted butter and cocoa powder. Set aside to cool. In large bowl beat eggs until frothy. Add Stevia In the Raw and Sugar In The Raw.
  3. Combine flours, baking powder and salt ñ add to egg mixture and stir. Add in cocoa mixture, vegetable oil, buttermilk and vanilla. Stir until blended. Stir in mini chips.
  4. Pour batter into baking pan and bake at 350F about 20 minutes or until toothpick comes out clean.
  5. Remove from oven and cool on rack.
3.1
https://lovintheoven.com/chocolate-chip-brownies-with-in-the-raw/

DSC_2801

I have to admit the packaging of the two products is especially convenient for a baker. Since I don’t exactly use a lot of Stevia or Sugar In The Raw in one sitting, I’m able to zip up or close the pour spout on the side of the box. I don’t have to worry about finding a Tupperware to store the remainder of the sugar in or finding a clip to make sure the bag stays closed. It makes my life a lot easier when I can just take an item out of my pantry, use it, and put it back without worrying if it’ll stay fresh or not.

In The Raw has a new app out called the “Au Natural In The Raw” app, where it pixelates your food pictures like this:

blurry

It gives you maximum viewing pleasure and lets you cover all that baked (or cooked) goodness in your food photography. Apparently, the majority of photos posted on social media platforms are pictures of food. Can you believe it? I sure can. We consume it everyday and want to share our plates with everyone else. The “Au Natural In The Raw” app makes this a more fun way of sharing your food pictures online. It also makes people take a closer look and consider using all natural ingredients in their next kitchen endeavor.

Your dessert photos will become so hot, so au natural, they will be labeled “too hot” for the web. That’s right. They went and did it. They became deliciously obscene. The metaphorical thermometer on Facebook is about to go up. Your Facebook friends will be in a frenzy. Your photo might even become the most liked photo in Facebook history, who knows? And for extra measure, you can even gain privileged access to the most coveted In The Raw family of secret recipes just for posting your creation.

Now for the good stuff. You can win a $100 Cooking.com gift card! How do you do so? Well, visit the In The Raw website and leave a comment telling me which recipe you’d make!

Rules:
No duplicate comments.
You may receive (2) total entries by selecting from the following entry methods:
a) Leave a comment in response to the sweepstakes prompt on this post
b) Tweet (public message) about this promotion; including exactly the
following unique term in your tweet message: “#SweepstakesEntry”; and leave the URL to that tweet in a comment on this post
c) Blog about this promotion, including a disclosure that you are receiving a sweepstakes entry in exchange for writing the blog post, and leave the URL to that post in a comment on this post
d) For those with no Twitter or blog, read the official rules to learn about an alternate form of entry.
This giveaway is open to US Residents age 18 or older. Winners will be selected via random draw, and will be notified by e-mail. You have 72 hours to get back to me, otherwise a new winner will be selected.
The Official Rules are available here.
This sweepstakes runs from 9/10/12-9/30/12.
Be sure to visit the In The Raw brand page on BlogHer.com where you can read other bloggers’ reviews and find more chances to win!

Filed Under: bars/brownies, chocolate chip, cocoa, dessert, giveaway

Cookies N’ Cream Kiss Cookie Bars

September 6, 2012 by kim 6 Comments

I’m really excited to let you know that I’ve had a blog makeover! Check it out! I got rid of all the extra noise and went back to a simple, clean layout. I wanted the pictures to be the main focus, not all the clutter in the background. What do you think?

DSC_2551

Now, I have room for bigger pictures. How’s that for you?

DSC_2515

DSC_2433

DSC_2443

Unwrap those babies!


DSC_2441DSC_2451

First layer goes into the lined pan.

DSC_2469

Throw some kisses on top.

DSC_2472

Drop some more dough on top.

DSC_2482

DSC_2483

And spread evenly.

DSC_2486

Bake.

DSC_2492

Cut.

DSC_2510

DSC_2511

DSC_2539

I’ve spent quite a bit of time this week on my blog. Probably more than I should have, but it’s such a labor of love. Once I get into the groove of things, I’m non-stop. I stayed up until 2AM last night editing pictures, adding drafts, and tweaking the tiny details on my layout. If you know me, you’ll know that 2AM is WAY past my bedtime. I’m usually out at 10PM. That’s another one of grandma characteristics I can’t seem to get of. As long as I have a good soundtrack to listen to while working, I can be at it for hours.

Now, I can’t stop looking at my blog layout. I don’t know why I didn’t do it earlier. I guess as I grow, my blog really does grow with me. I’ve also edited the link bar at the top, particularly the “About Me” section. I realized I wasn’t 24 anymore and my DB and I have been dating for more than 3 years. Whoops.

Anyways, I just wanted to thank you guys for following along. Truly, I wouldn’t be doing this if it weren’t for my blog readers. I’m amazed at how far this little ol’ blog has come along after… *gasp* 5 years! My blog will be FIVE years this fall. I. Cannot. Believe. It. THANK YOU!

Oh, I guess I probably should talk about these heavenly squares. I’ve always loved Hershey’s Cookies N’ Cream bars. I even ate so much of it when I was little that I threw up, but that doesn’t stop me from eating them now. Sorry, that probably wasn’t appropriate for a food blog… but I promise these won’t have that effect on you (unless you’re allergic, eat too much, you hate cookies n’ cream, or are drunk).

Recipe from Picky Palate.

Print
Cookies N’ Cream Kiss Cookie Bars

Yield: 12-16 bars

Ingredients

  • 1 stick unsalted butter, softened
  • 1/2 cup granulated sugar
  • 1/2 cup packed light brown sugar
  • 1 large egg
  • 1 teaspoon pure vanilla extract
  • 1 1/2 cups all purpose flour
  • 1/2 teaspoon baking soda
  • 1/2 teaspoon kosher salt
  • 1 cup mini chocolate chips
  • 12 Oreo Cookies, broken up
  • 25 Cookies and Cream Hershey’s Kisses

Directions

  1. Preheat oven to 350 degrees. Line an 8x8 pan.
  2. Cream together the butter and both sugars. Add in the egg and vanilla until well mixed.
  3. Stir in the dry ingredients, chocolate chips and oreo cookie pieces until just combined.
  4. Press 1/3 of the dough into the bottom of prepared baking pan. Place the kisses on top. I did 4x5, but you can do 5x5 if you want more kisses.
  5. Spoon the remaining dough on top of the kisses and spread evenly. Bake for 25-30 minutes, until golden brown. Let cool completely before cutting into squares.
3.1
https://lovintheoven.com/cookies-n-cream-kiss-cookie-bars/

Filed Under: bars/brownies, candy, chocolate chip, cookies, dessert, white chocolate

  • « Previous Page
  • 1
  • …
  • 29
  • 30
  • 31
  • 32
  • 33
  • …
  • 71
  • Next Page »

hi! i'm kim-- a girl mom, baker, blogger, and ex-flight attendant. welcome!

Search

  • Facebook
  • Instagram
  • Pinterest
  • Twitter

Categories

RODELLE-BABadge


Categories

  • Facebook
  • Instagram
  • Pinterest
  • Twitter

Copyright © 2026 · Foodie Pro Theme by Shay Bocks · Built on the Genesis Framework · Powered by WordPress