Lovin' From the Oven

  • Home
  • About Me
  • Recipes
  • FAQ
  • My Lifestyle Blog
  • Disclaimer

Brickle Drop Cookies

February 15, 2011 by kim 9 Comments

IMG_1721

IMG_1709

IMG_1718

I hope everyone had a great Valentine’s day! I’ve always been a fan of the holiday, with a Valentine or not. There’s something about seeing hearts and flowers everywhere that just makes my little heart flutter. Lucky for me, I’ve had a Valentine for the past three years now. Here’s my Valentine’s Day outfit, if you’re curious!
My DB made me breakfast in bed (scrambled eggs in the shape of a “heart” that really looked like a triangle with sausage) and we went to BJ’s for lunch. That was about the extent of our V-day because I had to work the Valentine’s event at my work for the night.
When I came home, I was surprised with homemade chocolate covered strawberries and the book, “The Girl With The Dragon Tattoo!” I’ve been meaning to buy the book for a while, but haven’t gotten around to it because I have so many books in my queue as is. I really want to finish the series before I start watching the movie, though. All in all, it was a laid back day with the boy I love!
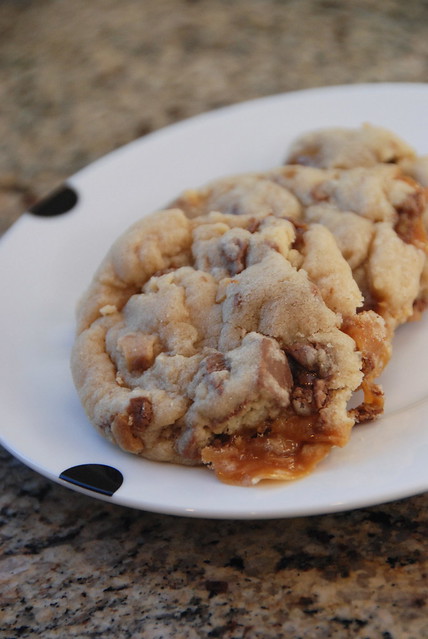
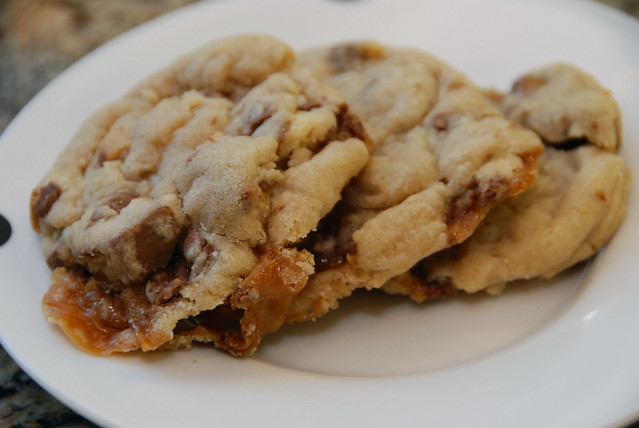
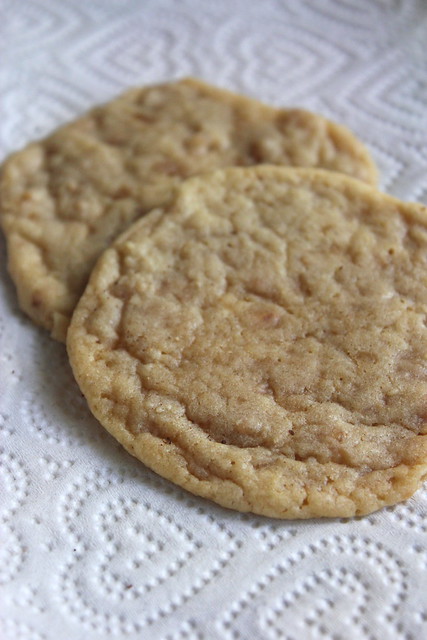
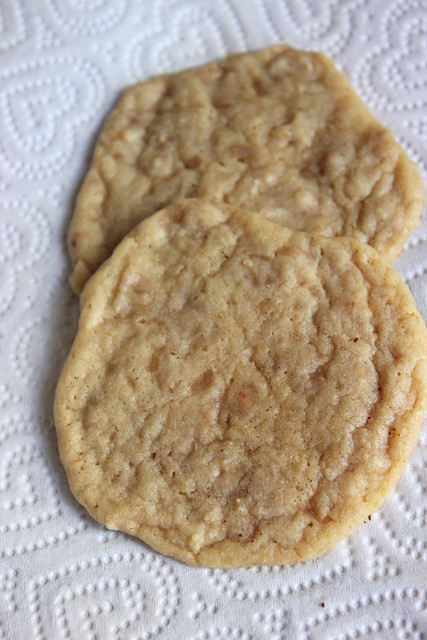
Now, I wanted to post this cookie so you can see that not all of my cookies come out perfect! I have this problem, just like any other normal human being, too! My cookies came out extremely flat and a bit undercooked, despite me leaving them in the oven for an additional 5 minutes. What the heck. I even refrigerated them overnight! Oh well, sometimes flat cookies happen to hardworking bakers. Nothing you can do about it but eat it all up yourself!
Recipe from the back of the Heath’s bag. Can also be found online at Hershey’s.

  • 1 cup (2 sticks) butter or margarine, softened
  • 1 cup granulated sugar
  • 1 cup packed light brown sugar
  • 1 teaspoon vanilla extract
  • 1/2 teaspoon salt
  • 3 eggs
  • 3-1/2 cups all-purpose flour
  • 2 teaspoons baking soda
  • 2 teaspoons cream of tartar
  • 1-1/3 cups (8 oz. pkg.) HEATH BITS ‘O BRICKLE Toffee Bits

  1. Heat oven to 350°F. Lightly grease cookie sheet or line with parchment paper.
  2. Beat butter, granulated sugar, brown sugar, vanilla and salt in large bowl until blended. Add eggs; beat well. Stir together flour, baking soda and cream of tartar; gradually add to butter mixture, beating until blended. Stir in toffee bits. Drop by heaping teaspoons onto prepared cookie sheet.
  3. Bake 8 to 10 minutes or until lightly browned. Makes about 6 dozen.

Filed Under: candy, cookies, dessert

Chunky Twix Cookies

February 2, 2011 by kim 20 Comments

DSC_1270

DSC_1265

DSC_1271

Just a quick post while I prepare myself for the crazy weekend coming up at work. It’s Reagan’s Centennial on Sunday and the museum’s grand re-opening, so we’re expecting HUGE crowds and lots of business! Here’s a cookie to get you guys through this madness…

My favorite candy bar has and always will be Twix. Something about the caramel, shortbread, and chocolate reel me in every single time. When I saw a recipe that involved a copious amount of candy bars, I bought a huge bag of Twix and went straight to the kitchen. These cookies were wonderful. The Twix’s texture didn’t change much in the oven, but the caramel did feel gooey straight out of the oven. The caramel that did happen to melt out of the cookie hardened a bit, but no harm there! Recipe from Sprinkled with Flour.

  • 2 cups
  • ½ tsp. baking soda
  • ½ tsp. salt
  • 12 tbsp. unsalted butter, softened
  • 1 cup packed brown sugar
  • ½ cup granulated sugar
  • 1 large egg plus 1 egg yolk
  • 2 tsp. vanilla extract
  • 2 cups coarsely chopped Twix bars
  1. Preheat oven 325°.
  2. Whisk together the flour, baking soda and salt in a medium bowl; set aside.
  3. In a separate bowl, cream together the butter and sugars. Beat in egg, yolk, and vanilla until combined.
  4. Slowly add the dry ingredients to the wet ingredients. Gently stir in the Twix chunks.
  5. Roll the dough into balls and bake on a baking sheet for 15-18 minutes.
  6. Allow the cookies to cool for ten minutes before removing them off the baking sheet.

Filed Under: candy, cookies, dessert

Thick and Chewy Gingerbread Cookies

January 25, 2011 by kim 5 Comments

DSC_1471

These were one of my cookies from the Christmas season that didn’t quite get finished. I spent hours working on them, but when it came down to it, I just ran out of time. Such a shame.. I forgot how much time rolled out cookies really take.
I baked batches of these and left them in a ziploc bag for days after Christmas had passed. I even left them undecorated because royal icing is just too time consuming. My friend came over and took a bite of a gingerbread cookie, despite me telling him that they were old, and took the whole bag home. These gingerbread cookies didn’t really taste like gingerbread cookies.. they tasted more like… well, I don’t even know. A little bland? Not very gingery?
Not that they were bad, they weren’t. But they weren’t fantastic. They did have some good characteristics, though… the cookie was sturdy, the outside was crisp, and the inside was soft and crumbly. I guess you win some, you lose some. You can’t have the best of both worlds!
From Sweet Pea’s Kitchen

  • 3 cups all-purpose flour
  • 3/4 cup firmly packed dark brown sugar
  • 3/4 teaspoon baking soda
  • 1 tablespoon ground cinnamon
  • 1 tablespoon ground ginger
  • 1/2 teaspoon ground cloves
  • 1/2 teaspoon salt
  • 12 tablespoons (1 1/2 sticks) unsalted butter, cut into 12 pieces and softened slightly
  • 3/4 cup molasses
  • 2 tablespoons milk
  1. Mix together the flour, sugar, cinnamon, ginger, cloves, salt, and baking soda in a mixing bowl.
  2. Cream the butter into the flour mixture until combined. Next, add the molasses and milk and mix until it forms a uniform dough.
  3. Divide dough in half and wrap in saran wrap. Refrigerate for at least two hours.
  4. Preheat oven to 350 degrees.
  5. Roll out the dough into 1/4 inch thickness and cut into desired shapes.
  6. Gather scraps and repeat process #5 until the dough is all used up.
  7. Place cookies about 1 inch apart on baking sheet. Bake for 8 to 11 minutes.
  8. Decorate as desired with royal icing if desired.

Filed Under: cookies, dessert

  • « Previous Page
  • 1
  • …
  • 63
  • 64
  • 65
  • 66
  • 67
  • …
  • 105
  • Next Page »

hi! i'm kim-- a girl mom, baker, blogger, and ex-flight attendant. welcome!

Search

  • Facebook
  • Instagram
  • Pinterest
  • Twitter

Categories

RODELLE-BABadge


Categories

  • Facebook
  • Instagram
  • Pinterest
  • Twitter

Copyright © 2026 · Foodie Pro Theme by Shay Bocks · Built on the Genesis Framework · Powered by WordPress