Like I said in my previous post, this post has nothing to do with cooking, so look away if you’re not interested. After posting a picture on my Instagram about my recent knitting obsession, I had a couple of people ask me about knitting with the loom. There are tons of tutorials online to learn how to knit using sticks, but not as many using a knitting loom. Since I had a camera and was starting a new project, I figured I’d make my own tutorial if anyone else wanted to learn the easier way to knit.
First, here’s what you need:
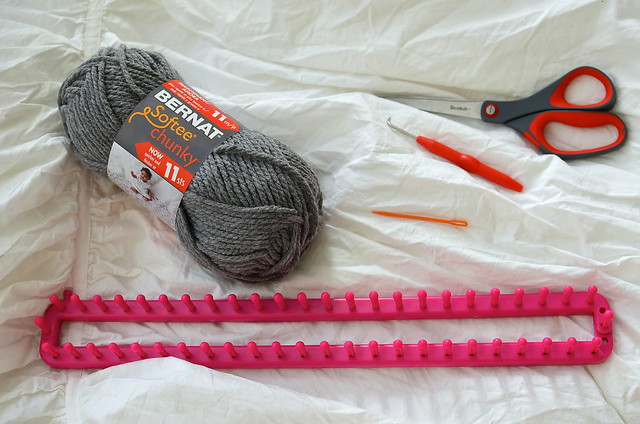
- knitting loom
- loom hook
- yarn needle
- scissors
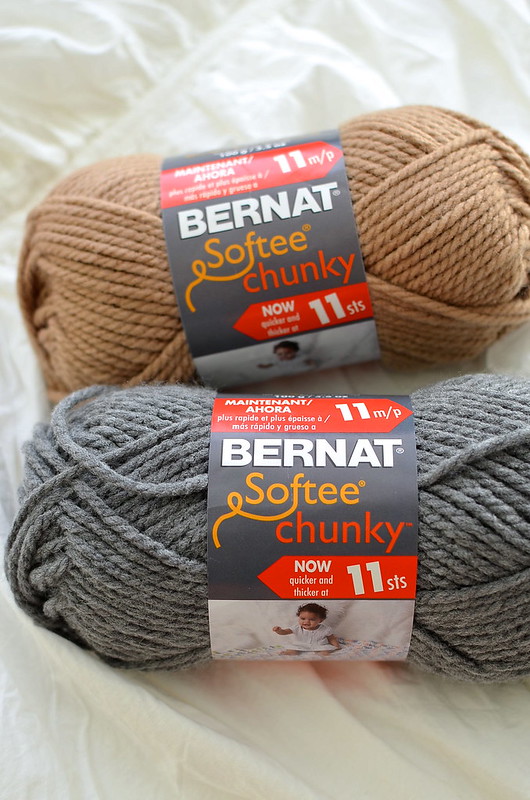
- yarn (If you want a chunkier scarf, use a thicker yarn. My favorite is by Bernat: “Softee chunkee.” I used two skeins for this project.)
- crochet hook in a size K (I forgot to include this in the picture. Also, it’s not necessary but it makes your life a whole lot easier when casting off at the end.)
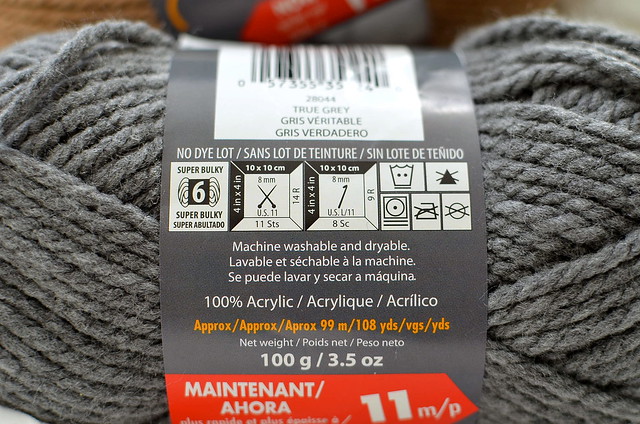
Here are the details of my yarn if you’re into that kind of thing. I don’t really bother with specifics. If it looks and feels right, use it.
Did you know about this trick? In order to get the end of the yarn, stick your hand into the left side of the yarn ball and pull out the little bundle you feel.

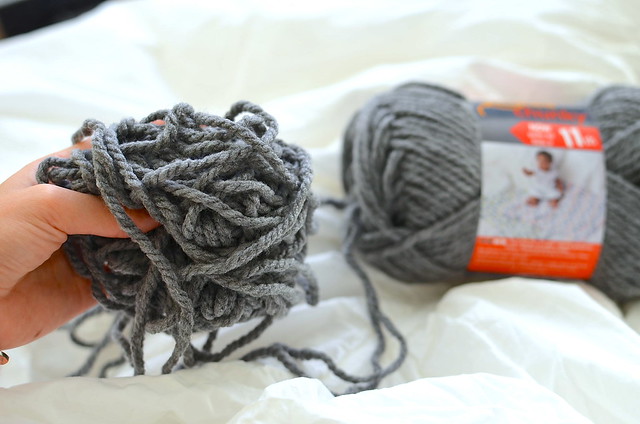
Voi-la! You’ve got an end of the yarn without dismantling the entire thing. I may or may not have taken too big of a handful in this picture. Oh well, you’re going to use it anyways.
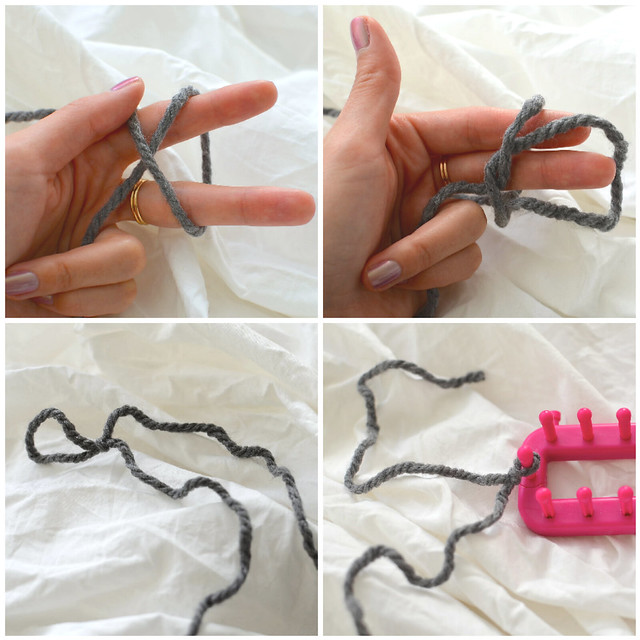
Start out by making a slip knot with about five inches at the end. Then, stick your slip knot onto the end prong of your loom.
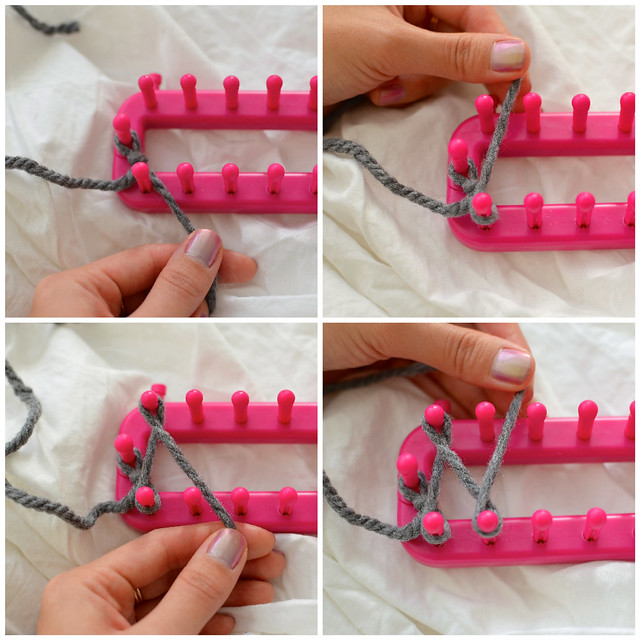
Let’s number our prongs. All the ones closest to you at the bottom will be odd numbers and the top row will be even numbers.
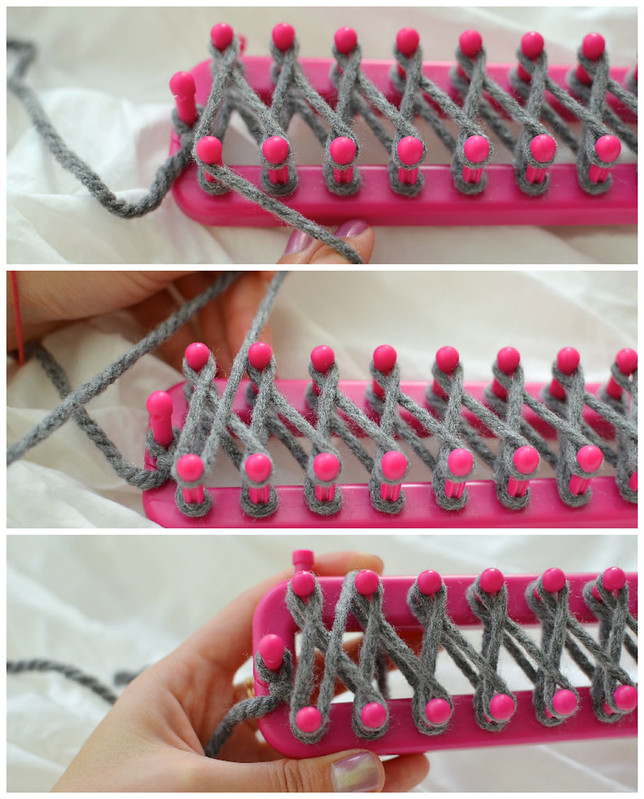
Now grab your string that’s attached to the ball of yarn and put it in between prongs 1 and 3. Wrap it clockwise around prong 1 and bring it up in between prongs 2 and 4.
Wrap it counterclockwise around prong 2 and bring it down in between prongs 2 and 4. Repeat this figure 8 pattern until you get to the desired width of your scarf. For this one, I used 13 prongs.
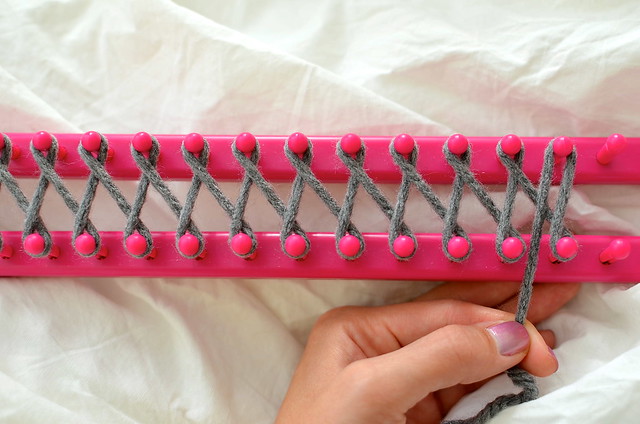
Once you get to your last even prong, bring it back in between the last two odd prongs you used.
Tip: There’s no need to make the string as tight as humanly possible. Actually, don’t even do that. I did that the first time and the middle of my loom started caving in the middle. No bueno. Nice and easy wins the race.
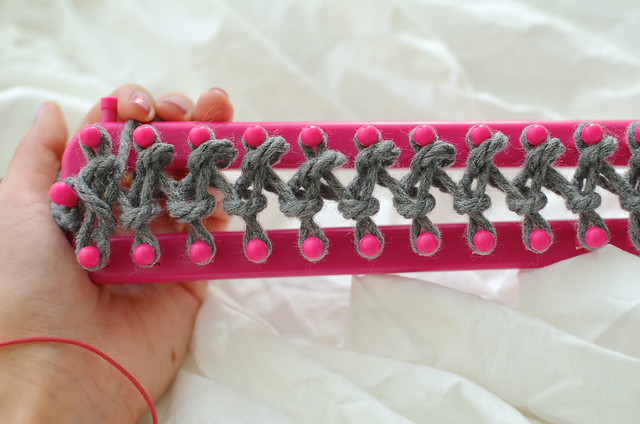
Push all the yarn loops on the pegs to the bottom. Then, continue wrapping your string again, now going from the right end of the loom to your left.
Wrap the string counterclockwise against the last odd peg and then bring it in between the 2nd and 3rd to last even pegs. Your last even peg will only have one layer. Continue the figure 8 pattern all the way to the where you began.
It helps me to remember which way to wrap the string by thinking of climbing up a ladder. Use the string to “climb” up your loom.
Once you get back to the end, wrap the string between pegs 2 and 4 and hold it there, as pictured.
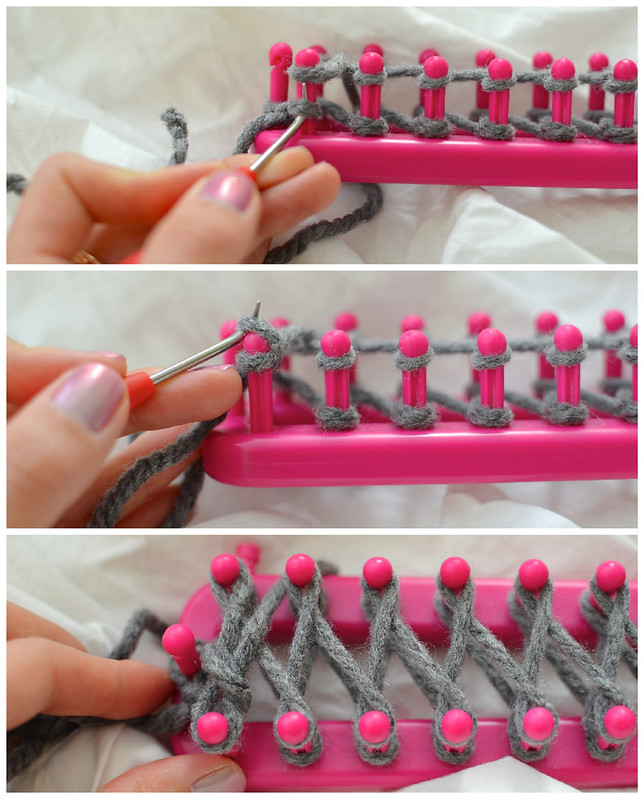
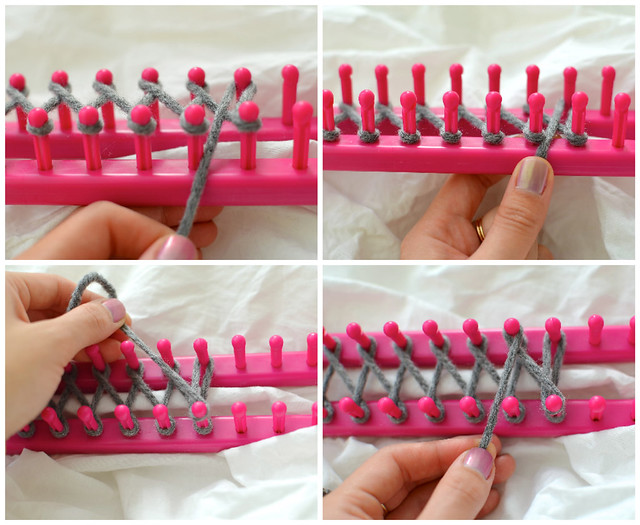
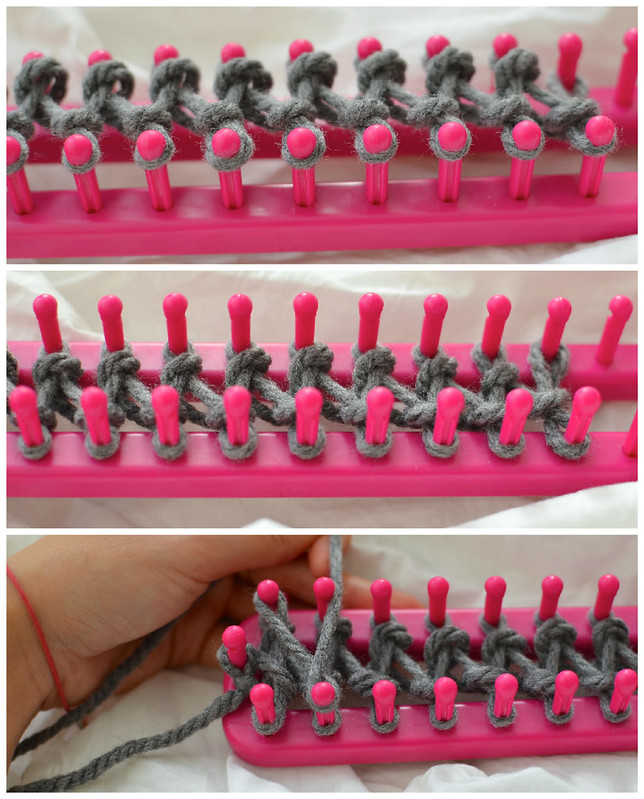
It’s time to bust out your loom hook. Starting from left to right,take the bottom yarn loop and bring it over the top one, completely taking the bottom loop off of the peg.
Continue this process for every peg, except for the your last even peg (since it only has one loop).
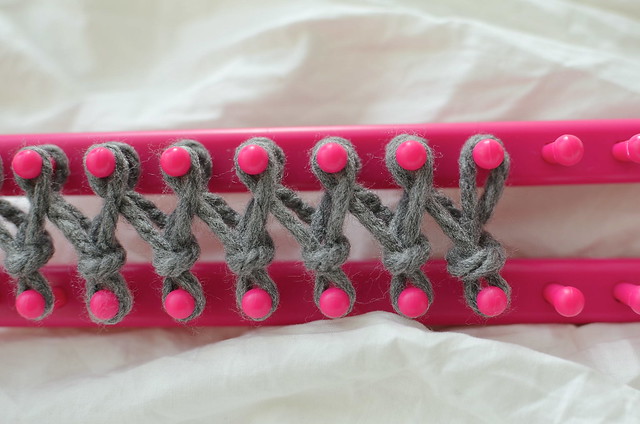
This is what your loom should look like after taking off the bottom layer of yarn loops.
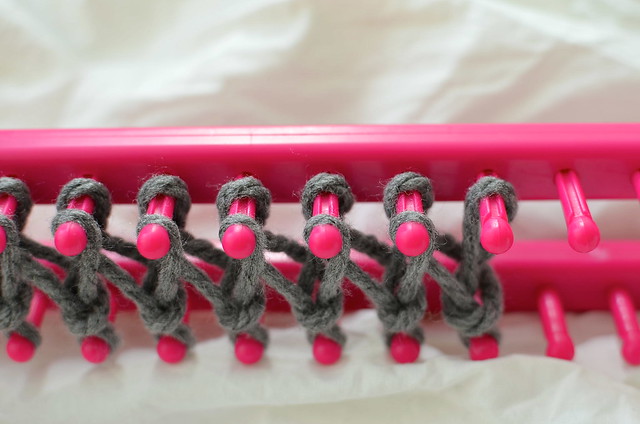
Now that you’re left with one layer of yarn loops at the top, push them all to the bottom again. Repeat this process again and again until you get your desired length. Remember, there will always be one peg with only one yarn loop when you go to hook them, so don’t freak out. Leave that single yarn loop alone!
Don’t forget to remove your slip knot from the peg after doing a couple of rows.
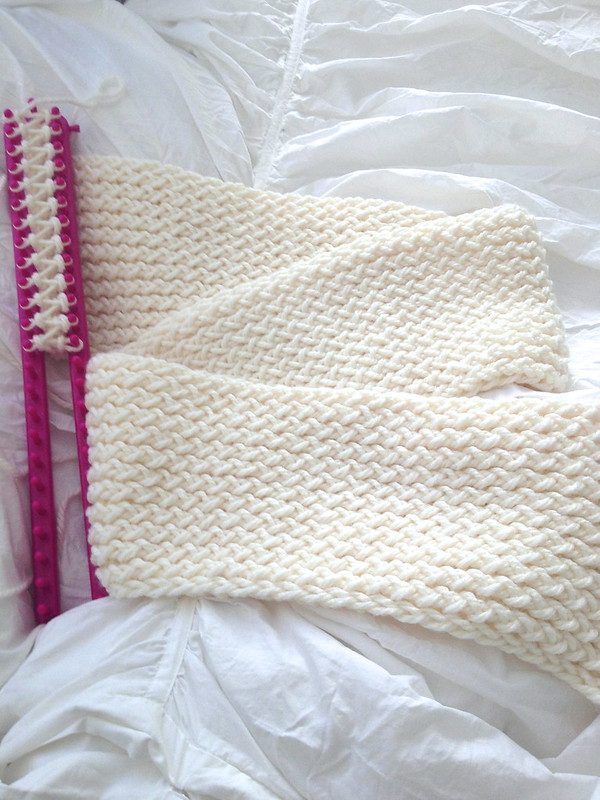
It takes a bit of time, but you’ll eventually see progress if you keep working at it. The thicker the yarn, the faster the scarf will be done. As for how to cast off when you’re finished, this YouTube video will show you better than any picture could explain.
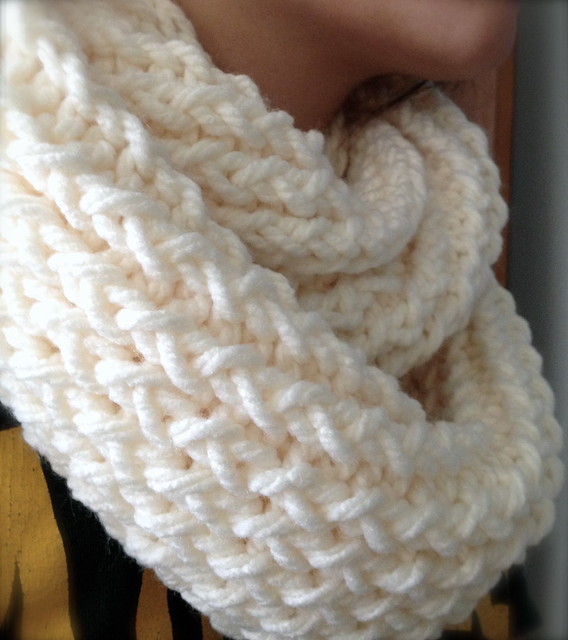
Attach both ends together using a flat seam and your knitting needle. Congratulations! You just made an infinity scarf.
Wow! this looks beautiful and super easy to make!
even though im only 12 years old this something really fun and something I enjoy doing!
Me too I love seeing and all that too and I’m also 12
I’m like 17 or something and I do not have such brain capacity
well iam going o to make somethink. i will more itthis is my frisr time the the loon loom/
I bought a zippy loom and it had no direction. This tutorial is awesome.
Amanda, I bought the Zippy Loom for a Christmas gift. I found an inexpensive “Zippy Loom Projects” book next to the loom at Michaels and Jo-Ann Fabrics, so if you have these stores near you, you may want to look for it. This infinity scarf if really pretty. I hope you try it on the Zippy Loom.
Ik ben. Een. Jurk aan. Het. Breien
Awesome tutorial. Thanks for sharing Kim! Can’t wait to try it out.
good for you! the scarf turned out so pretty. eager to see more knitted projects you accomplish
beautiful scarf! sorry i’m a total beginner– what do you mean by flat seam? and what size knitting needle do you use? i love this project but can just see myself with a scarf still stuck to the loom, no idea how to finish it up!
here’s what a flat seam is/looks like: http://bernatyarns.files.wordpress.com/2010/02/flatseamknit.jpg
as for knitting needle, you don’t need one when you’re using a loom. best of luck! let me know if you have any other questions!
Oh i see! One more question since I’m actually working on this now! I’m several rows in and I’ve removed the initial slip knot from the peg– the actual knot though is like 2 inches from the edge of the scarf. Should I make a second knot that’s closer to the scarf edge itself? When you made the flat seam, did you just weave in the initial 5 inch thread with the slip knot or did you trim it? Sorry for all the questions!
How do you connect the two ends of the scarf together?
Your instructions say to use a knitting needle. Do you mean a yarn needle for sewing the ends together?
“Attach both ends together using a flat seam and your knitting needle. Congratulations! You just made an infinity scarf.”
I, too, want to know more about the flat seam and the knitting needle. I know how to loom knit a scarf, but not how to join the ends to make it an infinity scarf!
You will use a large eye yarn needle , often made of plastic; find it near the yard and knitting needles. Very easy to thread with a length of your yarn. Look for visual help on YouTube.
j’aimerais avoir l’explication en français.
The youtube video explains how to cast off 🙂
There is no certain size of knitting needle you have to use, just use a loom needle that works for you or came with your loom. There are many YouTube videos that explain how to cast off and it is easy. This scarf would be just fine for beginners and I encourage you to try it!
super cute!!! the resulting scarf looks amazing! makes me want to go to michael’s tomorrow to get started 🙂 please share your future knitting projects/tutorials!
thanks for sharing. I got a loom like that for a gift but I had no idea what to do with it. I’ll have to get some yarn and give it a try.
Michael Sellick @http://thecrochetcrowd.com/ has lots of videos and tutorial about using looms. They are fun!
get an old bic pen (one with a straight shaft) and take it apart. You only want the hollow shaft. thread your yarn through the tube and then make your slip knot and proceed with wrapping your yarn using the tube. The hollow tube easily fits between the pegs and allows you to get your yarn easily wrapped and reduces the chance of the yarn popping off. I find it goes much quick than wrapping by hand.
wowzers….this tip I can use on my knitting machines also…..thannks a million…super great idea.
THANK YOU for the pen tip!!!!
How did you integrate both skeins?
i just tied them
Thank you for making this look so easy. I’ve really gotten into loom knitting. I’ve made 3 hats and I’m working on one more then I’m going to take a scarf.
How did you Use both skeins?did you just tie them together once you got to the end of the first one?
yes, i tied the ends together.
How long did you knit the scarf?
i used two skeins of yarn, which was enough to wrap around my neck twice. just hold it up around your neck and keep going until you’re happy with the length!
Love it! But how long did you make yours? I’m not sure how long to do it!
i used two skeins of yarn, which was enough to wrap around my neck twice. just hold it up around your neck and keep going until you’re happy with the length!
Can you still make this if your loom doesn’t have the end peg?
sure you can!
how exactly would I do that? This is the loom I have. Would I just use the side peg? http://www.walmart.com/ip/17370761?wmlspartner=wlpa&selectedSellerId=3&adid=22222222227000000000&wl0=&wl1=g&wl2=c&wl3=21486607510&wl4=&wl5=pla&wl6=19880599990&veh=sem
GREAT tutorial. ACTUaLLY ONE OF THE BEST I’ve seen. wish i had seen this one when i started loom knitting.
thank you so much!!
how did you connect the two sides to make it an infinity scarf?
i did a flat seam using a knitting needle.
I am not sure what a “flat seam” is. I don’t knit and am not familiar with this technique. any help would be appreciated.
Never mind I see the answer above, thanks!
Thank you so much for making such a wonderful, easy to follow tutorial!! Loom knitting is a lot faster and easier than with regular needles… And your pictures made the process even easier! 🙂
thank you so much for your kind words and feedback! i’m glad you enjoyed the tutorial! 🙂
The scarf looks great! Since you used two things of yarn how did you pick it up when the first yarn ran out? Thanks in advance 🙂
Alex I believe she said that she just tied them together, at least that is what I did and then just hid the ends.
I’d love to see a pdf file that I could print out so I DIDN’T HAVE TO KEEP GETTING UP AND BACK AND FORTH TO SEE WHAT I NEED TO DO.
Janet, you can actually do that by going to your browser’s “file” tab, and click print. Then either print directly from there, or you can “Print as .PDF” and it will save the page as a document. Hope that helps!
Just FYI, you can make an infinity scarf on the large round loom as well, and there will be no need to stitch ends together since it comes out connected.
wouldn’t it be more like a cowl, then? Very short/small?
Should you take off the bottom layer every time you go around the loom and back or should you unhook the bottom layer another time in between there?
yes, every time! it’s a lot of work, but it’s quicker than knitting by hand.
This is omly my second knitting project. Is it normal that the front and back side of my scarf look different from one another? One side looks like the little X’s like the scarf in your photos, but the opposite side looks more like braided ribs. I can’t figure out what I’m doing that could make one side look different from the other! Any thoughts?
Love the tutorial!!! Just wondering though, the amount of pegs you use is that the width that the scarf with come out to be or does it shrink? Thanks for the amazing tutorial, can’t wait to get started 🙂
it’ll shrink a little. happy knitting!
What kind of stitch is this? a zig zag rib stitch?
My question, also. It looks kind of like a twisted double knit: k1 through the back loop, slip 1. I haven’t tried it to be sure and would welcome other opinions. I’m not a big loom fan, but this stitch is lovely.
This is an awesome tutorial! Made 2 so far using Red Heart’s boutique midnight yarn – comes out nice and soft and drape-y. I made it 60″ long then flat-seamed it, so about 1.5 skeins of the midnight yarn.
Thanks so much!
you’re welcome!
When I first did this it came out really lose. So how do I fix that?
hold your string tighter when you are going from peg to peg.
Okay. Could it be the string I’m using?
Hi I want to try loom knitting,what long loom brand and size would you recommend
I have seem several tutorials for Using the loom, and this is really the best! Thank you and I really appreciate the comments about the little things… Like, remove the slip knot after a few rows, and leave that last stitch alone ( the single loop one)….aha! Now THAT MAKES SENSE!
Thanks so much – great job!
thanks for taking the time to comment and for your kind words. happy knitting! 🙂
I just bought a package of looms at JoAnn’s. I thought I would like to try loom knitting. I am having a hard time getting started. I have done it far enough to pull the bottom loop over the top loop. But it looks so lose I tried it again doing it tighter, But for some reason when I put the loops over it looks sloppy. Help!!
If you use a lighter weight yarn, it will look more lacy. Use a heavy weight, or bulky, yarn for tighter stitches.
very true! thanks for the tip!
Hi, i saw your tutorial and just had to try! I bought a loom by Boye, but it doesn’t have the starting peg at the end. Can you tell me how I start without that peg? Thanks for your help!
very nice love it
HI–OK, GOT MY MATERIALS….MY YARN SIZE #6 CHUNKY BULKY;
5OZ.
HOWEVER, THERE’S NOTHING ANYWHERE THAT SAYS #11, WHAT’S THE SIGNIFICANCE OF THAT?
aLSO, I HAVEN’T SEWN OR KNIT ANYTHING IN YEARS….SO DON’T
LAUGH IF i ASK U TO REFRESH ME ON WHAT A “flat” SEAM IS?
tHANX,FOR GREAT PIX & SIMPLE INSTRUCTIONS.
WISH ME LUCK!
The # 11 on the yarn wrapper is the Gage: In most handmade items ( with yarn) this represents a size, that is usually a 4X4 swatch, that counts the number of stitches in length & width, this Gage is for Crochet hook or Knitting needle recommended for that type of yarn, I don’t believe this applies to Loom Knitting
Hi, I’m Nancy. I want to thank you for a great tutorial. I am new at loom knitting and I just finished this scarf. I did really well but in the beginning I made the stitches to loose. I used the bright green loom from Wal-Mart. Is their a different one I should use. Also I hope you will be having more tutorials for begginers. This is fun and great. Thank-you
hi nancy! i’m so glad you enjoyed this post! i’ll try to make more tutorials as i learn myself. the looms are up to you. if you plan to make a lot, i’d invest in a wooden one since the plastic pegs break easily. hope that helps! thanks!
I love your directions, but… what happens worth that one peg that has only one loop?
it says it in the directions.. you just slip it off the peg after you’ve done a couple of rows and then tie it at the end.
I think Lisa is referring to the peg that only ever receives one loop on it, not the beginning peg that has the slip knot ie. What happens to the stitch that only ever receives one loop? I have seen other tutorials where they never have that one single looped peg and was wondering how the two finished products differ. Great tutorial btw!
Awesome blog! Is your theme custom made or did you download it
from somewhere? A theme like yours with a few simple adjustements would really make my blog shine.
Please let me know where you got your theme. Thanks
Hi just wondering were u got your loom board from I looked on ebay and they are wood and the cheapest one I could find was like 80 dollars so just wondering is your wood and were u got it from and how much it cost
hi! there are links in the post where items are. if you hover over the different color words, it’ll link you to the site. wood would be a great investment since they don’t break as easily. mine were plastic and cost under 20 dollars. you can also find them at your local craft stores like joanns or michaels.
Spotlight have looms etc
my mom is making my Knitting loom but for now I will use my Rainbow loom it can come apart. It is 6 pieces; 3 long pieces that you can uses the two sides. and take out the big blue piece.
I just finished this project! I found it on Pinterest. It took me about two days! This was a great tutorial. It was also my first craft on a loom. This will definitely be a Christmas present!
awesome!! so glad you enjoyed it!
Thanks for sharing your thoughts on diet herbalife shake.
Regards
If you wish for to increase your know-how only keep
visiting this web site and be updated with the most up-to-date
news posted here.
Feel free to surf to my web site – Yacon Root Max Review
excellent post, very informative. I ponder wwhy the opposite specialists of this sector don’t realize this.
You should proceed your writing. I am sure, you’ve a huge
readers’base already!
Here iis my web blog – using a pill to help with baldness
Will it be the same peg with one loop?
Do you happen to remember how long your skeins of yarn were?
My family members always say that I am killing my time here at
web, except I know I aam getting experience every day
by reading such fastidious articles.
Look at my site; business cash advance
Hi there! I started using your instructions, but when I got to the end I had to use another site to figure out how to bind it off.. I don’t think it was right. How do I know if it’s right? Is there some way to fix it if I didn’t do it right? Could you fix it if I pay you? I just can’t figure it out!
Thanks!
McKenzie
this is THE BEST tutorial I have found! I just picked up the loom for the first time today, & finished a whole skein all in the same sitting. thanks for the clear directions!!
wooo! that’s wonderful news!! so glad it came in handy.
I really enjoyed this…made my first one and will definitely make some adjustments but I’m happy with it. I will use less pegs and make it shorter to be like a cowl or longer to wrap 🙂 thanks for sharing
awesome!! happy knitting! 🙂
Wow, this is so pretty! I am new to loom knitting and I love thus! Thanks very much for posting! 🙂
_____
Lee Ann
http://crochetgottaloveit.blogspot.com
you’re very welcome!
I have had a loom for awhile and couldn’t figure out how to
Use it. Your tutorial was awesome and the best one I have seen.
that means a lot!! thank you!
I have never done anything like this before but your tutorial was amazing!! Thank you!!
so glad you enjoyed it! xx
I purchased a long loom like the one you are using here. I am having alot of issues keeping the yarn from getting to tight right in the middle. I have taken apart 3x and it still keeps happening. What am I doing wrong?
you’re pulling the string too tightly as you are weaving back an forth. easy remedy: don’t tighten too much when you are going from peg to peg. i actually don’t even apply very much pressure when i’m pulling the yarn through. it’s more like “feeding” the pegs just so they’re wrapped… i hope that makes sense!
I will try again but im not pulling on the yarn at all. How do you use you loom? On a table surface or on your lap?
i use it on my lap, sometimes even holding it vertically when i’m looping the yarn since the gravity helps it go by a little faster. 🙂 when you say that the yarn is getting too tight in the middle, do you mean the middle of your scarf or the middle of the peg board?
Middle of the peg board. The scarf looks even thru out but it’s getting so hard to pull the bottem loops over. The ends on the loom are loose and the middle pegs are almost touching
oh okay, then yes i’d say you’re pulling it too tight when weaving it (even though it may not seem like it). that’s about as much as i can help through the internet since i’m not there to see it physically! sorry!
Maybe I can help. I am new but just had this same problem. I had to watch how hard I was holding my loom. I hold the whole thing in my hand and was squeezing to hard. It is very easy to do. Try holding only one edge of the loom and like Kim said use very little tension on the yarn.. I hope this helps. Sorry to interfere Kim
you’re not interfering at all! i love hearing advice/feedback from others. thanks for sharing!
I love it. It looks so pretty
thanks! 🙂
I’d love more detail on the sewing part at the end… I can do all of it but that.
So easy n what a nice gift…
How would I incorporate a contrasting color running the length of the scarf?
So this scarf is not like others that have two ends, this has no end nad goes over your head?????????? I have seen these in stores, but yours is so much prettier! I have worked with the loom for years, the casting off video you posted was also great, I will get some thick yarn like you did!!!!!! GREAT JOB nad best intructions to make! Email me if you have time to let me know if I am correct about this having no ends?
Thanks so much for taking your time to share with us this project!
I figured it all out, thanks!
i love it
I was wondering how long (inches for example) the scarf should be before I cast off and stitch the ends together. Please get back to me when you can. Thanks!
it’s really up to you. some like tighter scarves and some like looser. i used two entire skeins and then stopped there and it was pretty snug. i would recommend just wrapping it around your neck twice and see if you like the length. hope that helps!
What do you do with the two single wrapped pegs on each end?
“Now that you’re left with one layer of yarn loops at the top, push them all to the bottom again. Repeat this process again and again until you get your desired length. Remember, there will always be one peg with only one yarn loop when you go to hook them, so don’t freak out. Leave that single yarn loop alone!
Don’t forget to remove your slip knot from the peg after doing a couple of rows.”
Hi there,
Im using your awesome tutorial to make a scarf, but I’m not sure if it’s long enough yet to take off the loom. How many feet/inches do you usually make yours? Thanks for the help!!
wonderful! it’s really up to you. i just looped mine around my neck until it looked long enough to me. there were no specific measurements, so you can do the same. just eyeball it!
If you want to wrap it twice around your neck, I have found that 60-65 inckes is about right..if you’re using bulky yarn.
All you have to do is then connect your cell using a hardware device and set up the app by yourself
desktop.
Thanks for great tutorial. I love it 🙂
you’re welcome!
Thank you so much for this great tutorial! My daughter and I just started loom knitting and I saw your scarf and told her k we gotta make that! Love it! Pictures are so clear to follow 🙂 have a great day!
you’re welcome! glad it helped!
Je te remercie pour ce sublime blog que vous avez écrit. Une bonne continuité à toi.
I love doing stuff like this! Thank you for great tutorial! I can’t wait to make one for me and my mom!!!
In addition, you should use the decoction as a face wash. Mix it until the mixture foams
and turns into a paste like consistency. Possibly
limit your hair duration or pull it back, to reduce the
extra oil that comes in contact with your skin.
I can’t believe I did it. Your video was perfect. Thanks a million. Christmas presents are started.
Hi, I don”t like the new looms with the hook on the top of the peg!!!!! too hard to push the yarn down like the old on’s better.
I’m now not sure the place you are getting your information,
however great topic. I needs to spend some
time finding out much more or figuring out
more. Thanks for great info I used to be in search of this
information for my mission. http://forum.typ1music.co.uk/entry.php?197-You-Make-These-Car-Games-Mistakes
I have been looking for a tutorial for loom knitting for eons. Finally, I found yours! It is the best!
Thank you!
With a 401k, you decide how your money is invested.
I see you don’t monetize your blog, don’t waste your traffic, you
can earn extra bucks every month because you’ve got hi quality content.
If you want to know how to make extra money, search for:
Ercannou’s essential tools best adsense alternative
I know this is older post, but had to comment on your directions. I usually can only follow videos, but I am going to keep your instructions, because they seem easier to follow than most others. I am getting my first long loom in a few days…can’t wait to try it out…thanks!!
Could you explain how to do two colors,love the look on the loom
Sorry wrong web site
What a fun read – I’ll be sharing with my friends. This is appreciated!
So what did you use the crochet hook for?